
Company Setup
Managing users
Learn how to navigate the user list, customize your view, track activity logs, edit profiles, and safely archive team members.
Efficient team management is the backbone of superior customer success. The Users dashboard in Qpien provides administrators with a high-level overview of their team's status, capacity, and security. From here, you can monitor verification statuses, review system activity, adjust individual conversation limits, and safely archive users when they leave the team to free up their seats.
In this article:
Accessing the Users dashboard
Understanding the user list columns
Customizing your list view
Editing an existing user
Archiving a user and freeing up a seat
Monitoring user activity logs
Accessing the Users dashboard
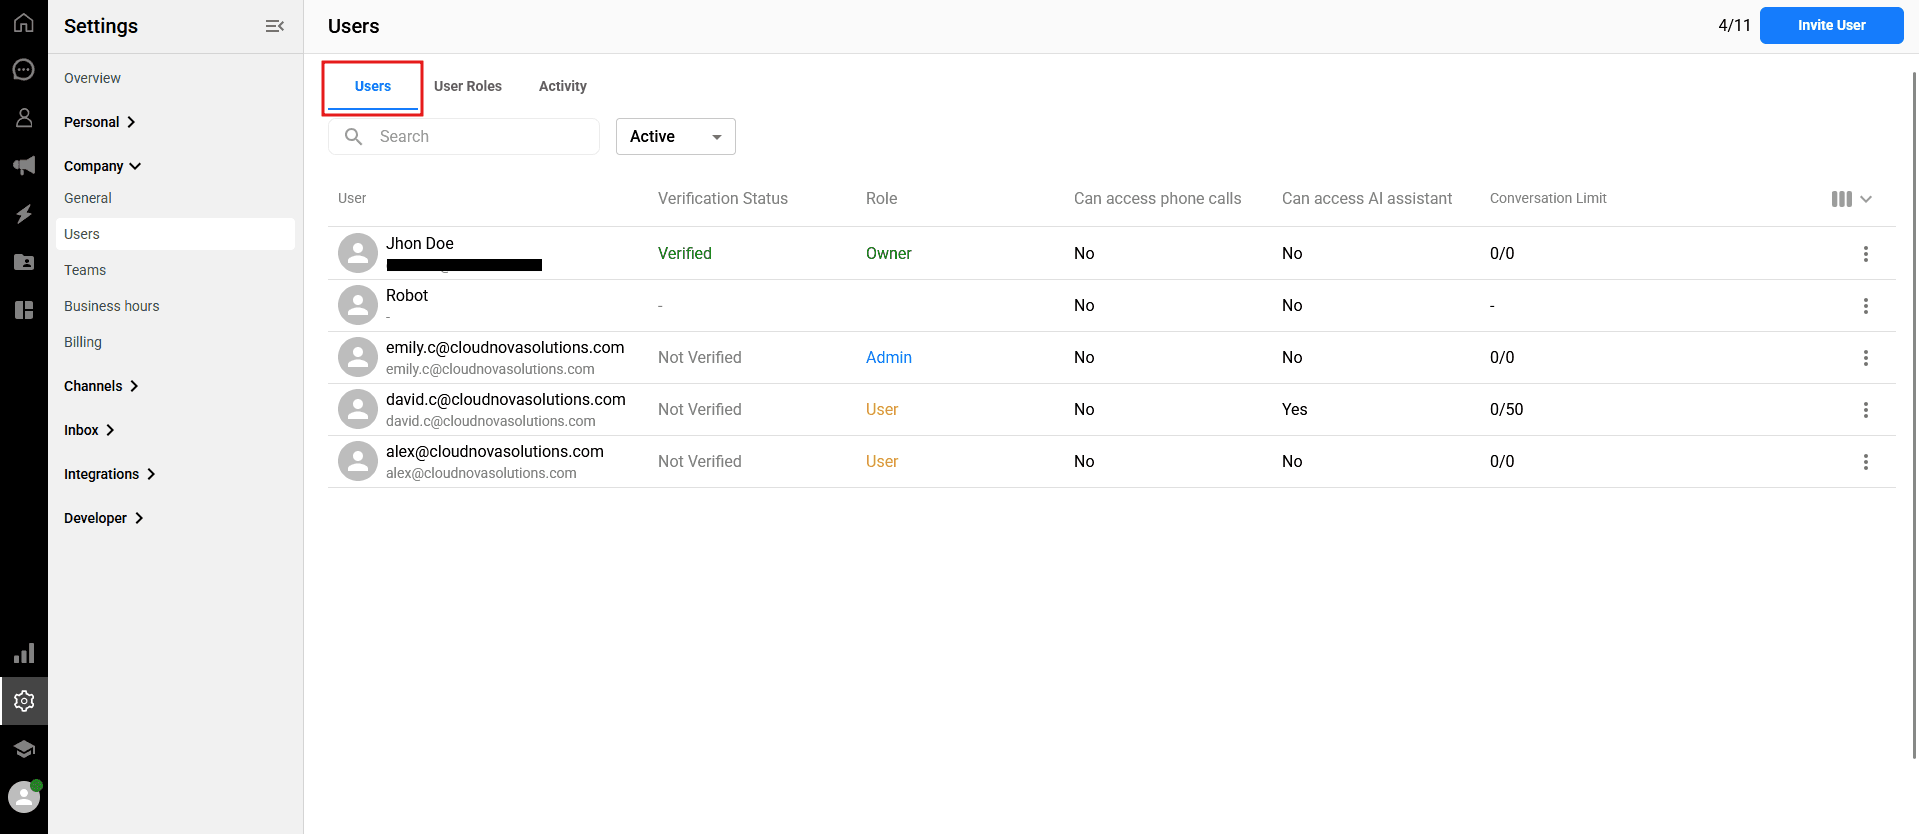
To view and manage your team members, navigate to Settings > Company > Users from the left sidebar of your dashboard, and ensure you are on the "Users" tab.
Understanding the user list columns
The main dashboard displays everyone who has been invited to your workspace. Here is what each column represents:
Role: Displays the assigned permission level (e.g., Admin, User).
Verification Status: Shows whether a user has verified their email address (Verified / Not Verified).
Note: Unverified users cannot log in to the system.
Can access phone calls: Indicates whether the user has the permission to answer incoming phone calls via Qpien.
💡 Tip: To learn how users can instantly toggle their personal availability to accept or decline incoming calls, check out our Personalizing your account article.
Can access AI assistant: Indicates whether the user has permission to utilize Qpien's AI-powered assistant features within the workspace.
Conversation Limit: Displays the maximum number of chats a user can handle simultaneously, along with how many they currently have open (e.g., "0/8" means 0 open chats out of a limit of 8).
Customizing your list view
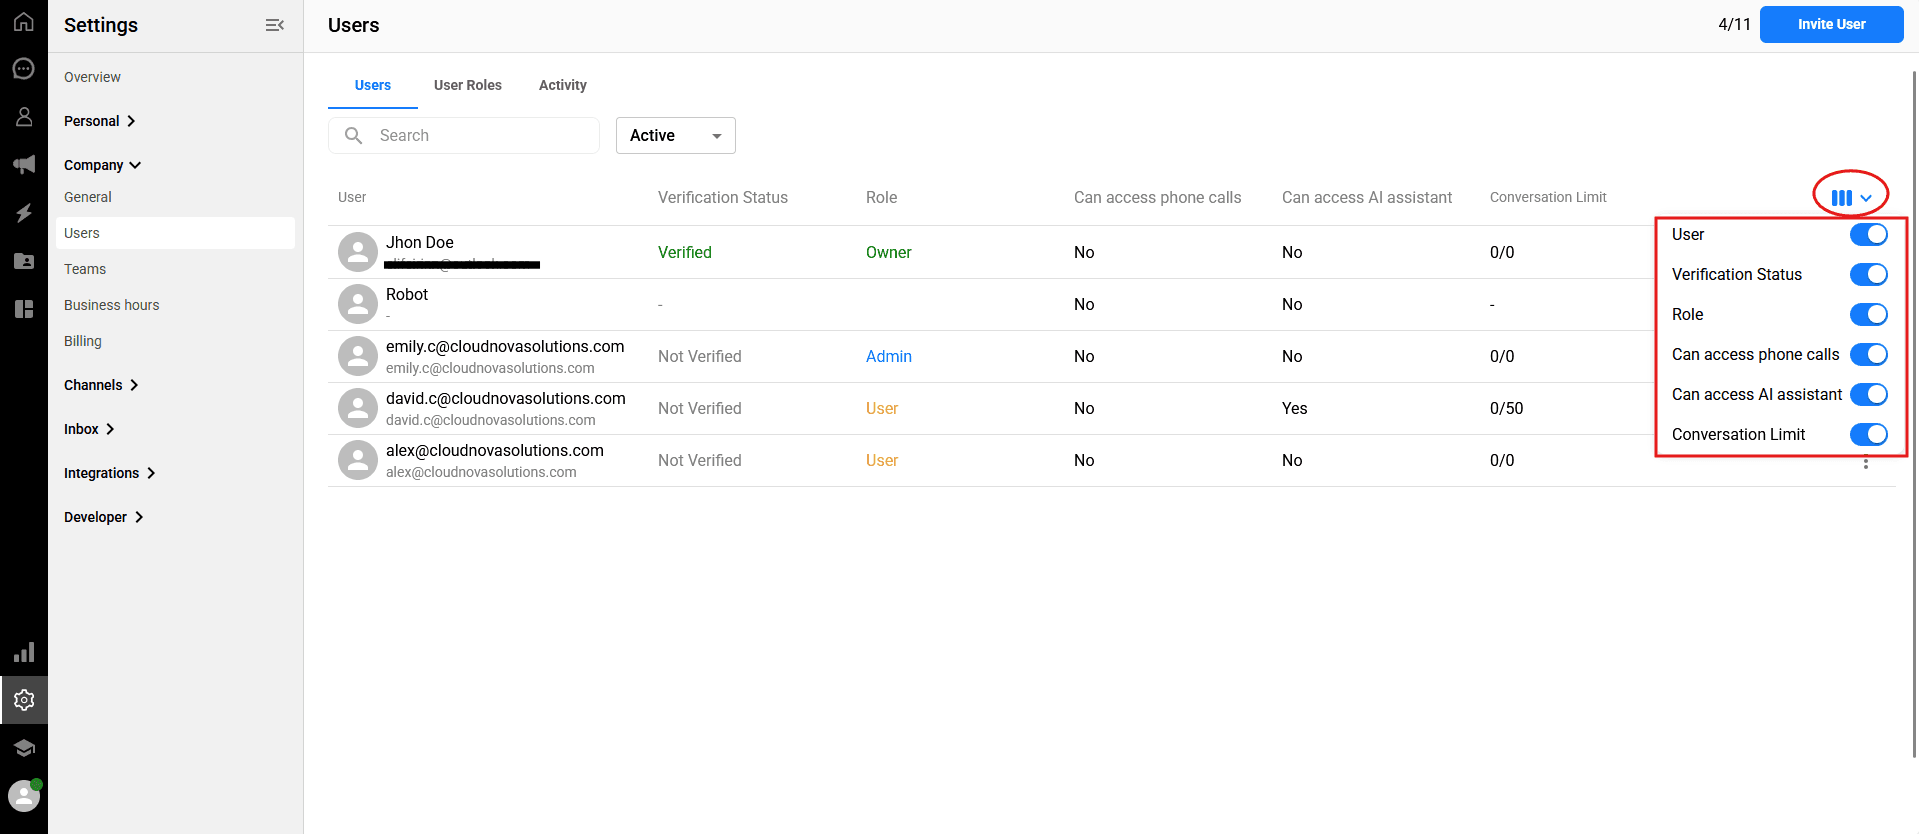
You can tailor the dashboard to show only the information most relevant to you by toggling specific columns on or off.
-> Click the column visibility icon (represented by three vertical lines) in the top right corner of the user list.
A dropdown menu will appear listing all available columns.
Toggle the switches next to each option (Role, Verification Status, etc.) to hide or display that specific column in your main view.
Editing an existing user
As an administrator, you can update a team member's role or conversation capacity at any time.
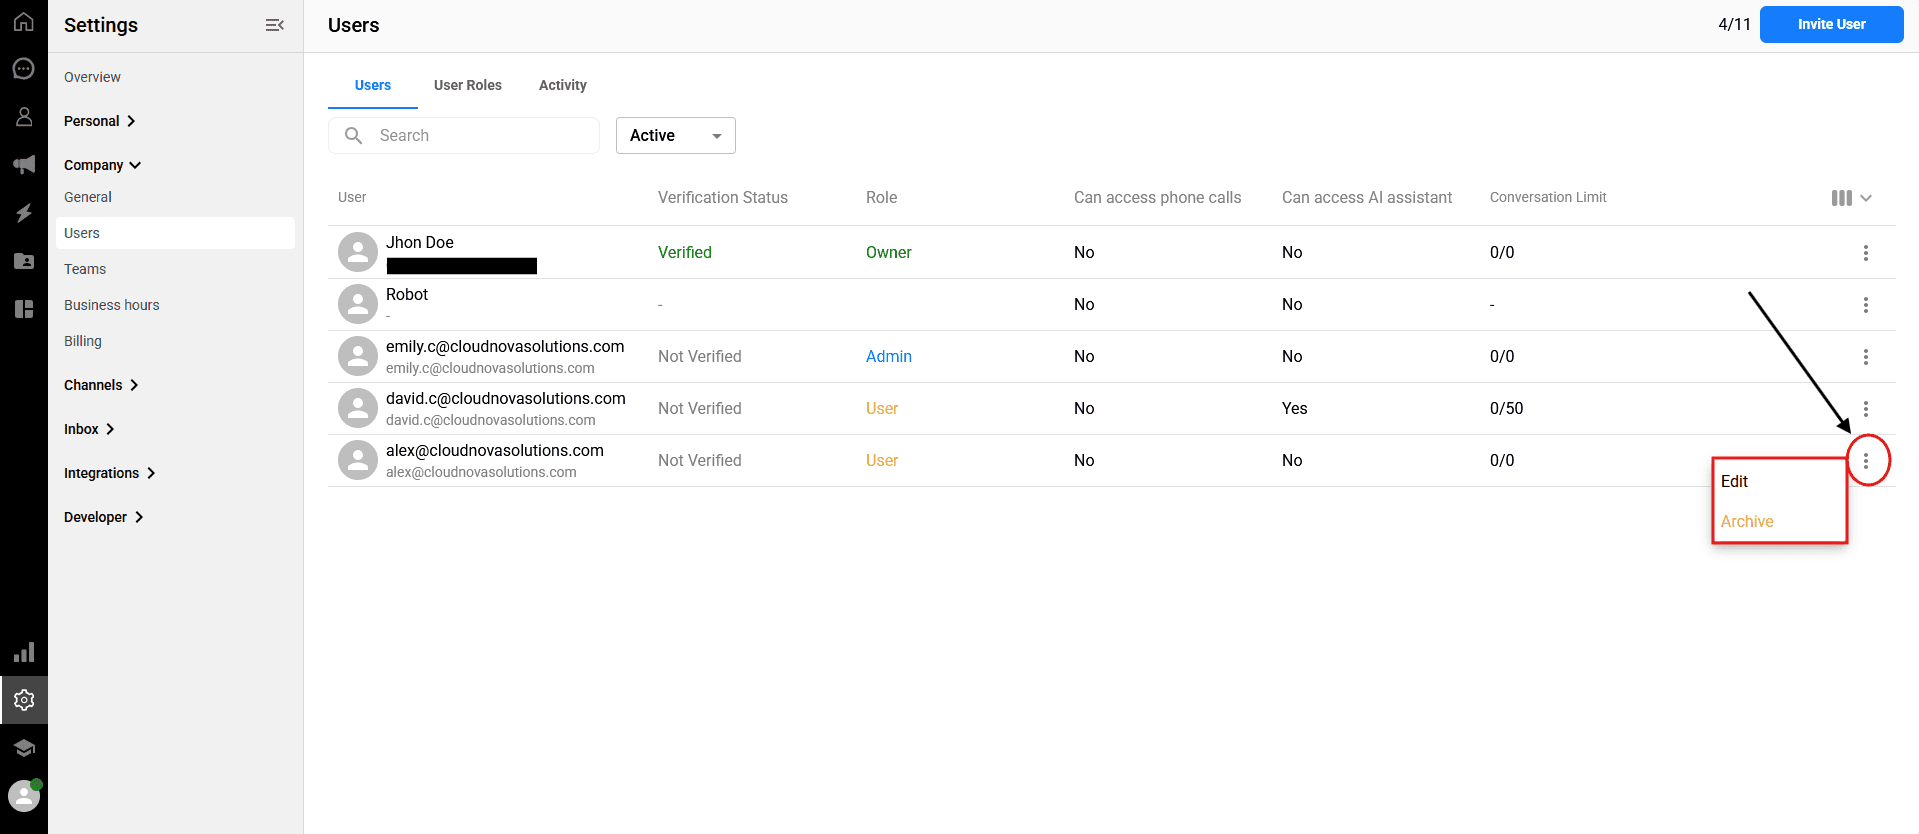
-> Return to the "Users" tab and locate the user you want to edit.
Click the three dots (⋮) icon located on the far right side of their row.
Select "Edit" from the dropdown menu.
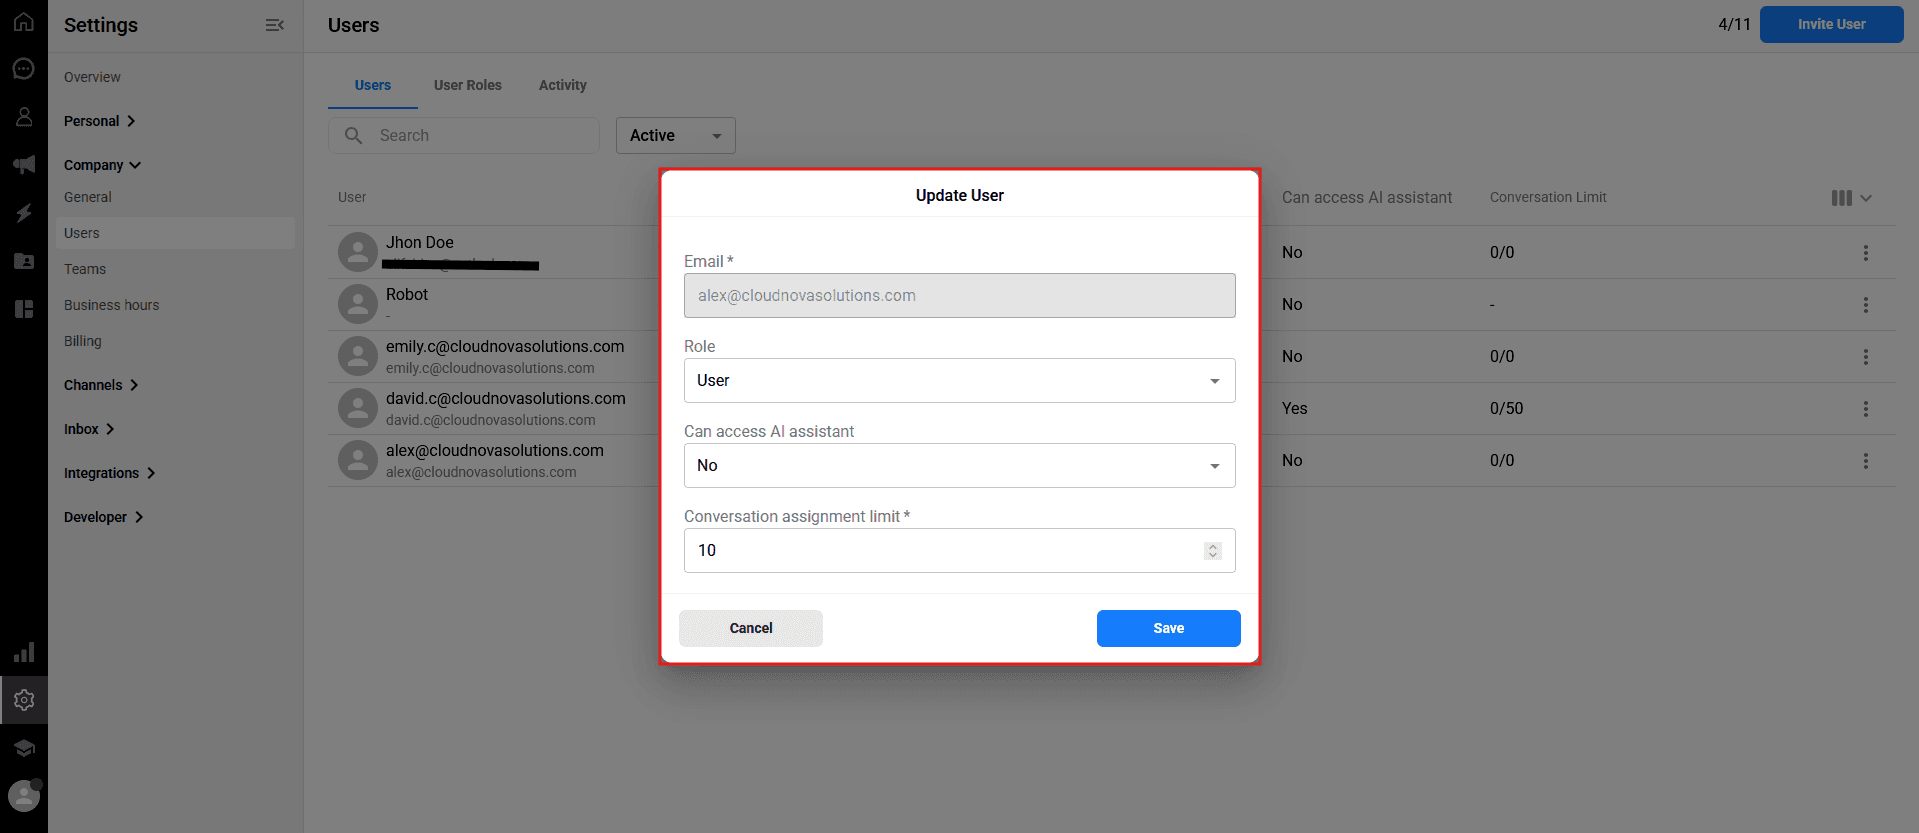
In the "Update User" modal, you can change their Role using the dropdown menu, or type a new number into the Conversation Limit field.
Click the blue
Savebutton to apply the changes immediately.
Archiving a user and freeing up a seat
If a team member changes roles or leaves the company, you can quickly remove their access by archiving them. Archiving a user safely preserves their past activity and conversation history within the system, while permanently preventing them from logging in.
-> Locate the team member you want to remove in the user list.
Click the three dots (⋮) icon on the far right of their row.
Select "Archive" from the dropdown menu.
A confirmation window will appear. Type the user's exact email address or name into the box as instructed on the screen.
Click the
Archivebutton.

Monitoring user activity logs
Qpien tracks key actions taken by your team members to help you maintain a secure audit trail.
-> From the top menu of the Users page, click on the "Activity" tab.
Here, you can view each user’s actions (such as logging in or out), along with their IP address and the exact date and time the activity was performed.
To narrow down the list, click the "Filter" button in the top right corner.
You can filter the logs by selecting a specific User, an Activity Type, or a custom Start and End Date range.
What happens to your billing seat? When you archive a user, the seat previously occupied by that user instantly becomes empty and available. You can invite a brand-new user to fill that empty seat immediately, completely free of any additional charges.
💡 Tip: Now that you have an empty seat, learn how to bring new teammates into your workspace by reading our article on Inviting New Users. (Note: Link will be added here once the third article is published.)
Efficient team management is the backbone of superior customer success. The Users dashboard in Qpien provides administrators with a high-level overview of their team's status, capacity, and security. From here, you can monitor verification statuses, review system activity, adjust individual conversation limits, and safely archive users when they leave the team to free up their seats.
In this article:
Accessing the Users dashboard
Understanding the user list columns
Customizing your list view
Editing an existing user
Archiving a user and freeing up a seat
Monitoring user activity logs
Accessing the Users dashboard
To view and manage your team members, navigate to Settings > Company > Users from the left sidebar of your dashboard, and ensure you are on the "Users" tab.
Understanding the user list columns
The main dashboard displays everyone who has been invited to your workspace. Here is what each column represents:
Role: Displays the assigned permission level (e.g., Admin, User).
Verification Status: Shows whether a user has verified their email address (Verified / Not Verified).
Note: Unverified users cannot log in to the system.
Can access phone calls: Indicates whether the user has the permission to answer incoming phone calls via Qpien.
💡 Tip: To learn how users can instantly toggle their personal availability to accept or decline incoming calls, check out our Personalizing your account article.
Can access AI assistant: Indicates whether the user has permission to utilize Qpien's AI-powered assistant features within the workspace.
Conversation Limit: Displays the maximum number of chats a user can handle simultaneously, along with how many they currently have open (e.g., "0/8" means 0 open chats out of a limit of 8).
Customizing your list view
You can tailor the dashboard to show only the information most relevant to you by toggling specific columns on or off.
-> Click the column visibility icon (represented by three vertical lines) in the top right corner of the user list.
A dropdown menu will appear listing all available columns.
Toggle the switches next to each option (Role, Verification Status, etc.) to hide or display that specific column in your main view.
Editing an existing user
As an administrator, you can update a team member's role or conversation capacity at any time.
-> Return to the "Users" tab and locate the user you want to edit.
Click the three dots (⋮) icon located on the far right side of their row.
Select "Edit" from the dropdown menu.
In the "Update User" modal, you can change their Role using the dropdown menu, or type a new number into the Conversation Limit field.
Click the blue
Savebutton to apply the changes immediately.
Archiving a user and freeing up a seat
If a team member changes roles or leaves the company, you can quickly remove their access by archiving them. Archiving a user safely preserves their past activity and conversation history within the system, while permanently preventing them from logging in.
-> Locate the team member you want to remove in the user list.
Click the three dots (⋮) icon on the far right of their row.
Select "Archive" from the dropdown menu.
A confirmation window will appear. Type the user's exact email address or name into the box as instructed on the screen.
Click the
Archivebutton.
Monitoring user activity logs
Qpien tracks key actions taken by your team members to help you maintain a secure audit trail.
-> From the top menu of the Users page, click on the "Activity" tab.
Here, you can view each user’s actions (such as logging in or out), along with their IP address and the exact date and time the activity was performed.
To narrow down the list, click the "Filter" button in the top right corner.
You can filter the logs by selecting a specific User, an Activity Type, or a custom Start and End Date range.
What happens to your billing seat? When you archive a user, the seat previously occupied by that user instantly becomes empty and available. You can invite a brand-new user to fill that empty seat immediately, completely free of any additional charges.
💡 Tip: Now that you have an empty seat, learn how to bring new teammates into your workspace by reading our article on Inviting New Users. (Note: Link will be added here once the third article is published.)
Previous
Add Qpien Live Chat Into Your Website
Next
Next
How to view and download your invoice
Try Qpien free for 14 days! 🎉
Ready to take control of all your support channels?
Empower your customer interactions with Qpien! Boost sales and elevate satisfaction with every conversation.
Try Qpien free for 14 days! 🎉
Ready to take control of all your support channels?
Empower your customer interactions with Qpien! Boost sales and elevate satisfaction with every conversation.
Try Qpien free for 14 days! 🎉
Ready to take control of all your support channels?
Empower your customer interactions with Qpien! Boost sales and elevate satisfaction with every conversation.