
Channels
Create WhatsApp message templates
Learn how to create, format, and submit WhatsApp Message Templates for approval directly within Qpien.
To initiate a conversation with a customer or reply to them outside the standard 24-hour customer service window, you must use a pre-approved WhatsApp Message Template. Normal free-form messages cannot be sent directly once this 24-hour period ends. This guide explains how to format and submit your templates directly from Qpien.
How to create a new template
Creating a template requires careful attention to Meta's strict categorization rules.
-> Go to channels>messaging>whatsapp business api.
Click on the Templates tab (blue icon).

Click the
New Templatebutton to open the configuration page.
Filling out template details
Before drafting your message, you need to define its basic properties:
Name: Give your template a clear, understandable name to prevent confusion during sending. This name is internal and will not be visible to your customers.
Language: Select the language your message will be written in.
Category: Choose the appropriate category, such as Marketing or Utility (Information).
Important: You must strictly match the content to the category; a utility message must be used for information, and a marketing message must be used for marketing. If they do not match, your template will not be approved.
Formatting your message
You can build your template using different media types, text variables, and interactive buttons.
Header (optional)
The header appears at the very top of the message. If you choose to include media in your header, you must strictly adhere to the following maximum file limits:
Image: Maximum 5 MB.
Video: Maximum 16 MB.
Document: Maximum 100 MB.
Message body (required)
This is the main information to be sent. You can use dynamic variables to insert specific data (like a customer's name) instead of leaving blank spaces.
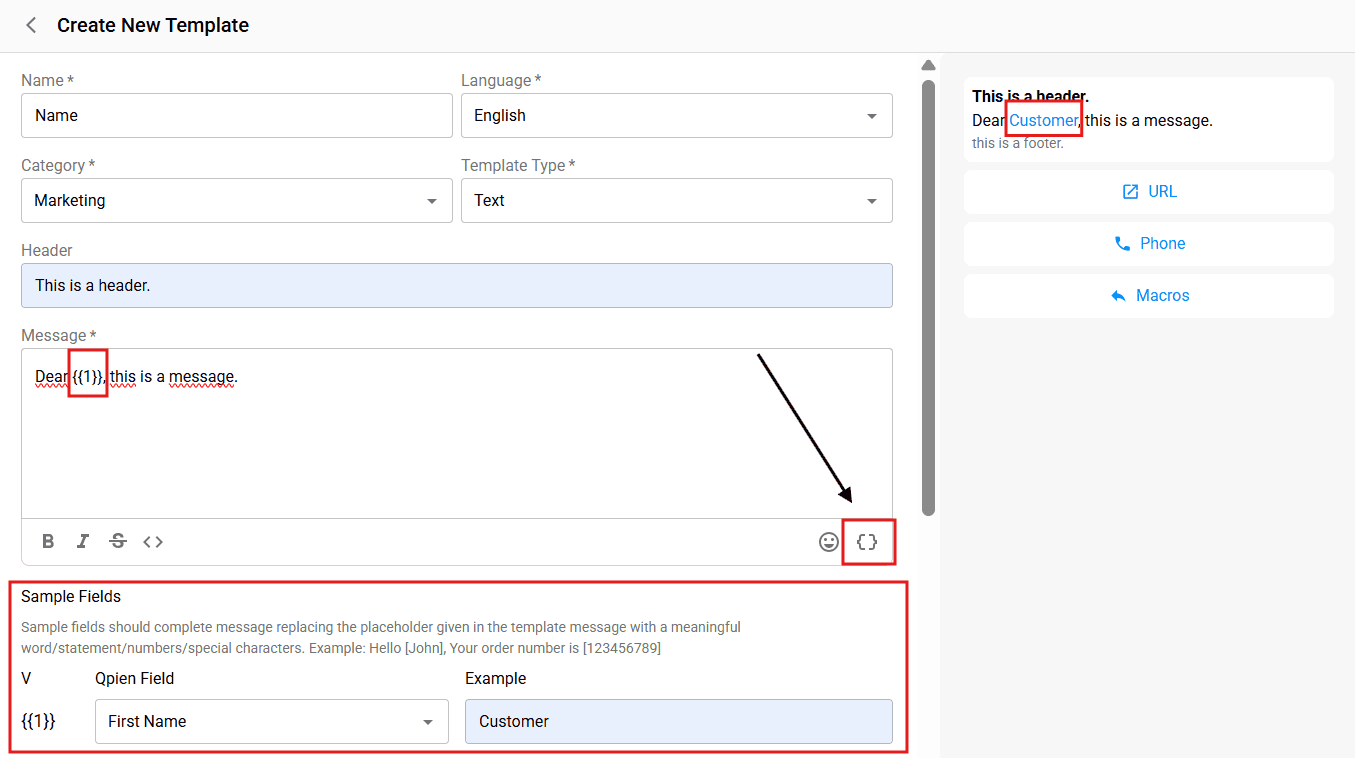
Using dynamic variables (custom fields)
Dynamic variables allow you to automatically pull specific data—such as a customer's name, order number, or appointment date—directly into your template. These variables correspond to the "Custom Fields" previously defined in your settings.
How to add a variable: Click the curly brackets icon
{ }at the bottom right of the message editor (as shown by the arrow in the image).
Placeholder Format: Variables will appear in your text as placeholders like
{{1}},{{2}}, etc.
Once you add a variable to your message, you must define what that variable represents in the Sample Fields section below the editor:
Select the Field: Under the "Field" dropdown, choose the relevant category (e.g., First Name, Last Name, or a custom-created field).
Provide an Example: In the "Example" box, type a sample value (e.g., "Customer" or "John"). This helps the system validate the template and gives a real-time preview of how the message will appear to the recipient. At the same time, in cases where the variable you specify is empty, it shows the one written here by default.
Pro Tip: Using dynamic variables not only saves time but also significantly reduces the risk of sending incorrect information to your customers.
Footer (optional)
A footer is added as faded text at the bottom of your message.
Buttons (optional)
Buttons encourage customer interaction. Meta imposes strict limits on the number and type of buttons you can include:
Quick Replies: Used when asking for a ready selection or piece of information from the customer. You can add a maximum of 10 quick reply buttons.
URL Buttons: You can add a maximum of 2 URL buttons.
Phone Button: You can add a maximum of 1 phone button.
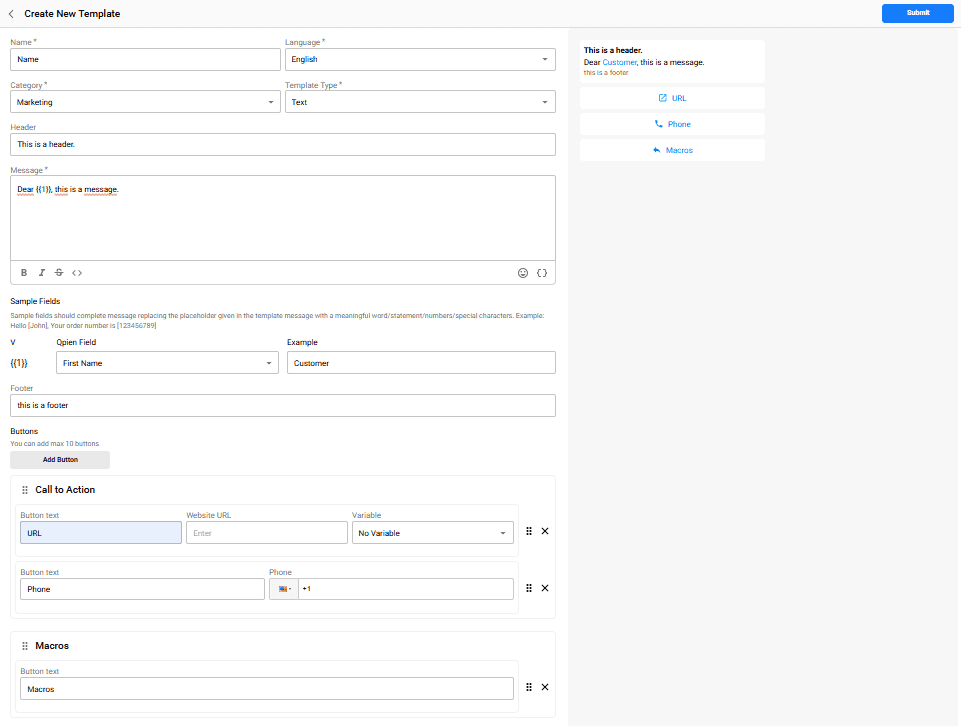
Submitting for approval
Once you have made all the necessary adjustments, click the Send button to submit your template for Meta's review.
The approval process generally takes about 10 minutes.
However, in some cases, it can take up to 1 hour.
Once approved, your template is ready to be sent to your customers.
To initiate a conversation with a customer or reply to them outside the standard 24-hour customer service window, you must use a pre-approved WhatsApp Message Template. Normal free-form messages cannot be sent directly once this 24-hour period ends. This guide explains how to format and submit your templates directly from Qpien.
How to create a new template
Creating a template requires careful attention to Meta's strict categorization rules.
-> Go to channels>messaging>whatsapp business api.
Click on the Templates tab (blue icon).
Click the
New Templatebutton to open the configuration page.
Filling out template details
Before drafting your message, you need to define its basic properties:
Name: Give your template a clear, understandable name to prevent confusion during sending. This name is internal and will not be visible to your customers.
Language: Select the language your message will be written in.
Category: Choose the appropriate category, such as Marketing or Utility (Information).
Important: You must strictly match the content to the category; a utility message must be used for information, and a marketing message must be used for marketing. If they do not match, your template will not be approved.
Formatting your message
You can build your template using different media types, text variables, and interactive buttons.
Header (optional)
The header appears at the very top of the message. If you choose to include media in your header, you must strictly adhere to the following maximum file limits:
Image: Maximum 5 MB.
Video: Maximum 16 MB.
Document: Maximum 100 MB.
Message body (required)
This is the main information to be sent. You can use dynamic variables to insert specific data (like a customer's name) instead of leaving blank spaces.
Using dynamic variables (custom fields)
Dynamic variables allow you to automatically pull specific data—such as a customer's name, order number, or appointment date—directly into your template. These variables correspond to the "Custom Fields" previously defined in your settings.
How to add a variable: Click the curly brackets icon
{ }at the bottom right of the message editor (as shown by the arrow in the image).
Placeholder Format: Variables will appear in your text as placeholders like
{{1}},{{2}}, etc.
Once you add a variable to your message, you must define what that variable represents in the Sample Fields section below the editor:
Select the Field: Under the "Field" dropdown, choose the relevant category (e.g., First Name, Last Name, or a custom-created field).
Provide an Example: In the "Example" box, type a sample value (e.g., "Customer" or "John"). This helps the system validate the template and gives a real-time preview of how the message will appear to the recipient. At the same time, in cases where the variable you specify is empty, it shows the one written here by default.
Pro Tip: Using dynamic variables not only saves time but also significantly reduces the risk of sending incorrect information to your customers.
Footer (optional)
A footer is added as faded text at the bottom of your message.
Buttons (optional)
Buttons encourage customer interaction. Meta imposes strict limits on the number and type of buttons you can include:
Quick Replies: Used when asking for a ready selection or piece of information from the customer. You can add a maximum of 10 quick reply buttons.
URL Buttons: You can add a maximum of 2 URL buttons.
Phone Button: You can add a maximum of 1 phone button.
Submitting for approval
Once you have made all the necessary adjustments, click the Send button to submit your template for Meta's review.
The approval process generally takes about 10 minutes.
However, in some cases, it can take up to 1 hour.
Once approved, your template is ready to be sent to your customers.
Previous
Usage/ How to see and manage your usage
Next
Next
Creating, Edit, and Delete Segments
Try Qpien free for 14 days! 🎉
Ready to take control of all your support channels?
Empower your customer interactions with Qpien! Boost sales and elevate satisfaction with every conversation.
Try Qpien free for 14 days! 🎉
Ready to take control of all your support channels?
Empower your customer interactions with Qpien! Boost sales and elevate satisfaction with every conversation.
Try Qpien free for 14 days! 🎉
Ready to take control of all your support channels?
Empower your customer interactions with Qpien! Boost sales and elevate satisfaction with every conversation.