
Qpien AI
Knowledge Sources
In order for Artificial Intelligence to provide more accurate and appropriate responses, you must train it and provide it with information on the potential topics you want it to respond to.
You can perform this process via the Add Knowledge Source page.
The information you add is learned by the AI and used to generate future responses accordingly.
This enables the AI to provide answers that are both more accurate and aligned with the criteria you have set.
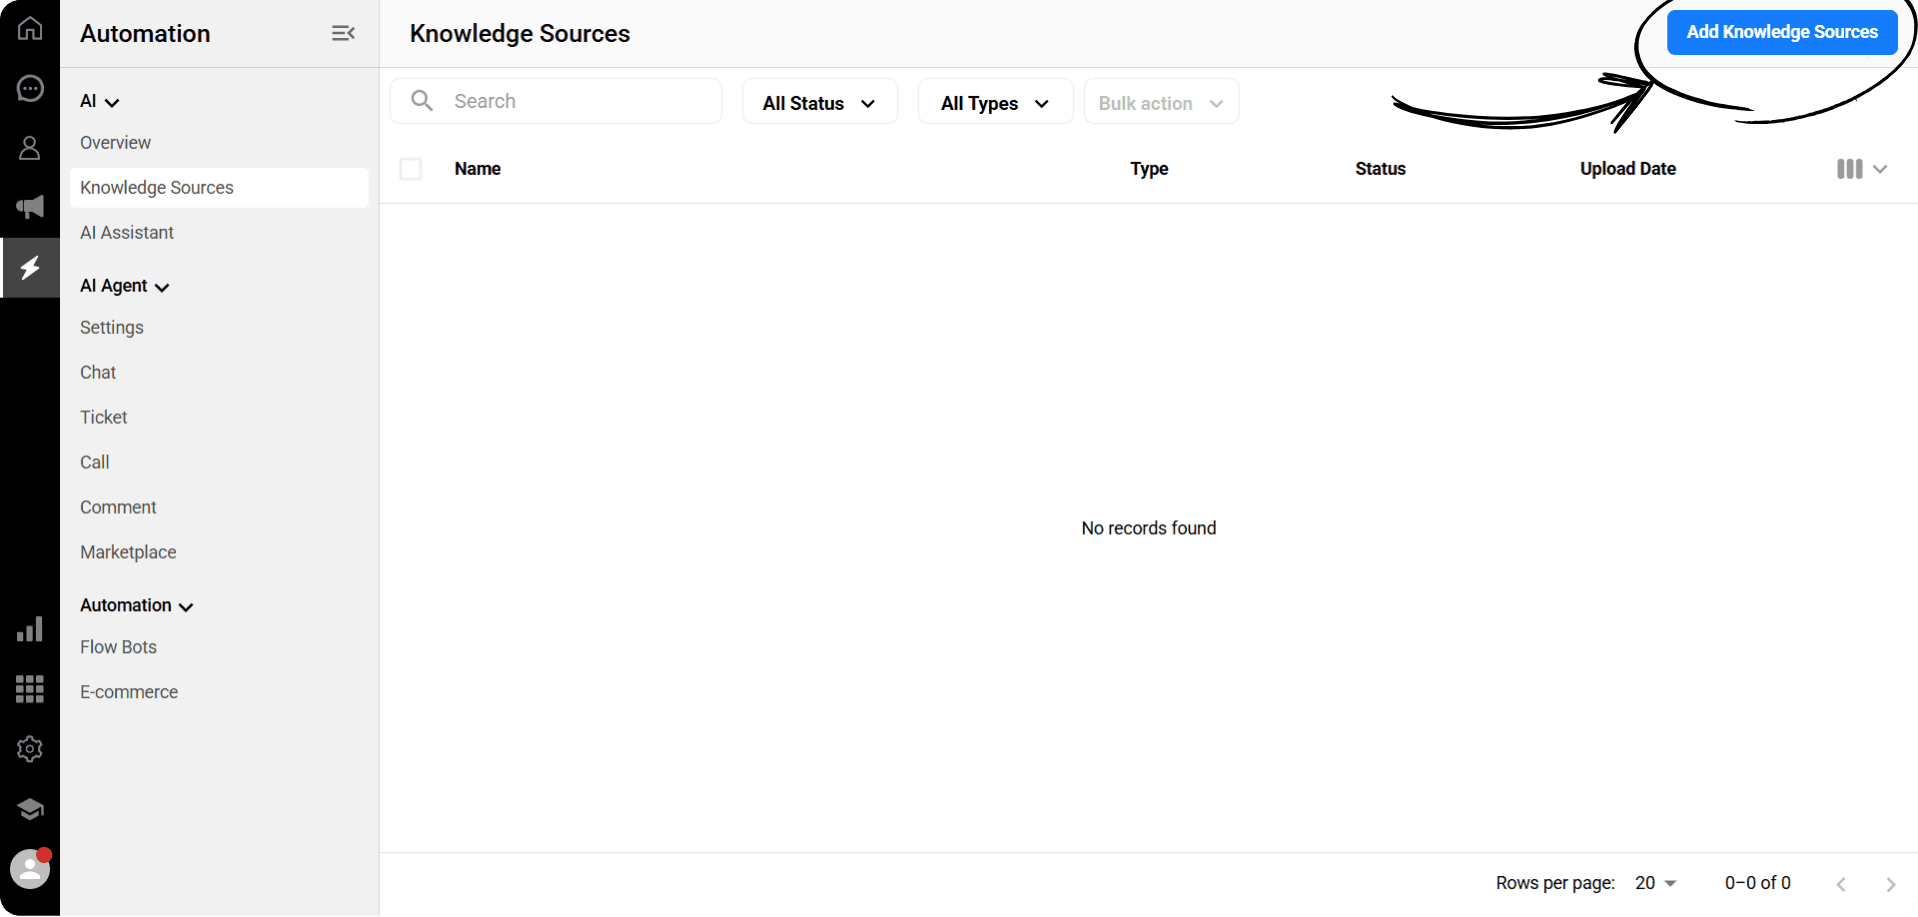
Go to the Automation page and select the “Knowledge Sources” tab.
In this area, your previously added information sources will be listed.
If you have not added any information sources yet, the list will appear empty.
To add a new information source, click the ‘Add Knowledge Source’ button in the top right corner.
Add Manually
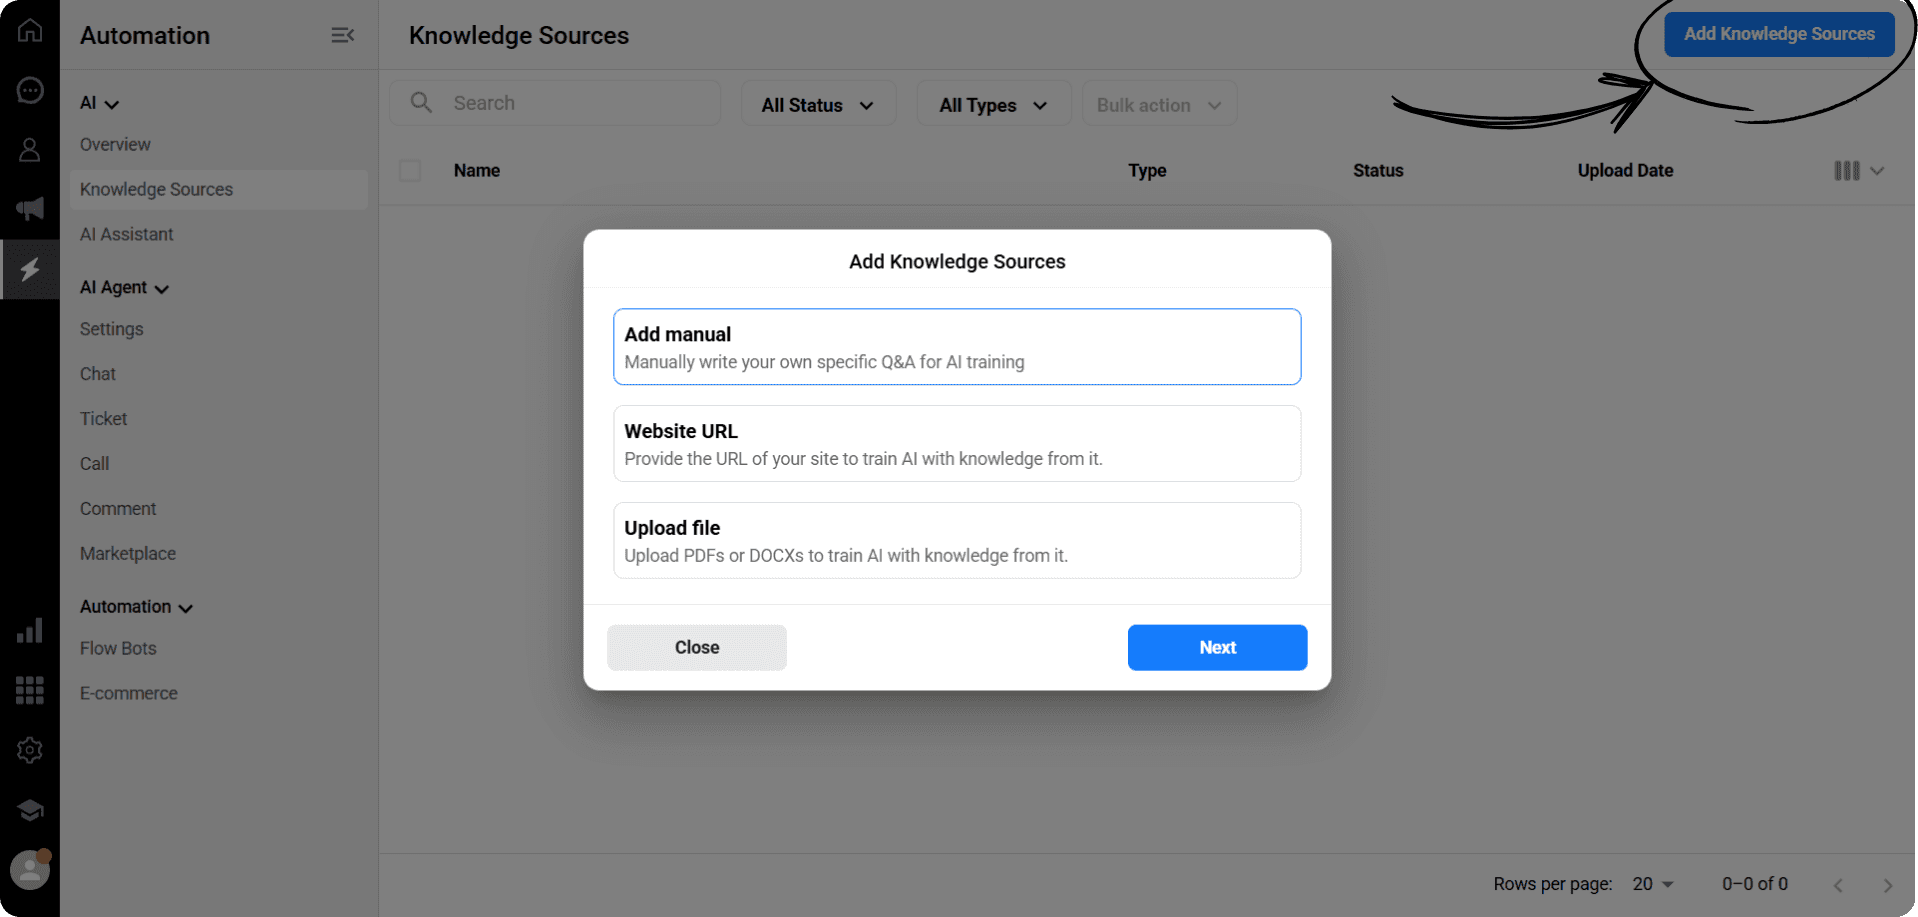
After clicking the Add Knowledge Source button, the addition method options will appear.
If you wish to select the Manual Addition option, tick this option.
Then click the Next button to continue.
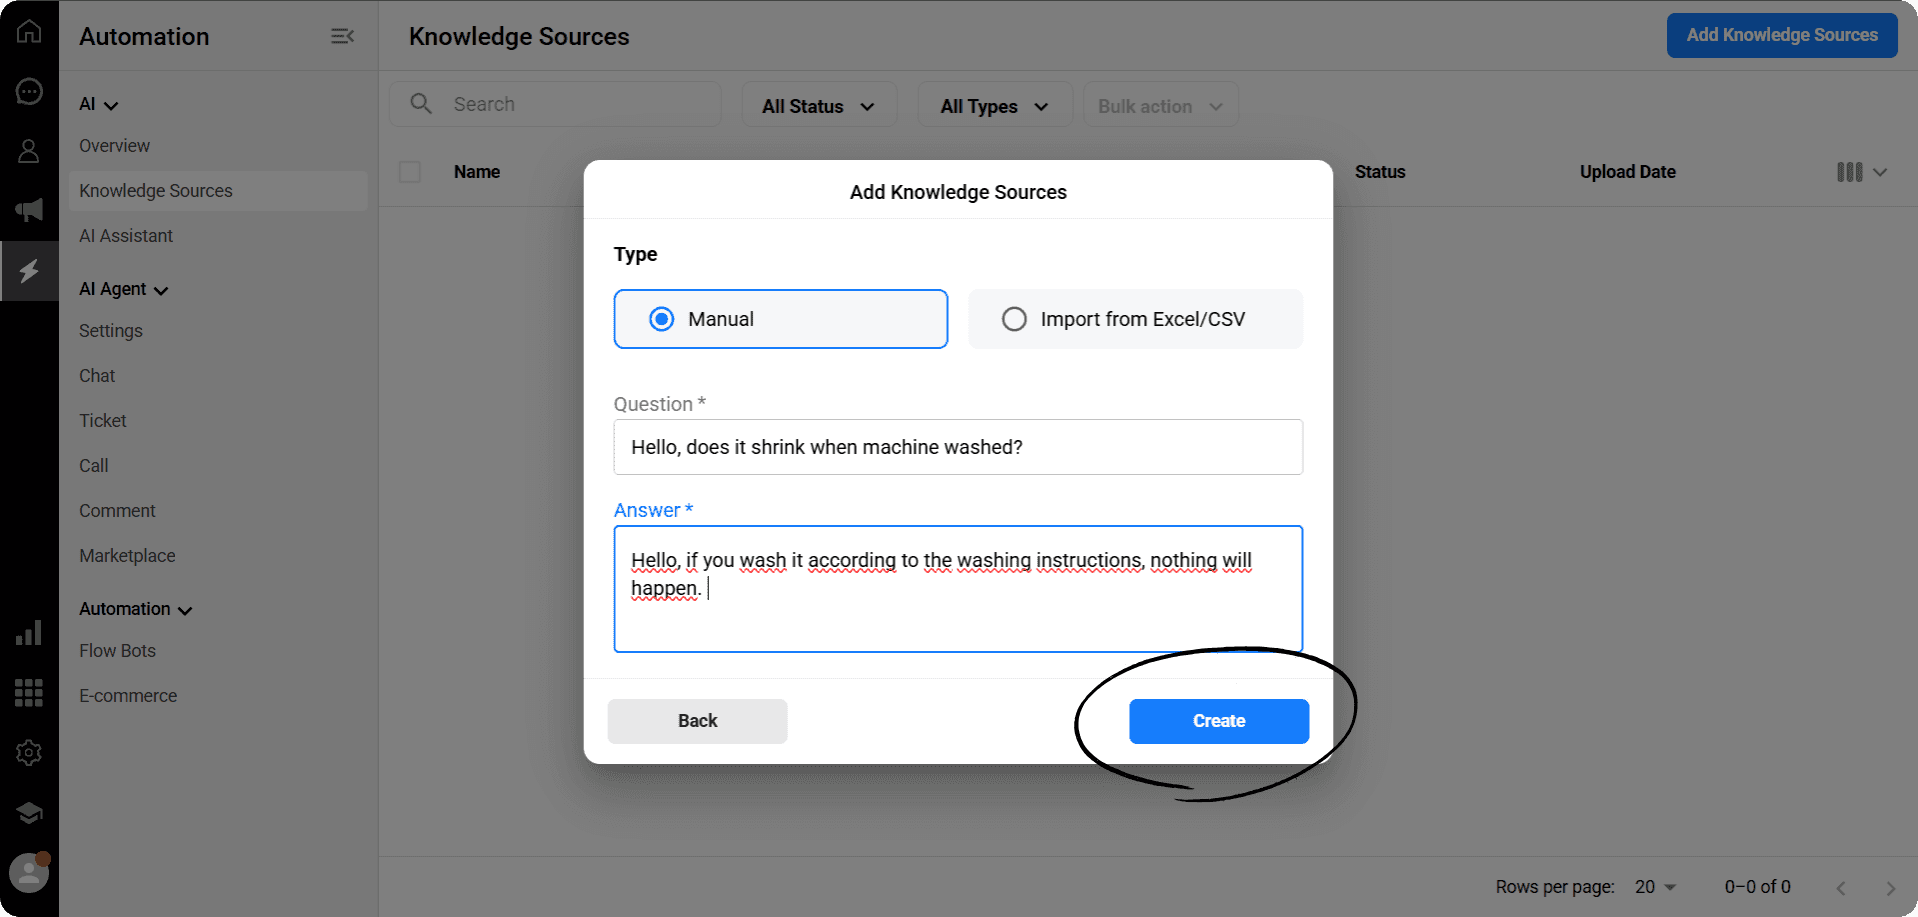
Select the Manual option as the Type.
In the field that opens:
In the Question section, write the question you want the AI to answer.
In the Answer section, write how you want the AI to respond to this question, as shown in the example.
Click the Create button to add the information source.
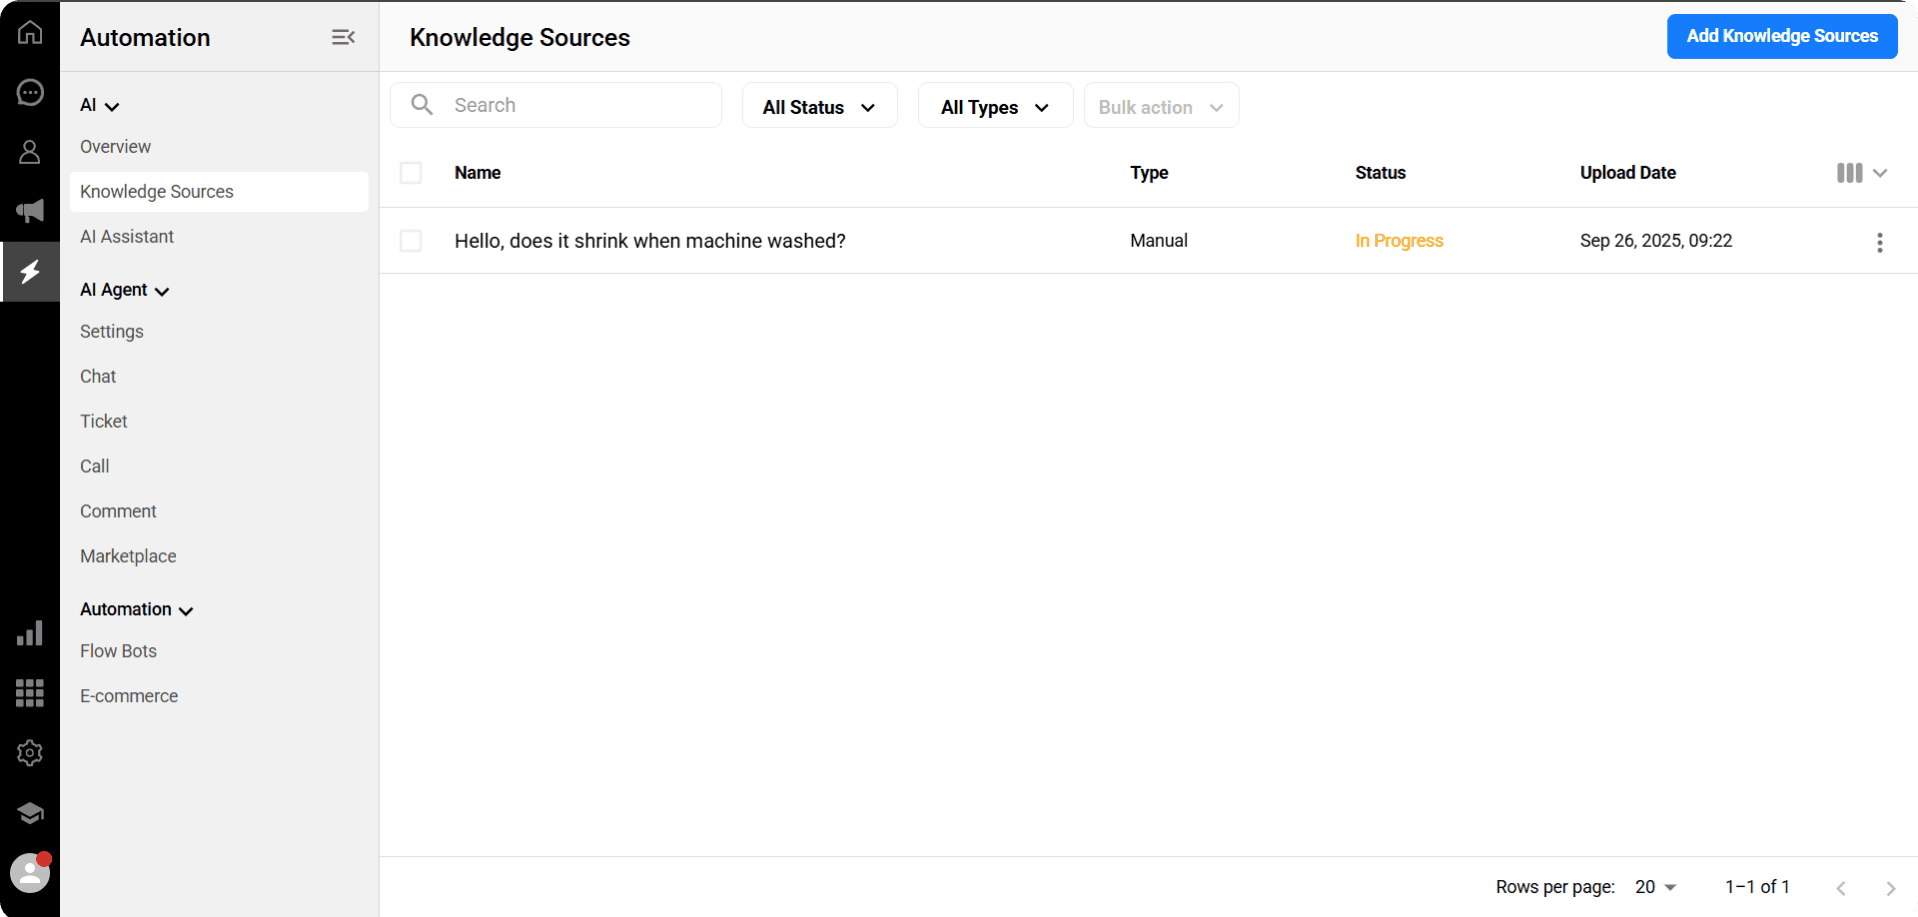
Your information source has been successfully added and appears in the list.
Name: The question you wrote appears here.
Type: The Manual addition type you previously selected is indicated here.
Status: As the AI is currently in the learning phase, it will appear as ‘In Progress’.
Upload Date: The date the information source was added is listed in day/month/year and time format.
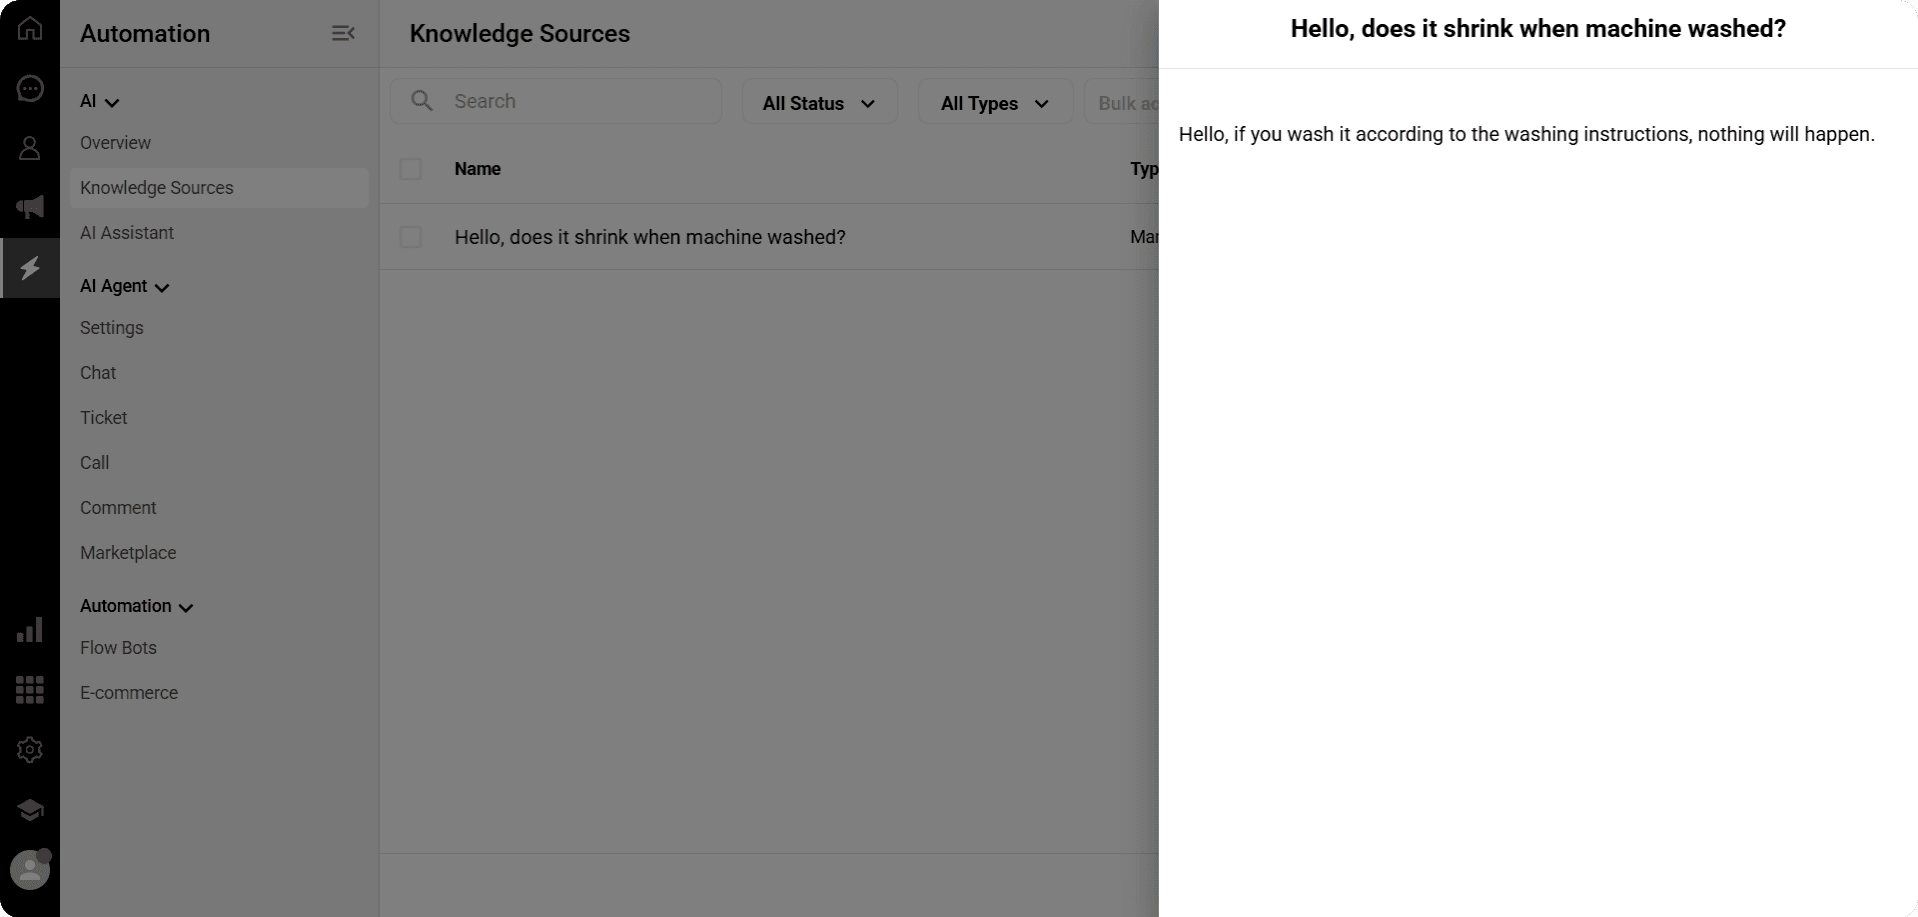
When you click on a piece of information in the list, you can view the content of that information source in detail.
Here, the questions and answers you previously added manually are displayed in full.
If necessary, editing or updating can also be done via this screen.
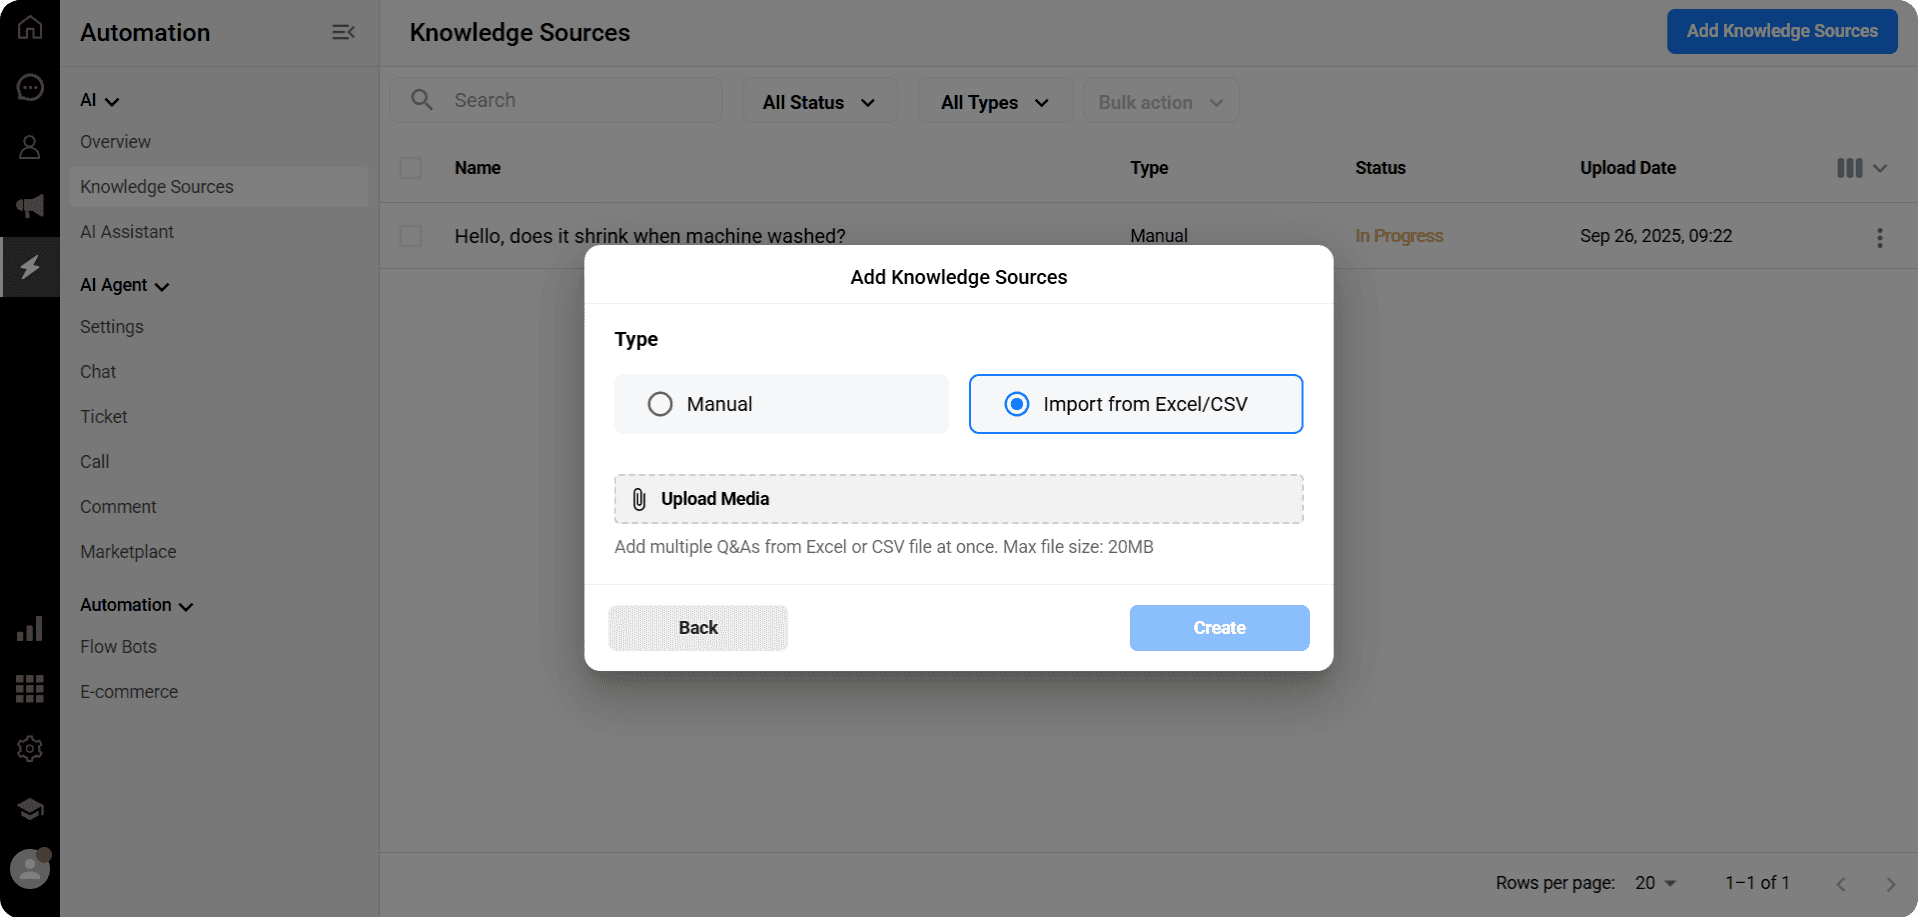
Select the ‘Import from Excel/CSV’ option as the type.
Click the Upload Media button.
From the computer window that opens, select the information source you wish to upload in the specified format and upload it.
Click the Create button to complete the process.
Once your data source has been created, you can check the status field to see that the Artificial Intelligence has moved to the learning phase.
Website URL
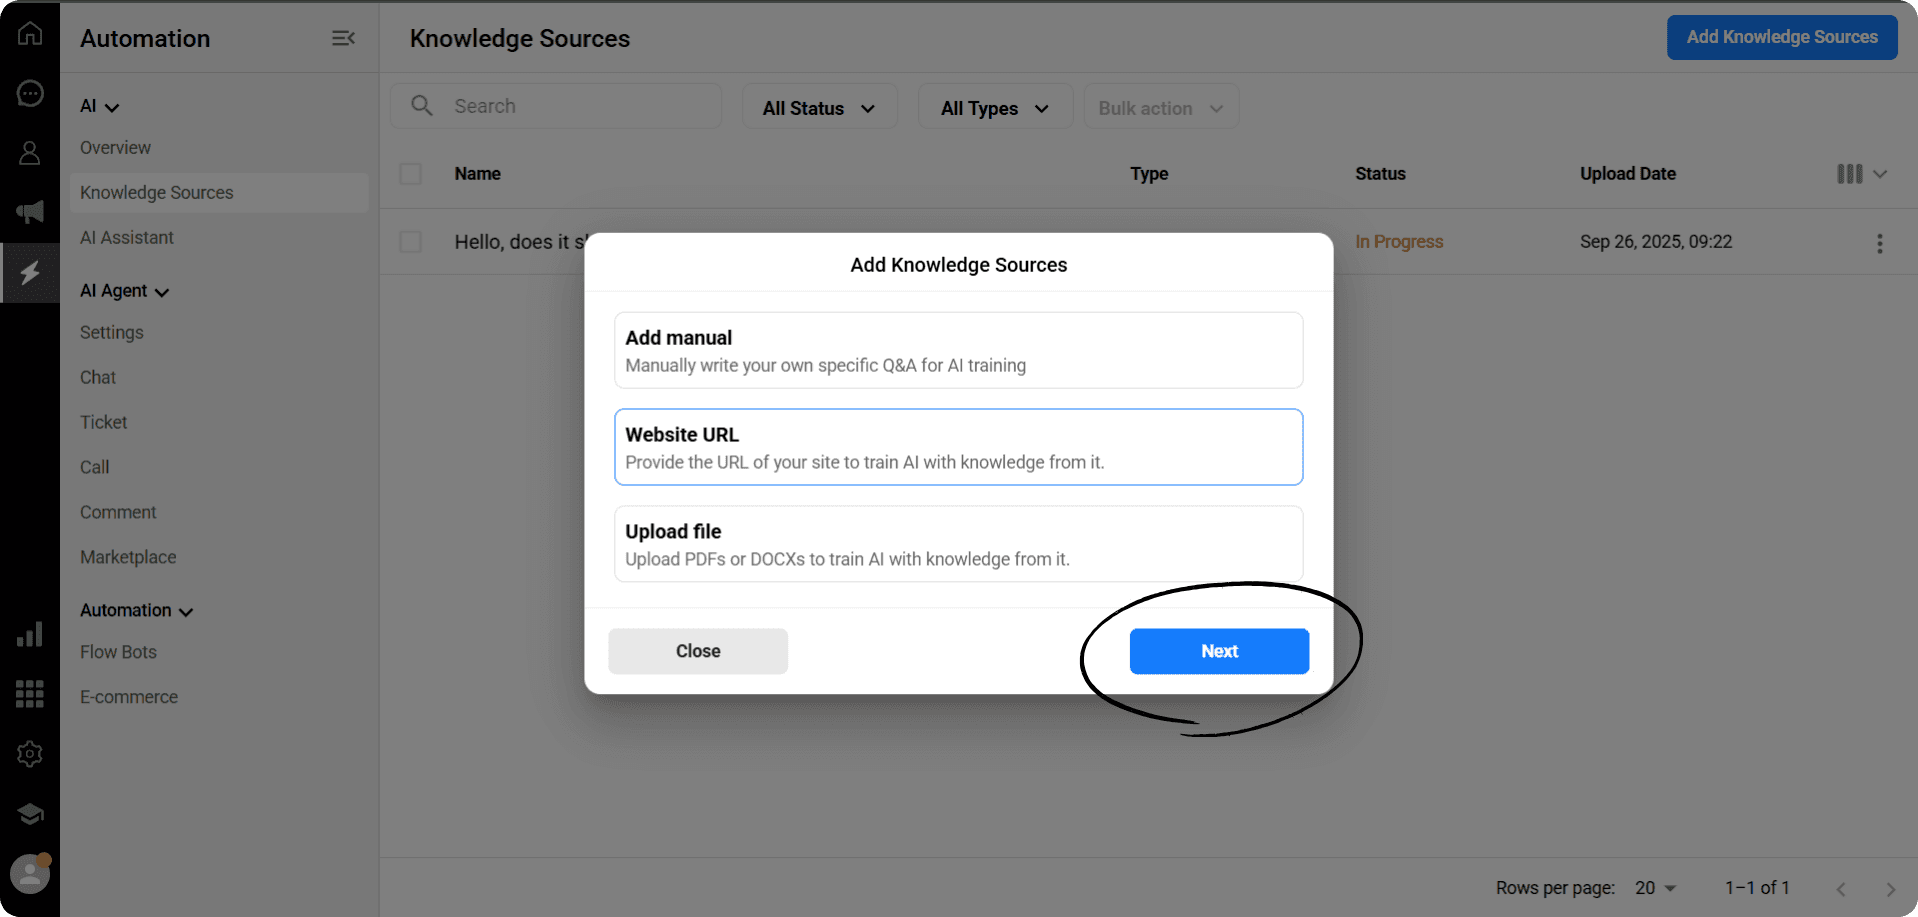
After clicking the Add Knowledge Source button, tick the ‘Website URL’ option in the panel that opens.
Then click the Next button to continue
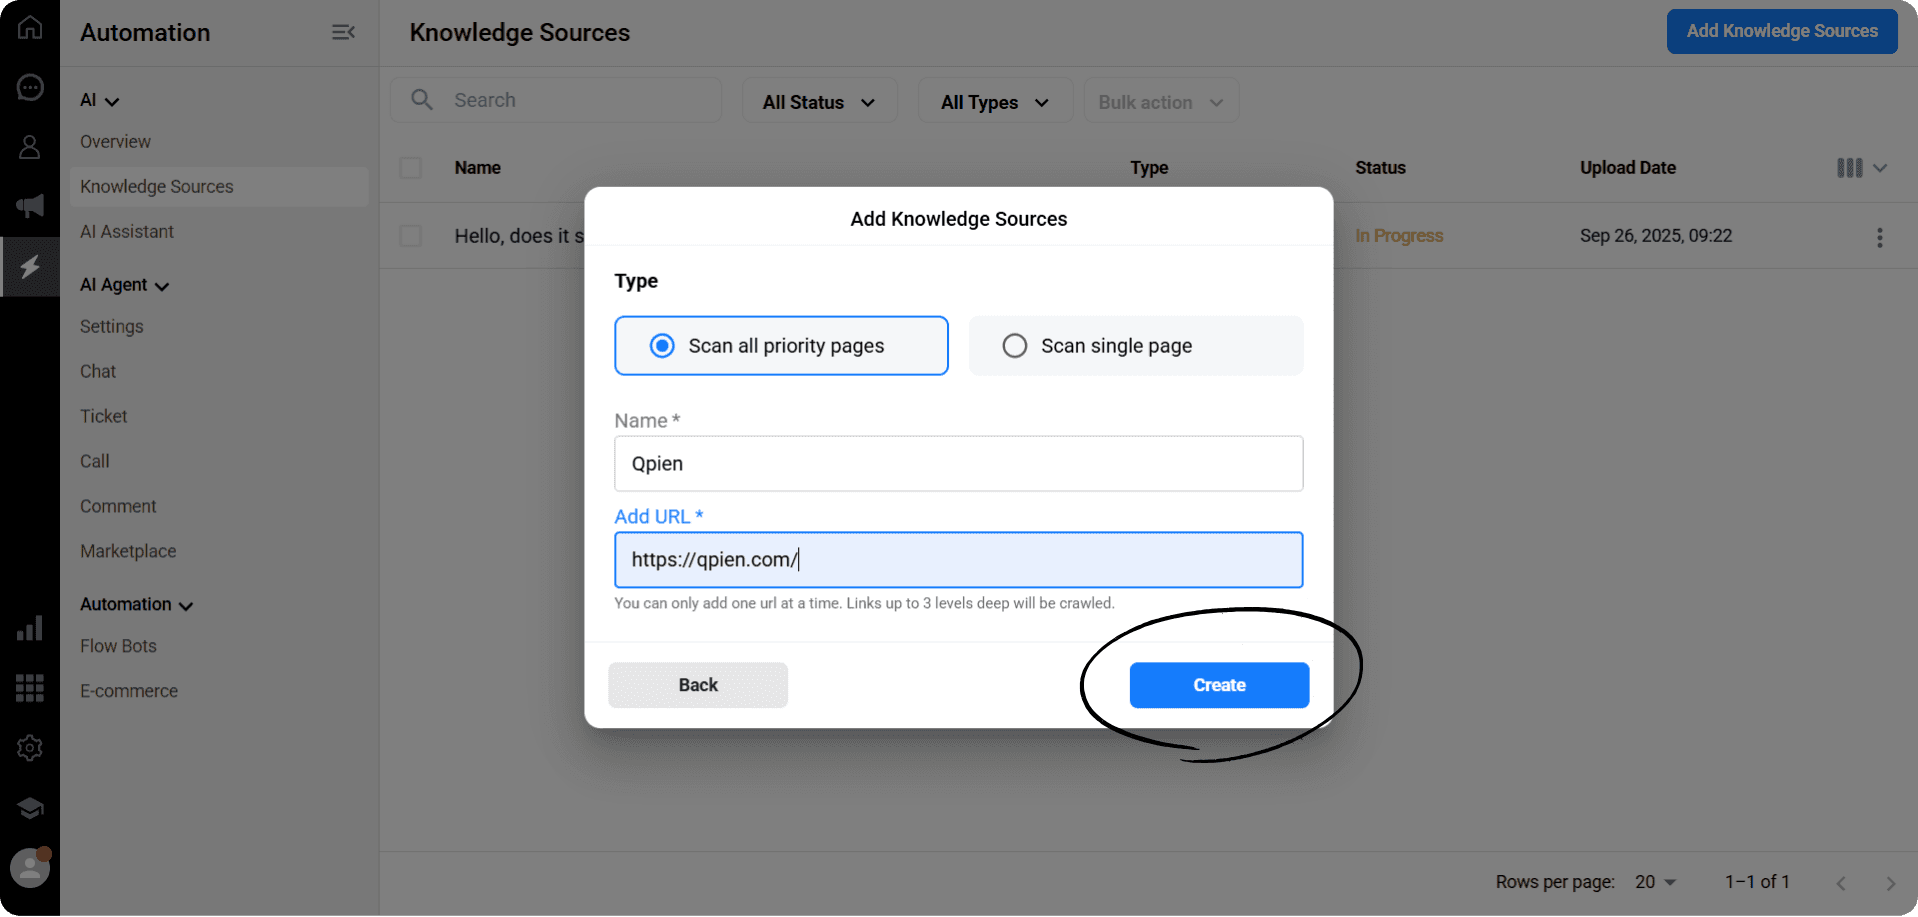
Scanning Option:
Scan all priority pages: The AI learns by scanning the website in general.
Scan a single page: It learns by scanning only the page that opens when the given URL is visited.
Name: Enter a name for the information source.
URL: Add the website's URL.
Click the Create button.
Once your information source has been created, you can check the status field to see that the AI has moved to the learning phase.
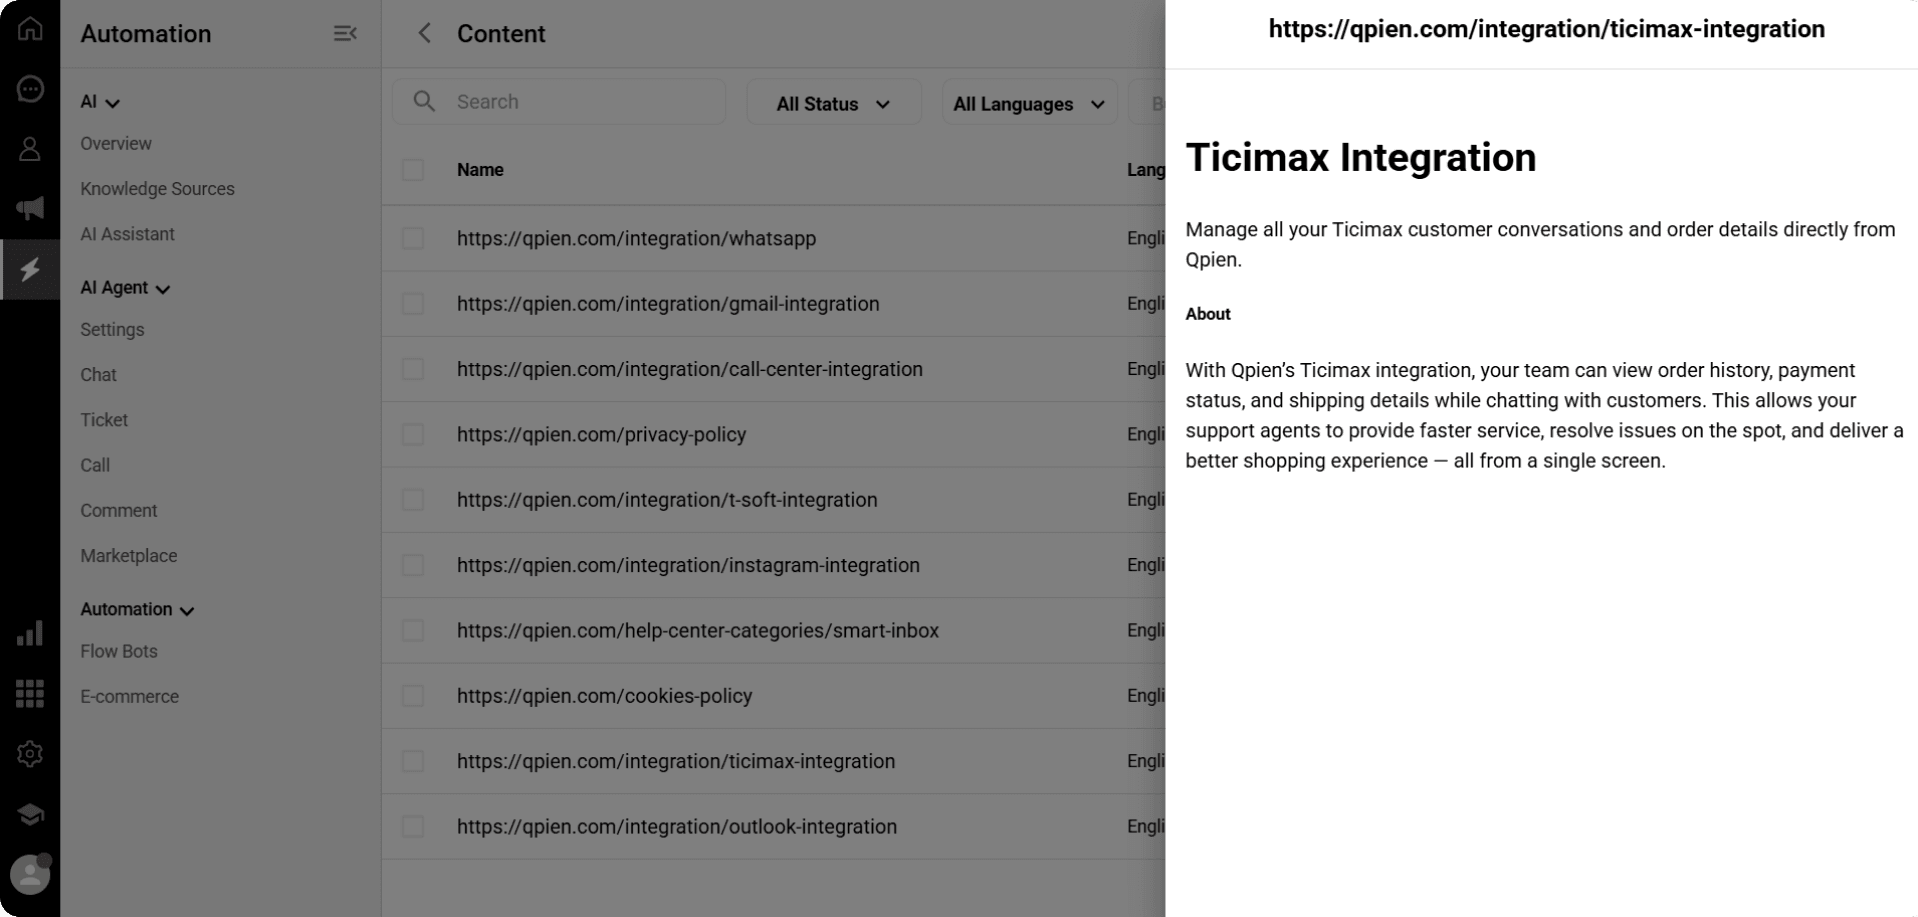
Once the status of your information source is ‘Completed’, you can click on the information source in the list to examine its content in detail.
On this screen, you can see the questions, answers, and added content that the Artificial Intelligence has learned.
If necessary, you can also make edits or updates to the content.
Upload File
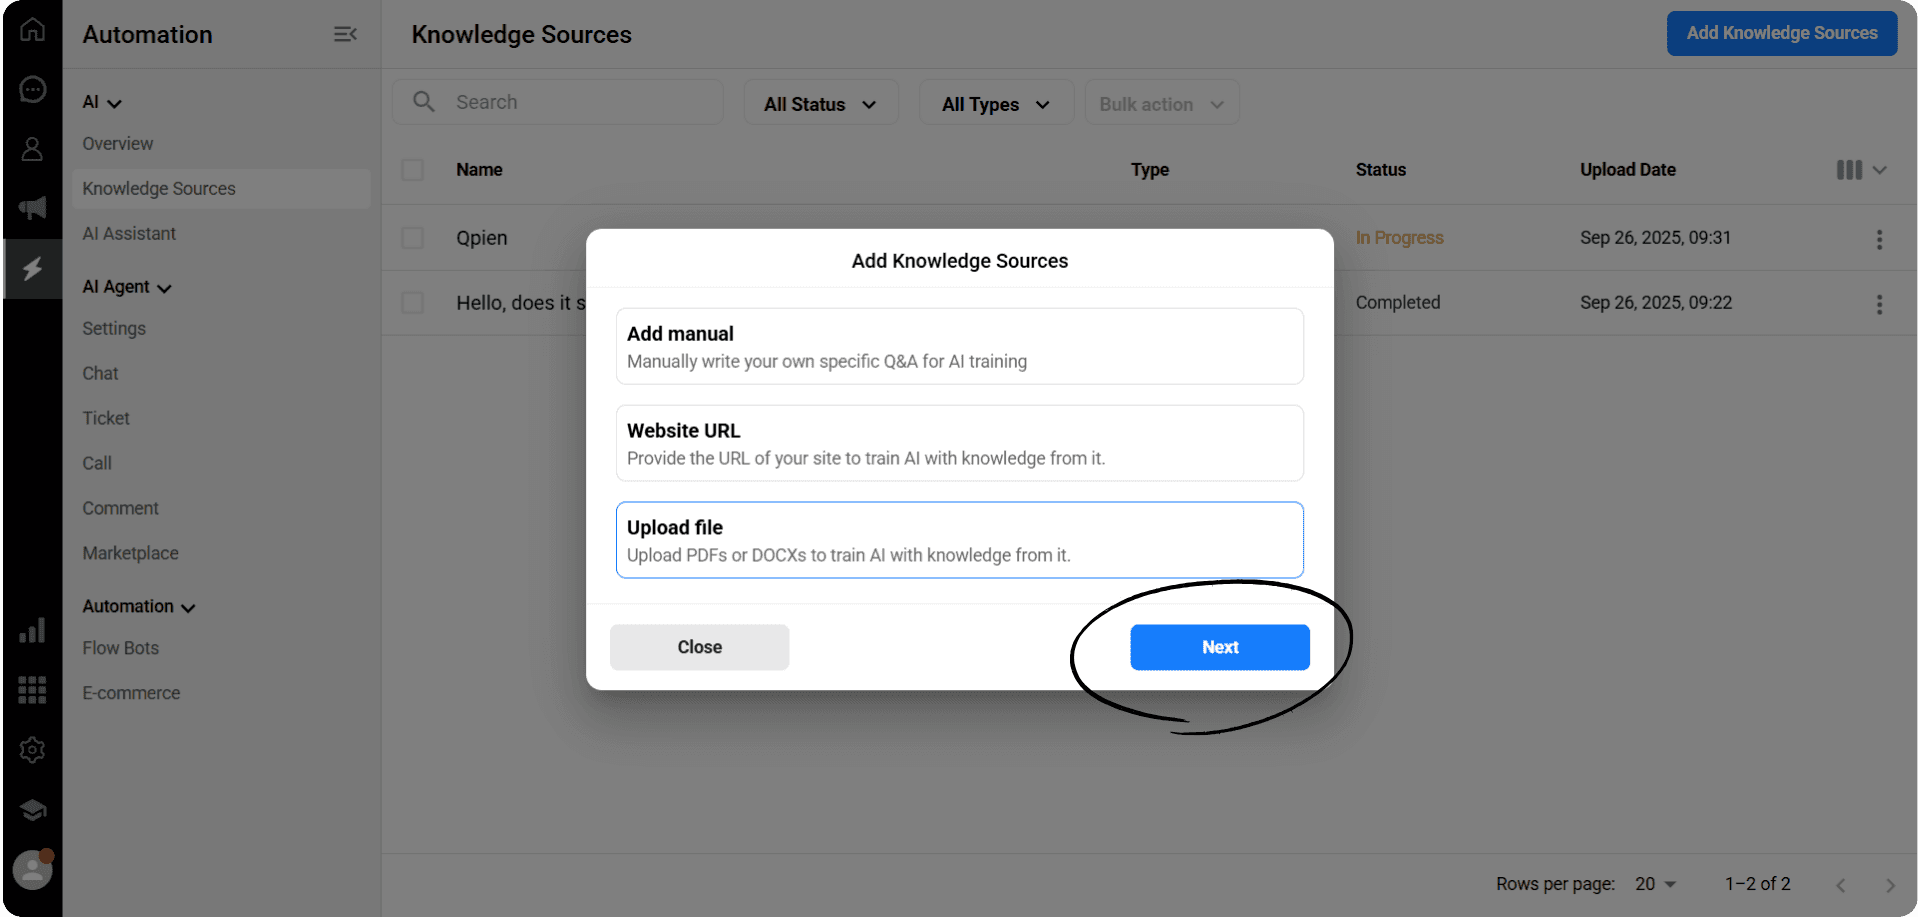
After clicking the Add Information Source button, select the ‘Upload File’ option from the panel that opens.
Then click the Next button to continue.
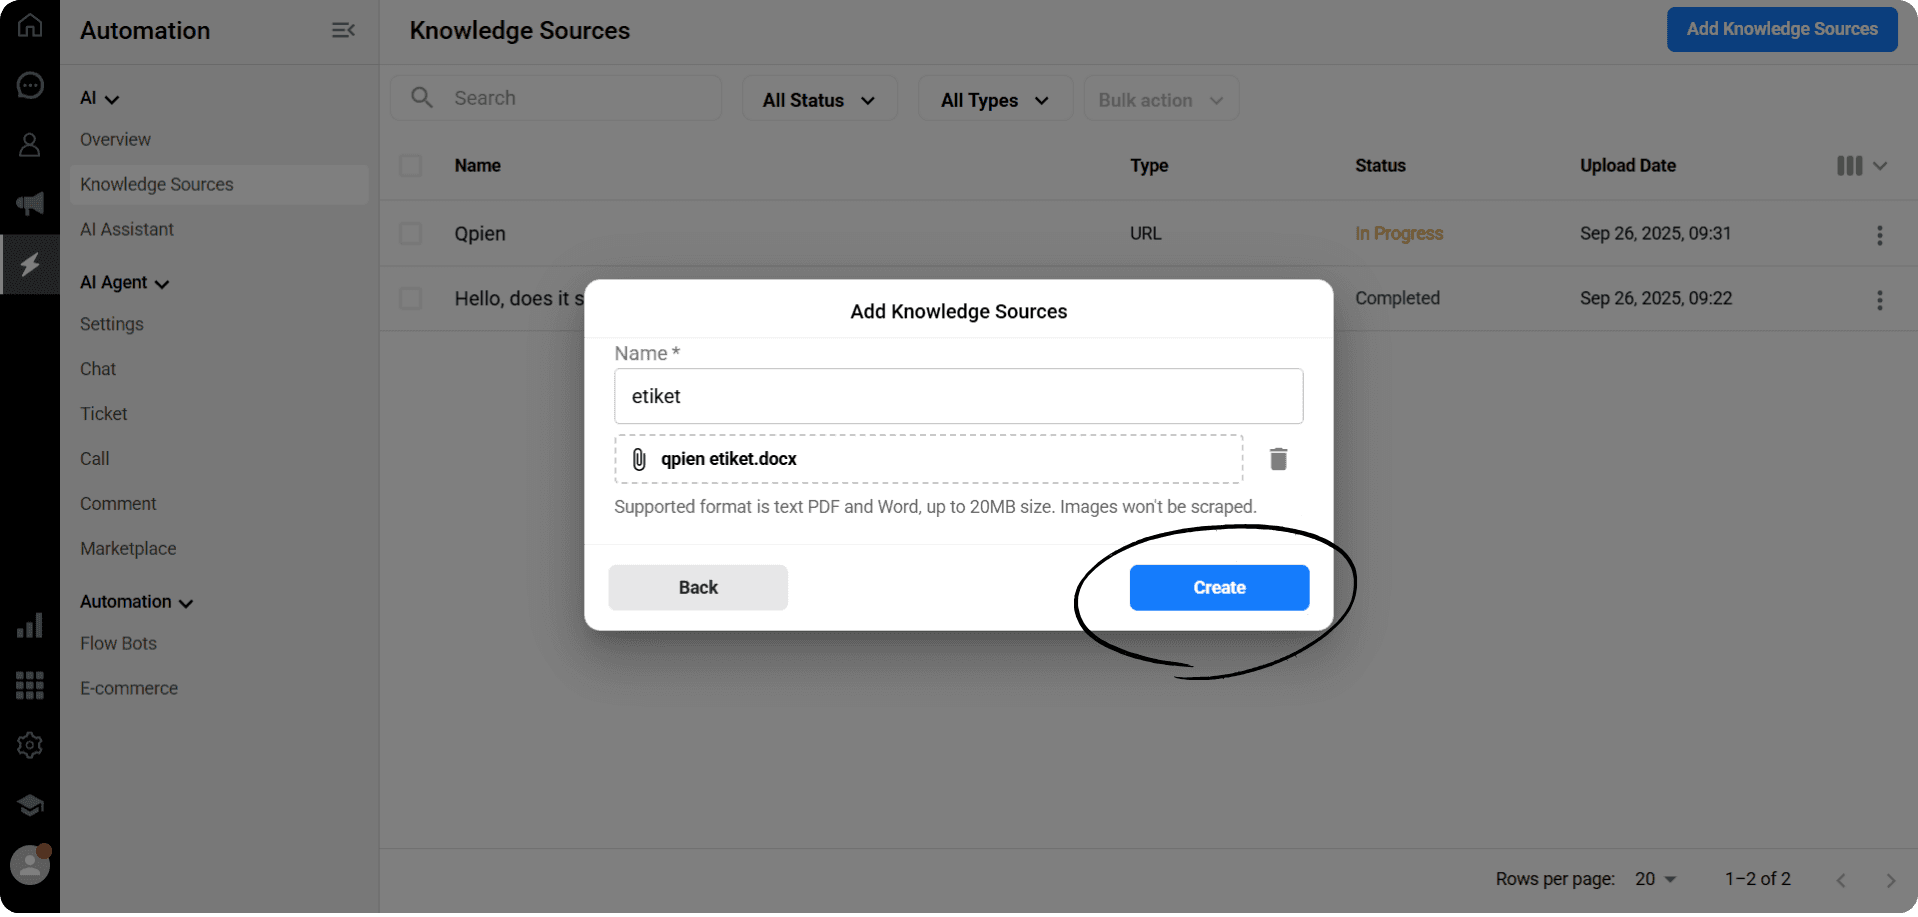
Name: Enter a name for the information source.
Click the Upload Media button.
From the computer window that opens, select the information source you wish to upload in the specified format and upload it.
Click the Create button.
Once your information source has been created, you can check the status field to see that the Artificial Intelligence has moved to the learning phase.
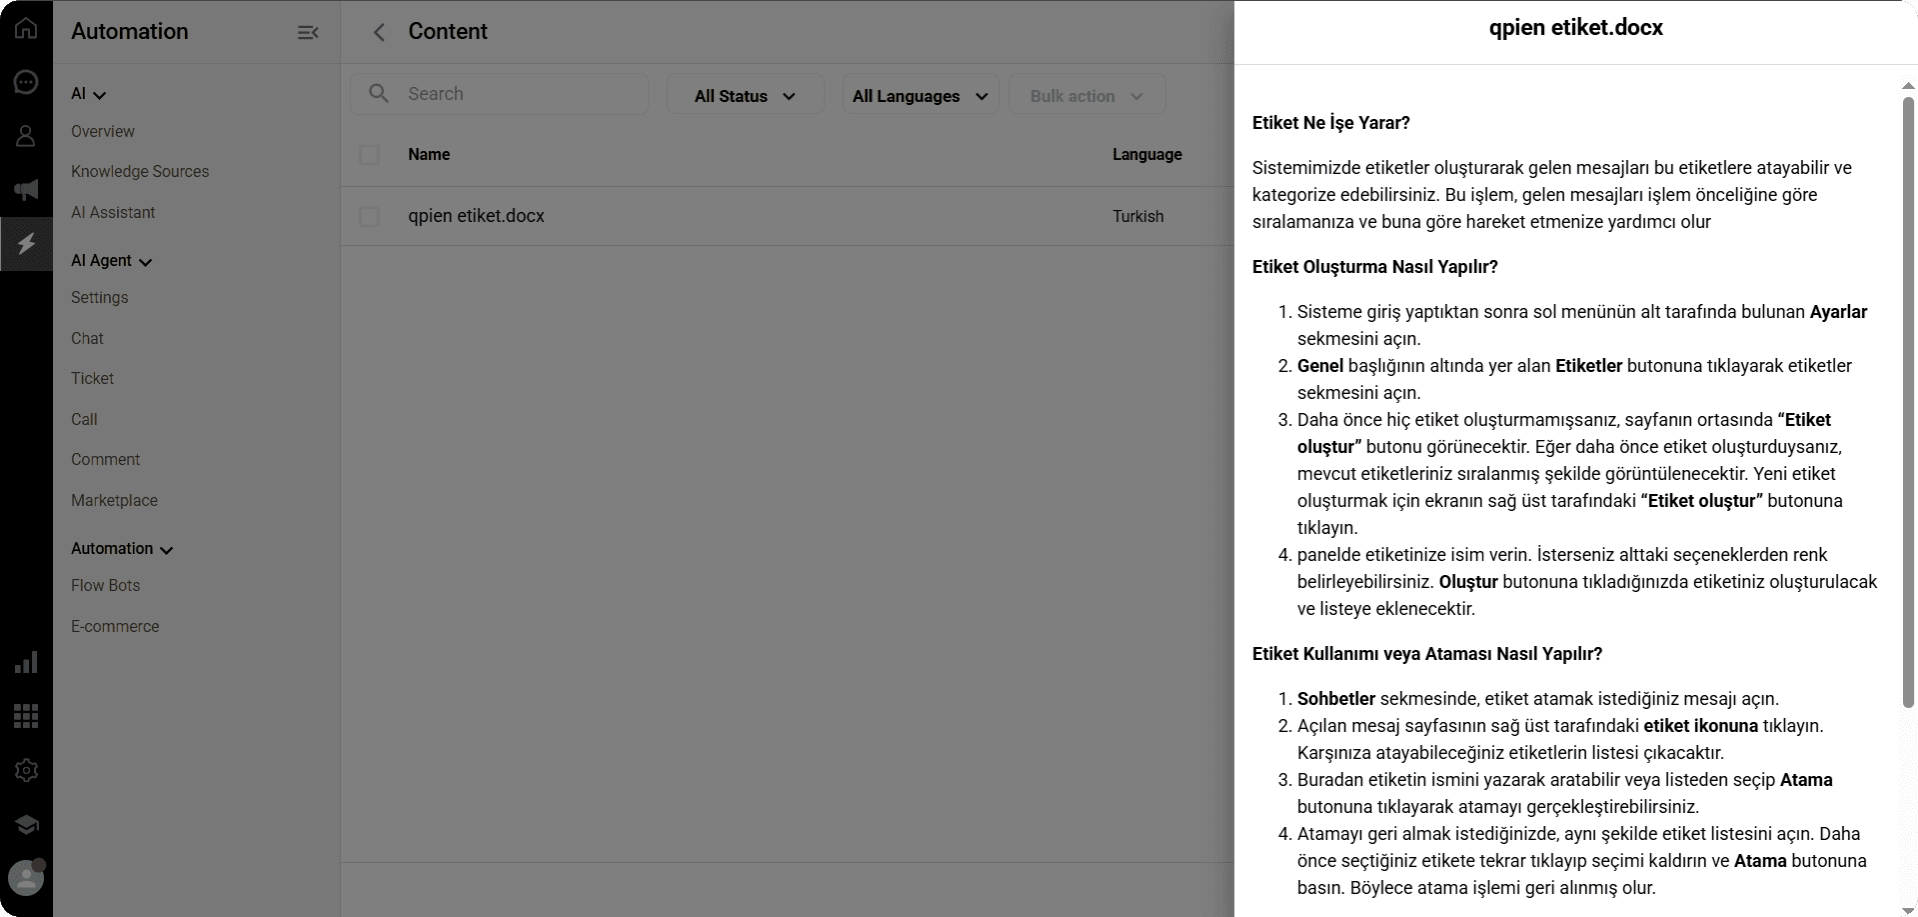
Once the status of your knowledge source is “Completed,” you can click on the knowledge source in the list to review its content in detail.
On this screen, you can see the questions, answers, and added content that the AI has learned.
Now that you have completed the information source addition process, you can begin exploring other actions you can perform on the information source page.
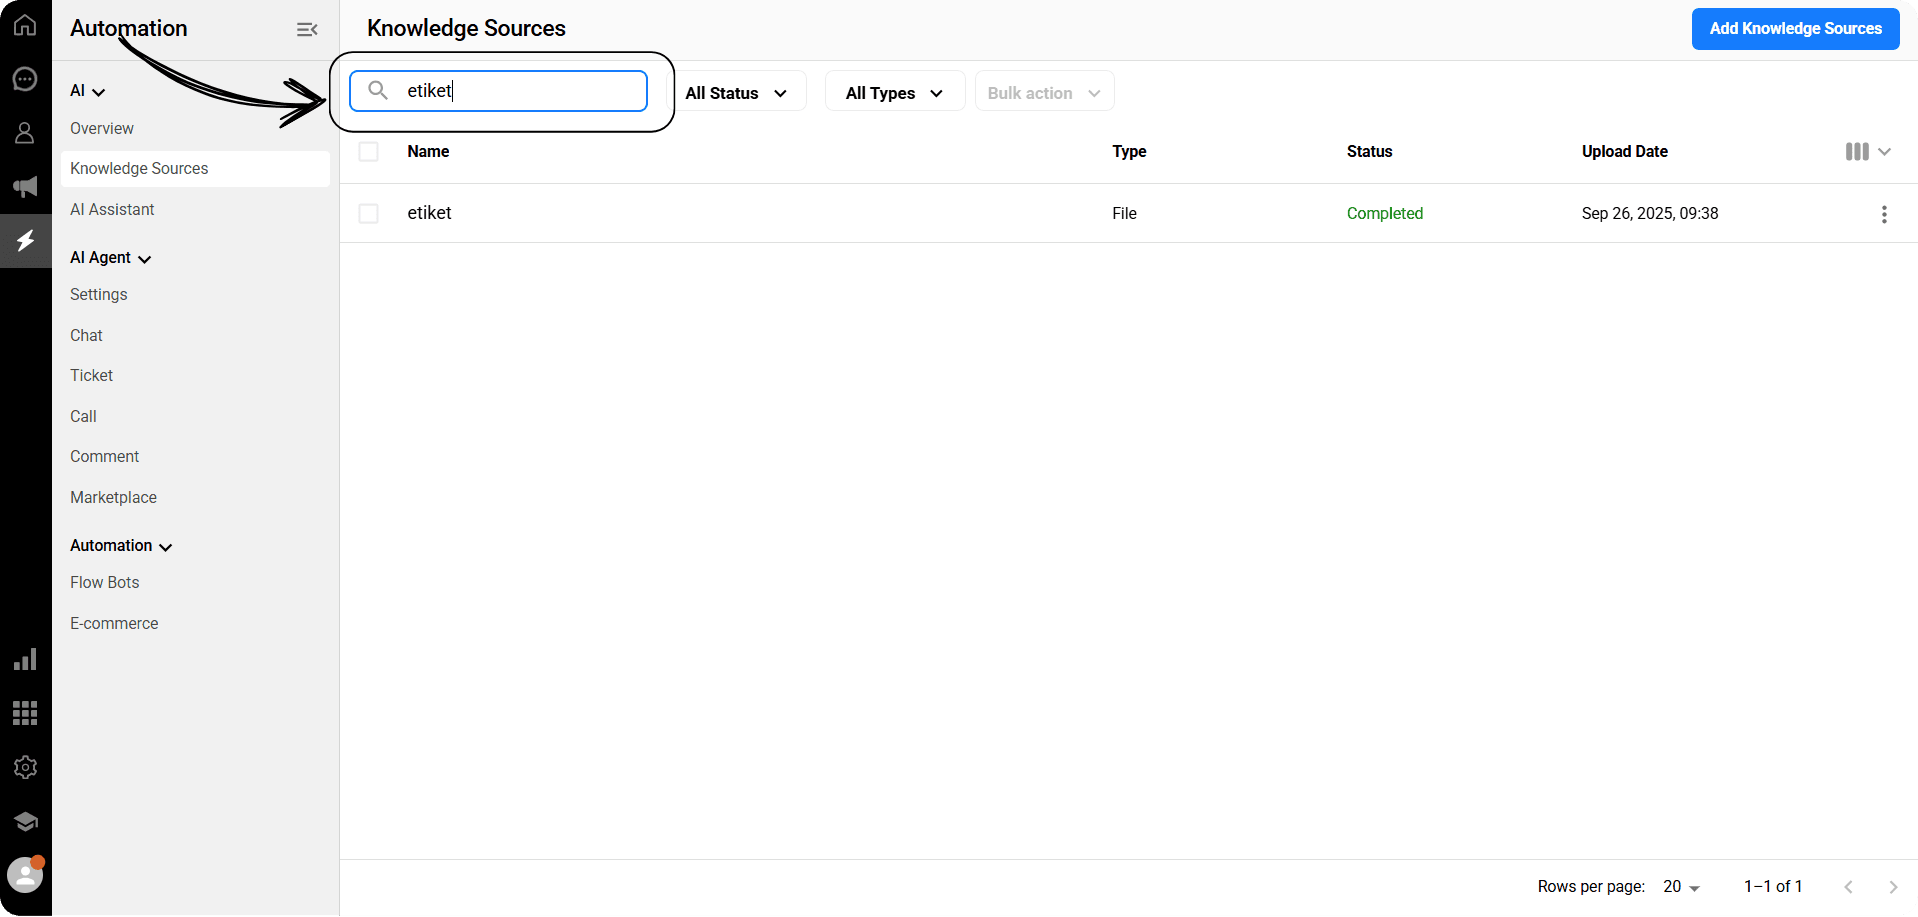
You can search by entering the name you gave the information source in the search field on the list.
This allows you to quickly find the information sources you added and perform actions on them.
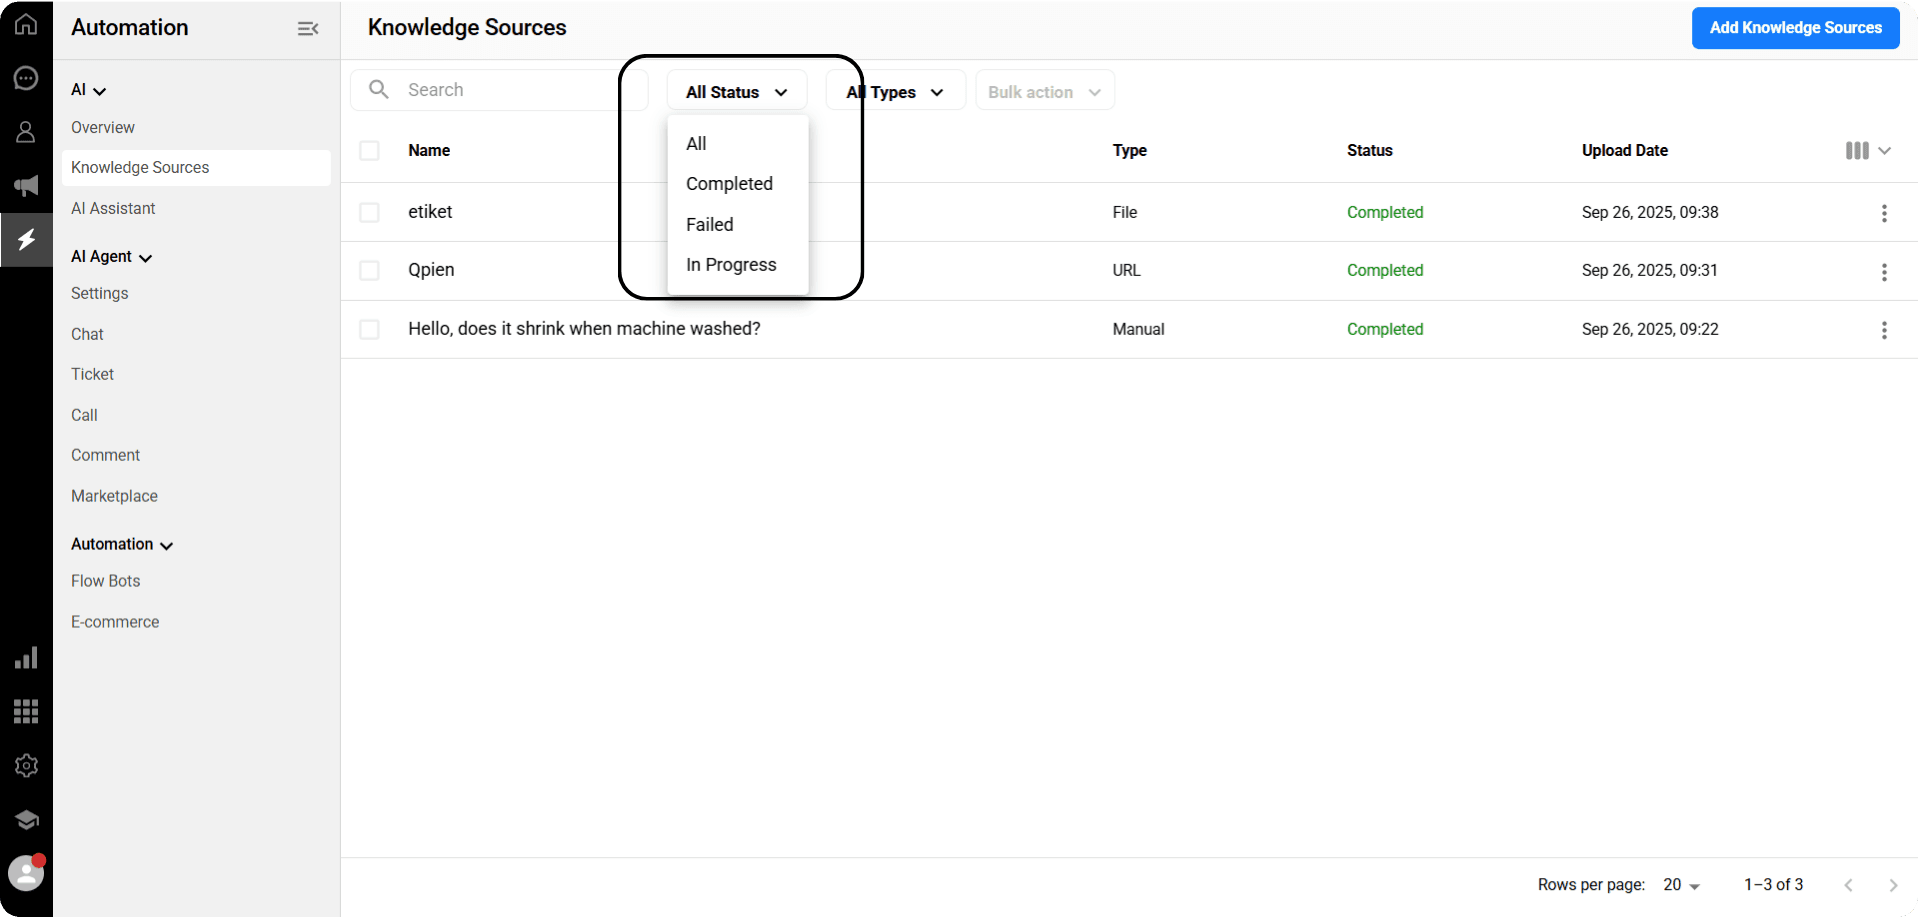
You can list information sources by filtering them according to their status.
For example, you can select information sources that are In Progress, Completed, or In Error and view only the relevant sources.
This allows you to manage your information sources more efficiently and access them quickly.
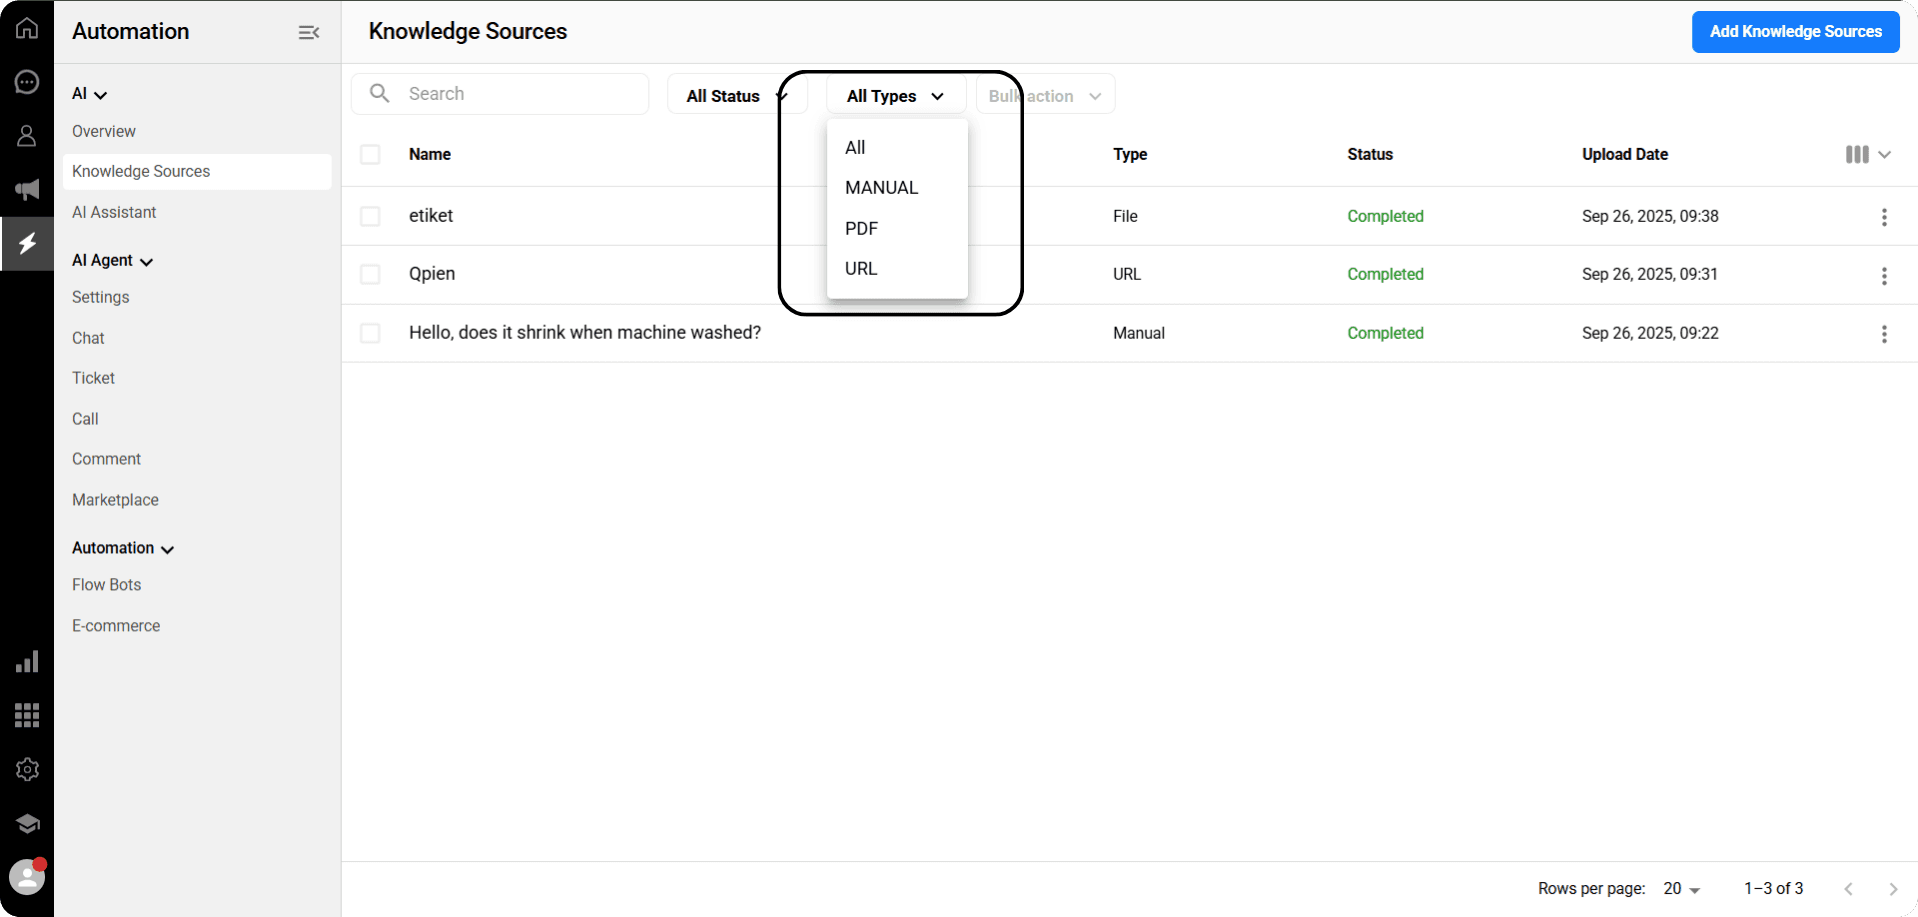
You can list information sources by filtering them by type.
For example: Manual, Website URL, or PDF type.

You can select or deselect all sources listed in the box to the left of the source name at once.
Alternatively, you can click the boxes to the left of each piece of information to select only the sources you want.
Using the Bulk Actions section at the top, you can delete all selected sources at the same time.
You can perform this process via the Add Knowledge Source page.
The information you add is learned by the AI and used to generate future responses accordingly.
This enables the AI to provide answers that are both more accurate and aligned with the criteria you have set.
Go to the Automation page and select the “Knowledge Sources” tab.
In this area, your previously added information sources will be listed.
If you have not added any information sources yet, the list will appear empty.
To add a new information source, click the ‘Add Knowledge Source’ button in the top right corner.
Add Manually
After clicking the Add Knowledge Source button, the addition method options will appear.
If you wish to select the Manual Addition option, tick this option.
Then click the Next button to continue.
Select the Manual option as the Type.
In the field that opens:
In the Question section, write the question you want the AI to answer.
In the Answer section, write how you want the AI to respond to this question, as shown in the example.
Click the Create button to add the information source.
Your information source has been successfully added and appears in the list.
Name: The question you wrote appears here.
Type: The Manual addition type you previously selected is indicated here.
Status: As the AI is currently in the learning phase, it will appear as ‘In Progress’.
Upload Date: The date the information source was added is listed in day/month/year and time format.
When you click on a piece of information in the list, you can view the content of that information source in detail.
Here, the questions and answers you previously added manually are displayed in full.
If necessary, editing or updating can also be done via this screen.
Select the ‘Import from Excel/CSV’ option as the type.
Click the Upload Media button.
From the computer window that opens, select the information source you wish to upload in the specified format and upload it.
Click the Create button to complete the process.
Once your data source has been created, you can check the status field to see that the Artificial Intelligence has moved to the learning phase.
Website URL
After clicking the Add Knowledge Source button, tick the ‘Website URL’ option in the panel that opens.
Then click the Next button to continue
Scanning Option:
Scan all priority pages: The AI learns by scanning the website in general.
Scan a single page: It learns by scanning only the page that opens when the given URL is visited.
Name: Enter a name for the information source.
URL: Add the website's URL.
Click the Create button.
Once your information source has been created, you can check the status field to see that the AI has moved to the learning phase.
Once the status of your information source is ‘Completed’, you can click on the information source in the list to examine its content in detail.
On this screen, you can see the questions, answers, and added content that the Artificial Intelligence has learned.
If necessary, you can also make edits or updates to the content.
Upload File
After clicking the Add Information Source button, select the ‘Upload File’ option from the panel that opens.
Then click the Next button to continue.
Name: Enter a name for the information source.
Click the Upload Media button.
From the computer window that opens, select the information source you wish to upload in the specified format and upload it.
Click the Create button.
Once your information source has been created, you can check the status field to see that the Artificial Intelligence has moved to the learning phase.
Once the status of your knowledge source is “Completed,” you can click on the knowledge source in the list to review its content in detail.
On this screen, you can see the questions, answers, and added content that the AI has learned.
Now that you have completed the information source addition process, you can begin exploring other actions you can perform on the information source page.
You can search by entering the name you gave the information source in the search field on the list.
This allows you to quickly find the information sources you added and perform actions on them.
You can list information sources by filtering them according to their status.
For example, you can select information sources that are In Progress, Completed, or In Error and view only the relevant sources.
This allows you to manage your information sources more efficiently and access them quickly.
You can list information sources by filtering them by type.
For example: Manual, Website URL, or PDF type.
You can select or deselect all sources listed in the box to the left of the source name at once.
Alternatively, you can click the boxes to the left of each piece of information to select only the sources you want.
Using the Bulk Actions section at the top, you can delete all selected sources at the same time.
Previous
Conversations Reports
Next
Next
Managing your billing details
Try Qpien free for 14 days! 🎉
Ready to take control of all your support channels?
Empower your customer interactions with Qpien! Boost sales and elevate satisfaction with every conversation.
Try Qpien free for 14 days! 🎉
Ready to take control of all your support channels?
Empower your customer interactions with Qpien! Boost sales and elevate satisfaction with every conversation.
Try Qpien free for 14 days! 🎉
Ready to take control of all your support channels?
Empower your customer interactions with Qpien! Boost sales and elevate satisfaction with every conversation.