
Smart Inbox
Inbox Overview
Qpien's Inbox screen gathers all customer messages in one central location.
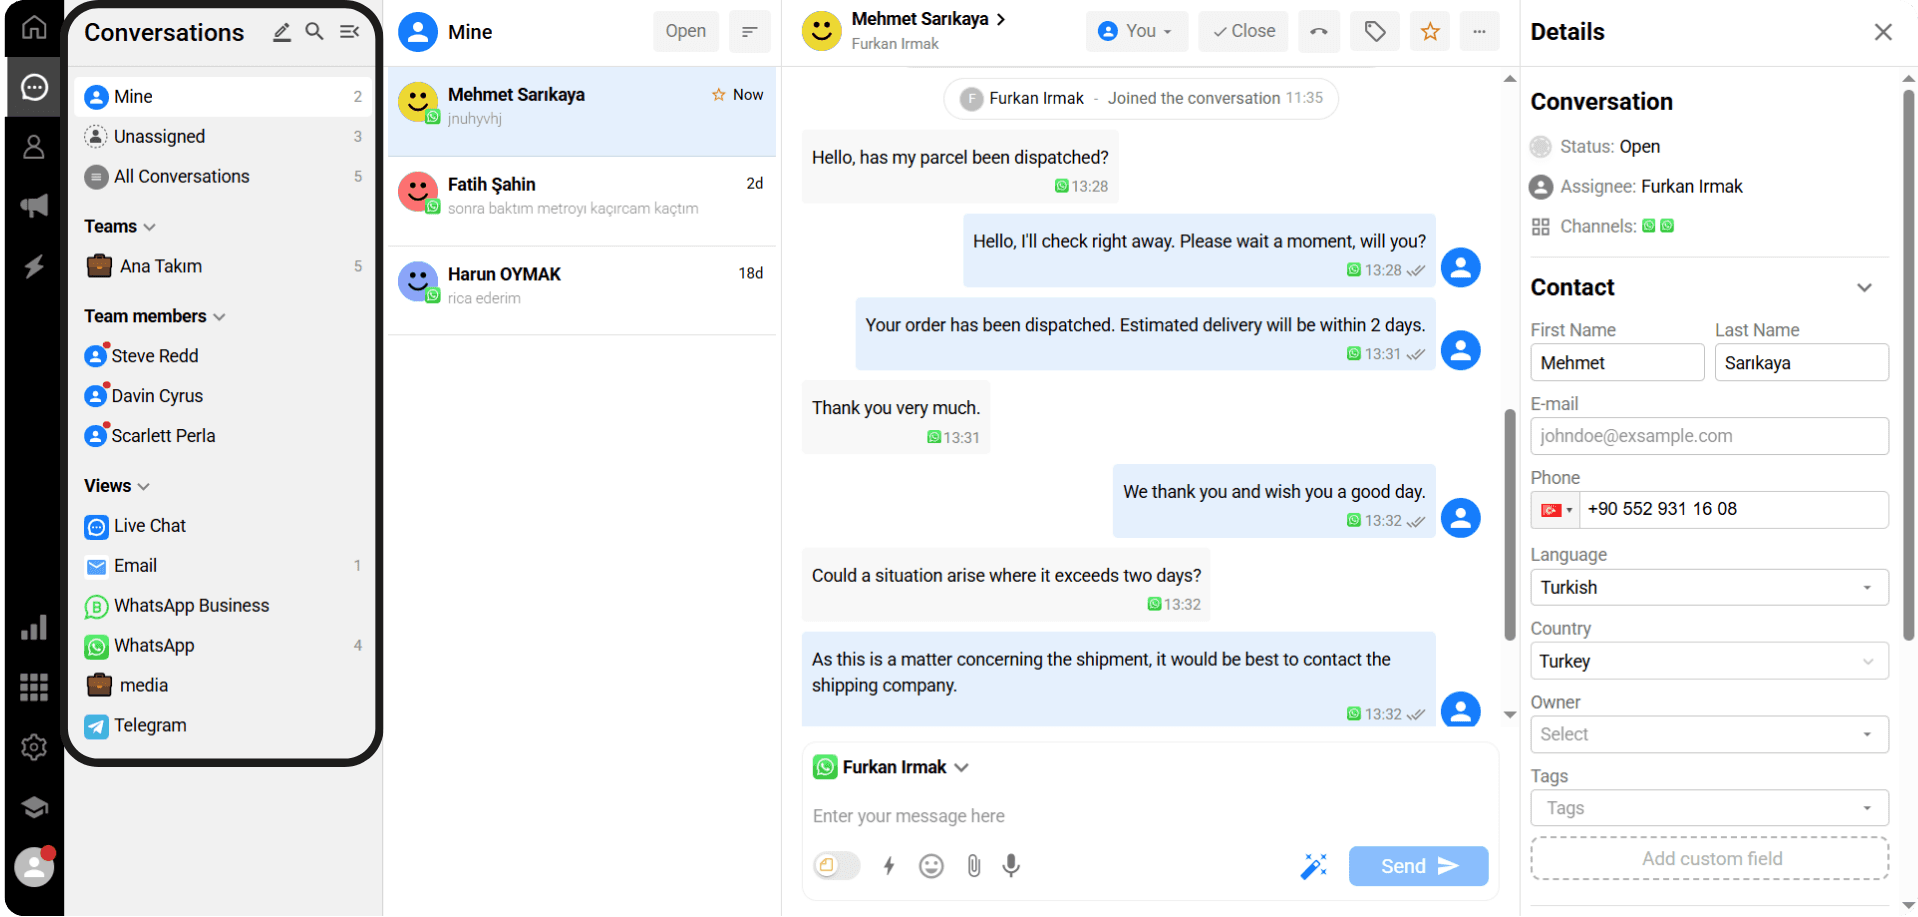
In the Conversations section, you can view all your communications in an organized manner. Here, you can:
Categorize your conversations,
View your teams and team members,
Quickly access the conversations you need using custom filters you set.
This way, you can easily organize customer communication and work more efficiently with your team.
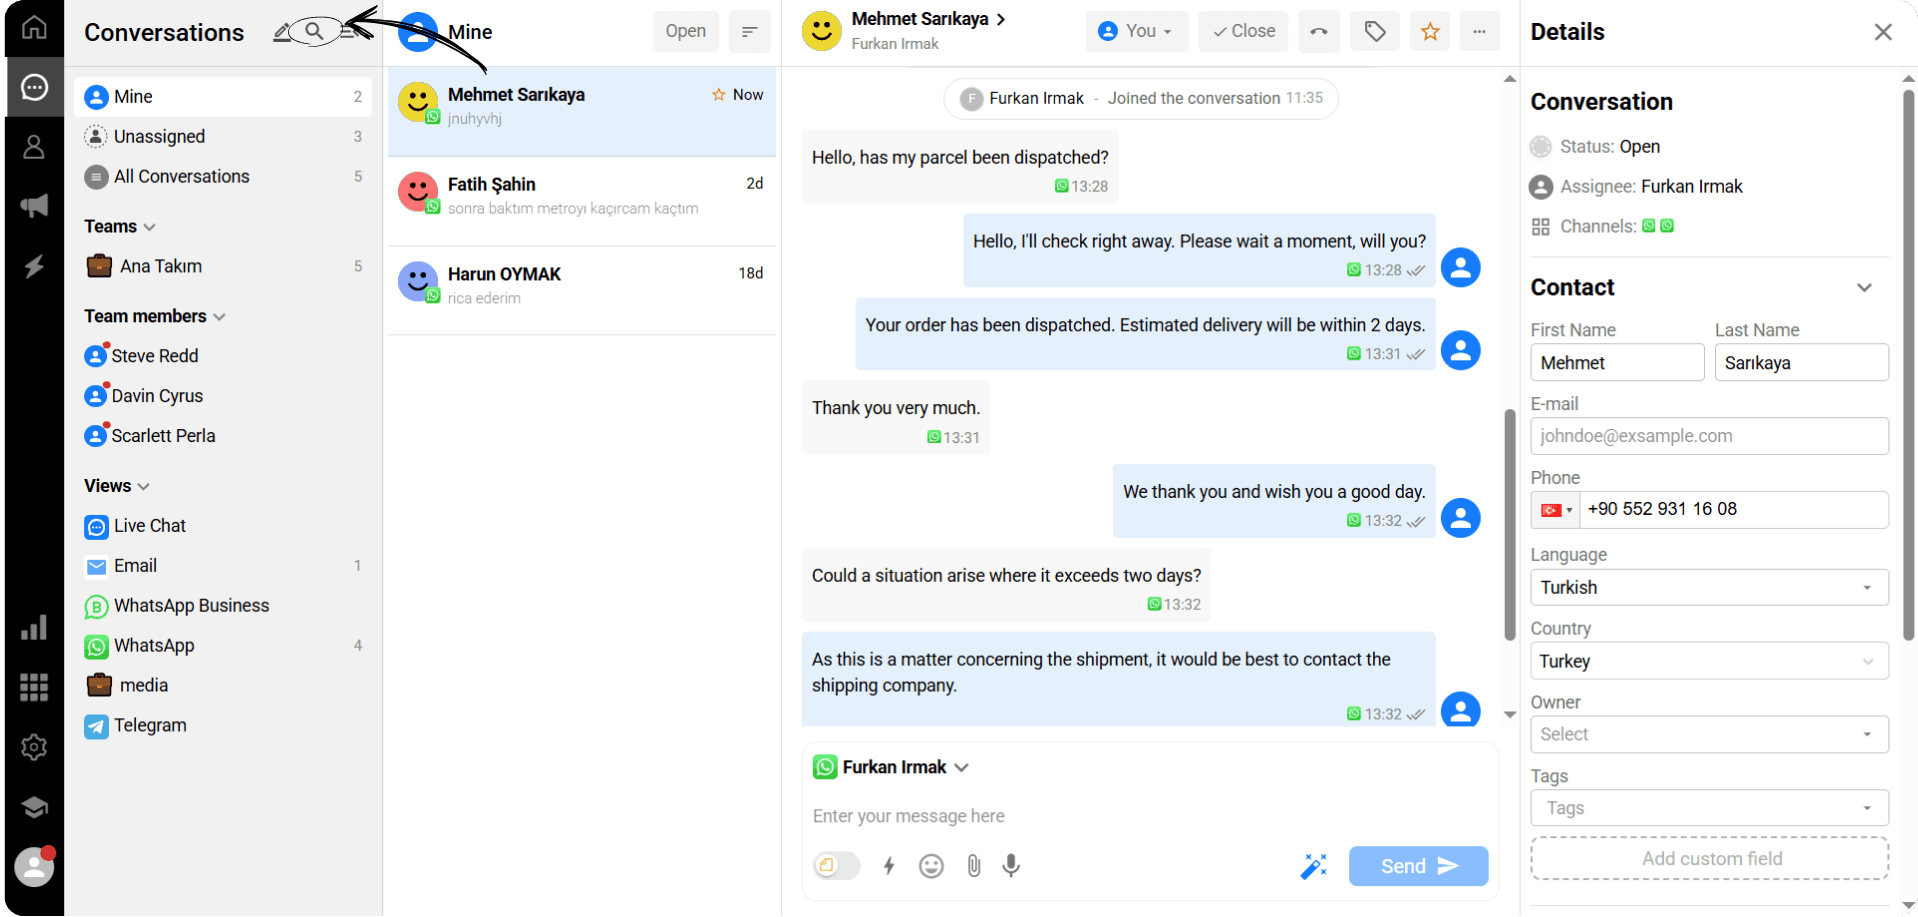
Click the magnifying glass icon to search for conversation by contact name.
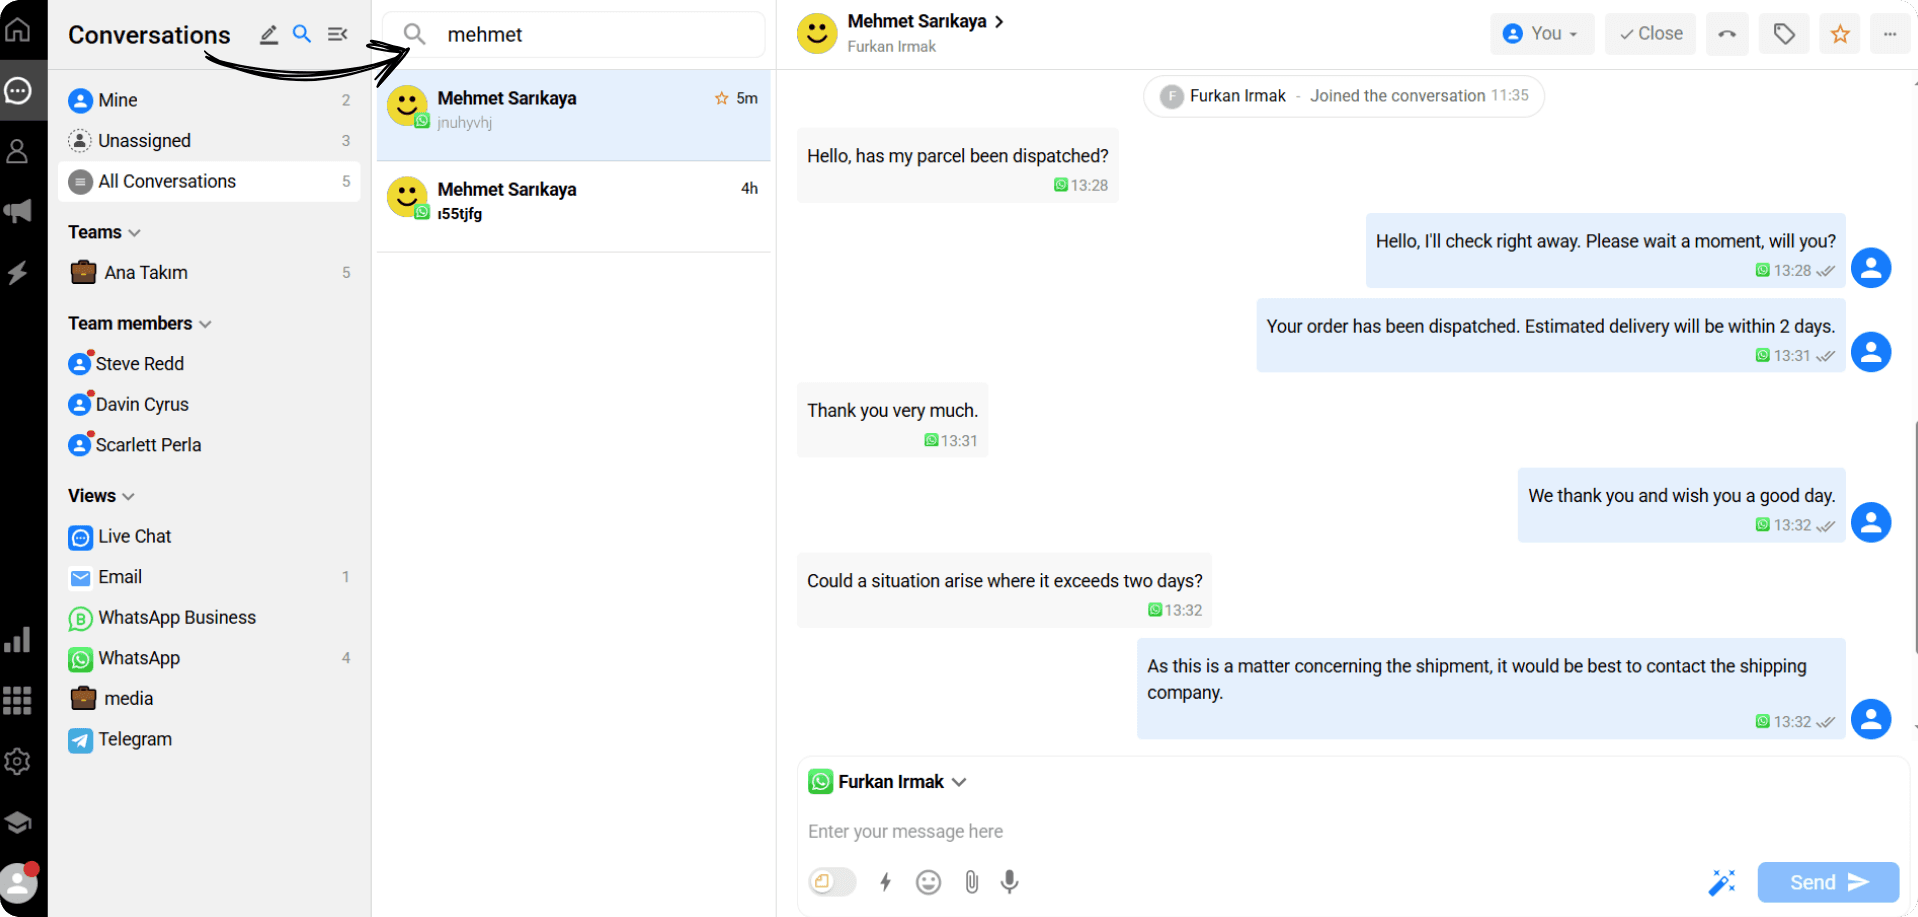
Click the magnifying glass icon to search for conversation by contact name.

In the conversations screen, you can easily access all your messages under different headings:
Mine → Displays all conversations assigned to you or those you have taken over.
Unassigned → Shows conversations that have reached the system but are still waiting for a response because they haven’t been assigned to anyone yet.
All Conversations → Includes all conversations belonging to all team members, allowing you to track all customer communications in a single view.
Teams
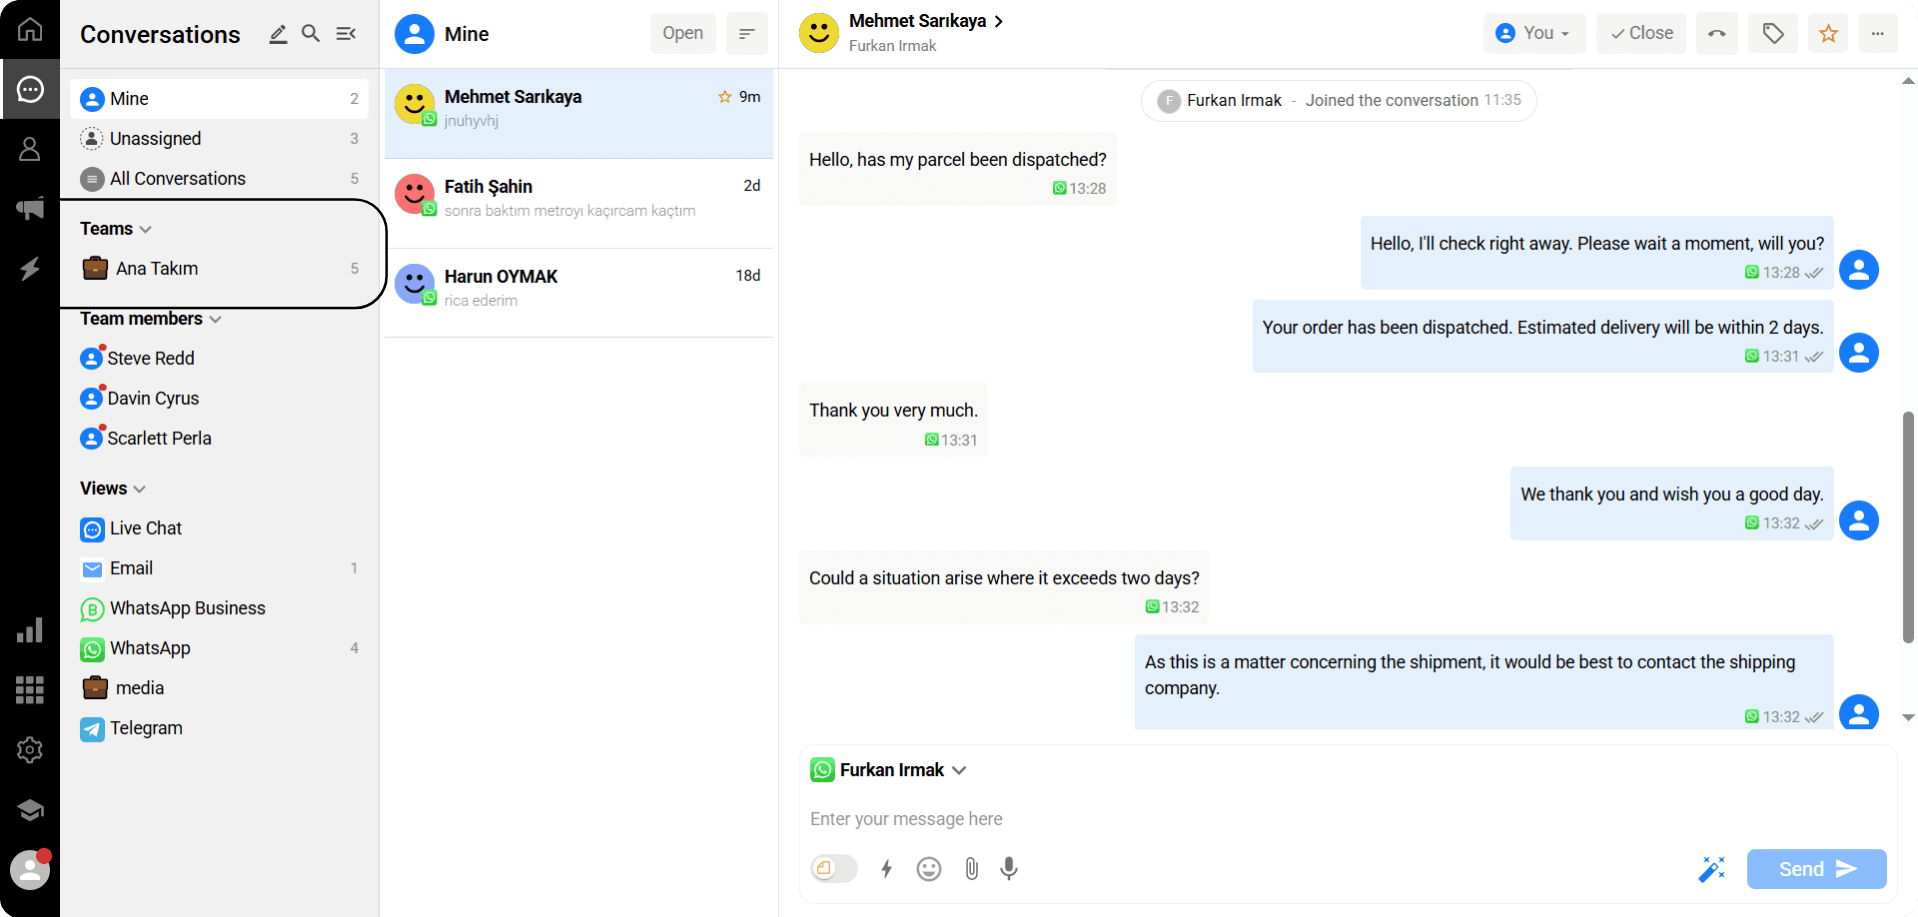
In Qpien, you can create teams for different tasks and responsibilities. Each team member is added to the designated teams, ensuring that the right people handle the appropriate conversations.
Teams are listed here.
Users can only see the teams they are members of.
This structure allows communication to be managed more efficiently and in an organized manner.
Team Members
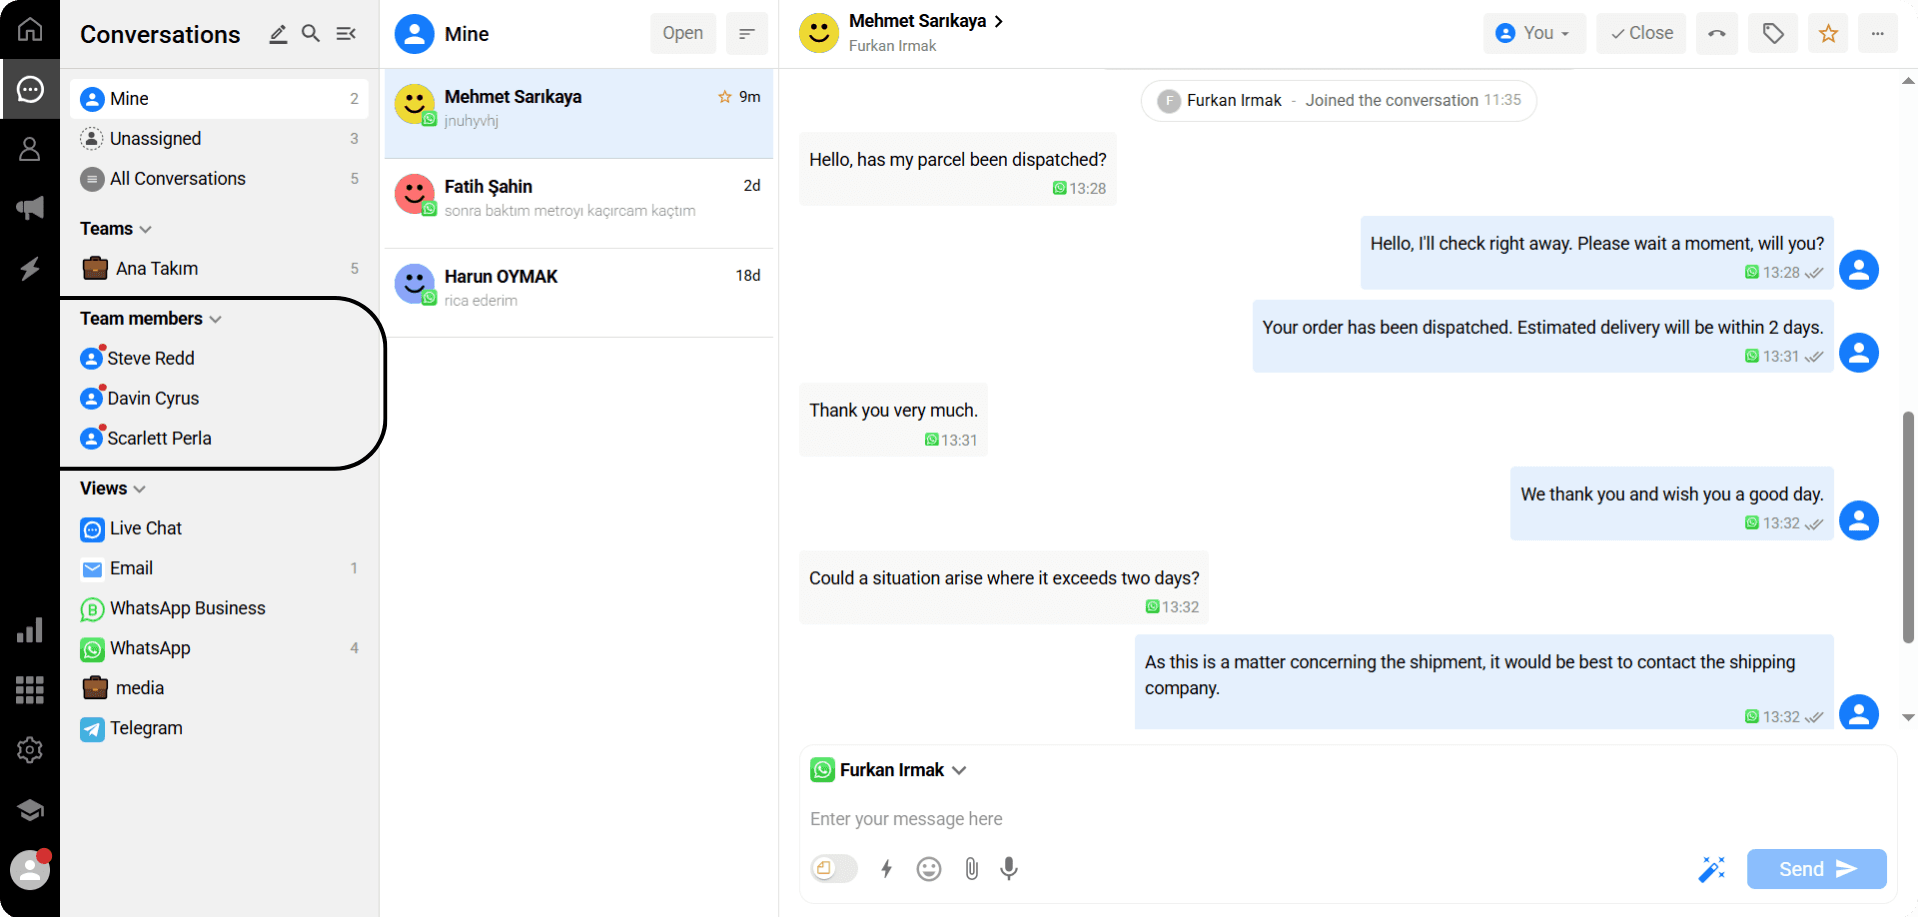
You can view the team members in the shared teams you belong to in this section.
By clicking on a team member from the list, you can see the conversations assigned to that person.
This way, you can easily track who is handling which customer and make collaboration within the team more efficient.
Views
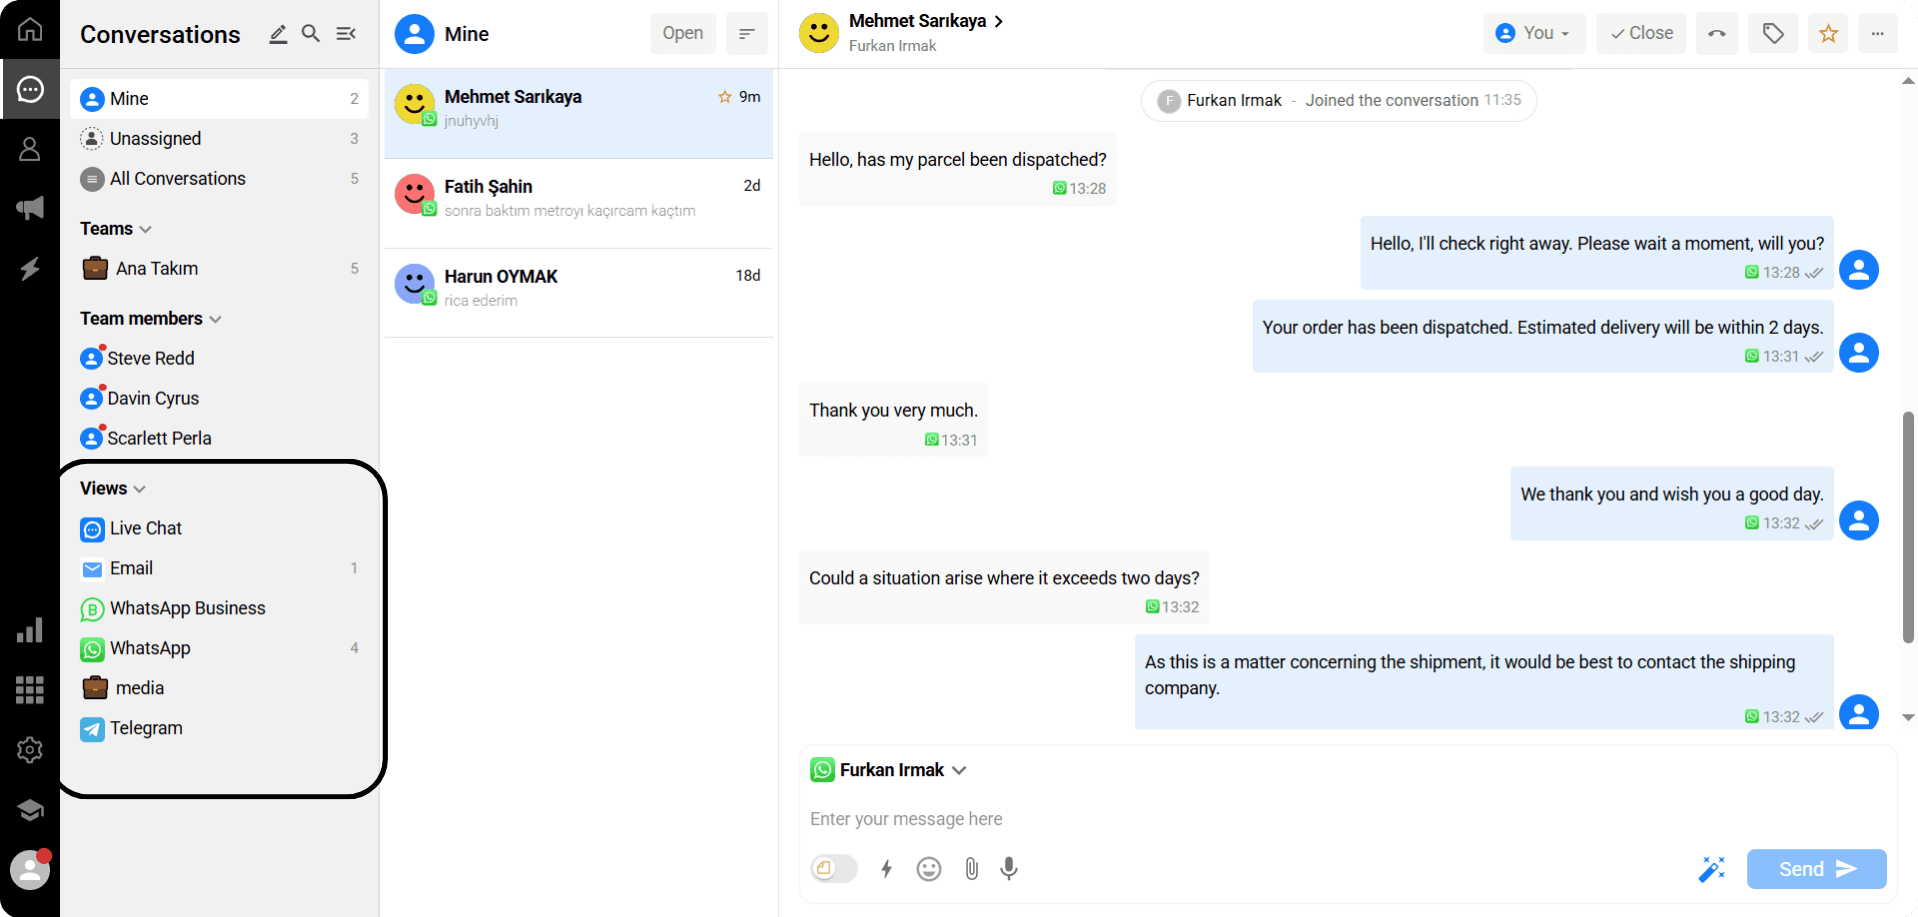
With views, you can separate your conversations according to specific criteria and keep your screen more organized.
Filters help you quickly reach the right conversations, especially during high message traffic.
This way, your teams can manage customer requests more efficiently and in an organized manner.
Conversation List
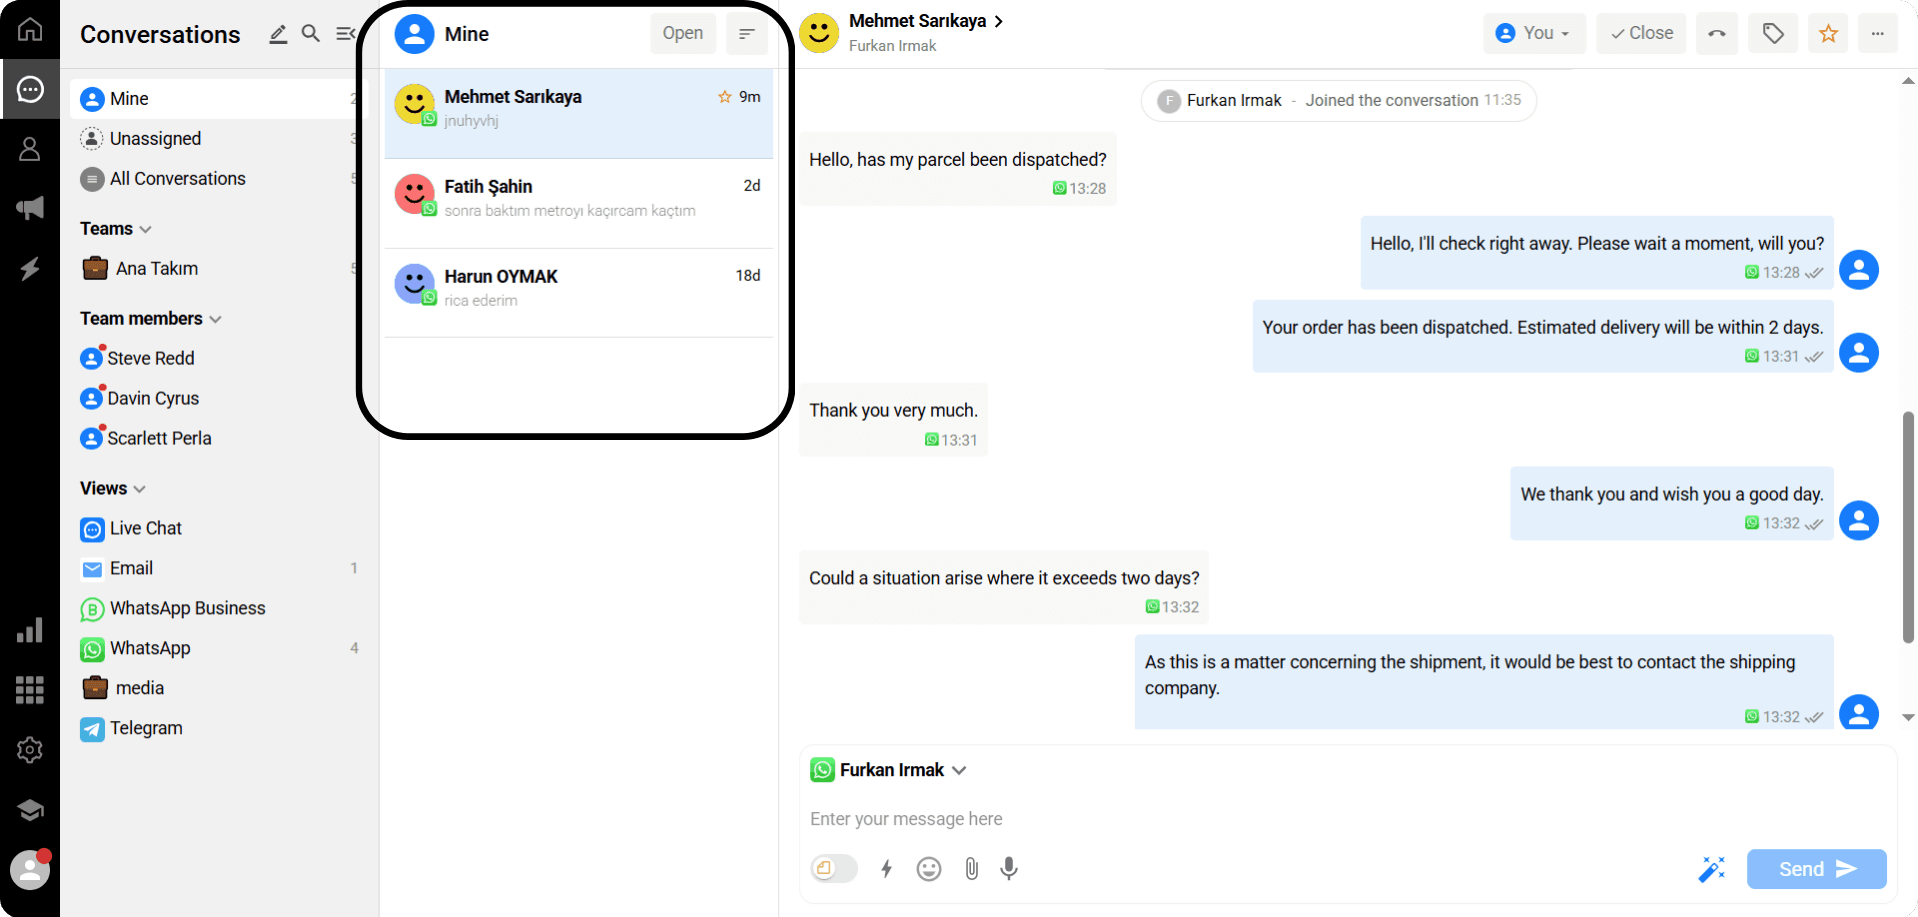
The messages under the selected conversation category, team, or custom filter are listed in this section.
For example:
When WhatsApp is selected, only messages received via WhatsApp that have not yet been closed are displayed here.
This structure allows you to quickly access the conversations you need and enjoy a clutter-free conversation experience.
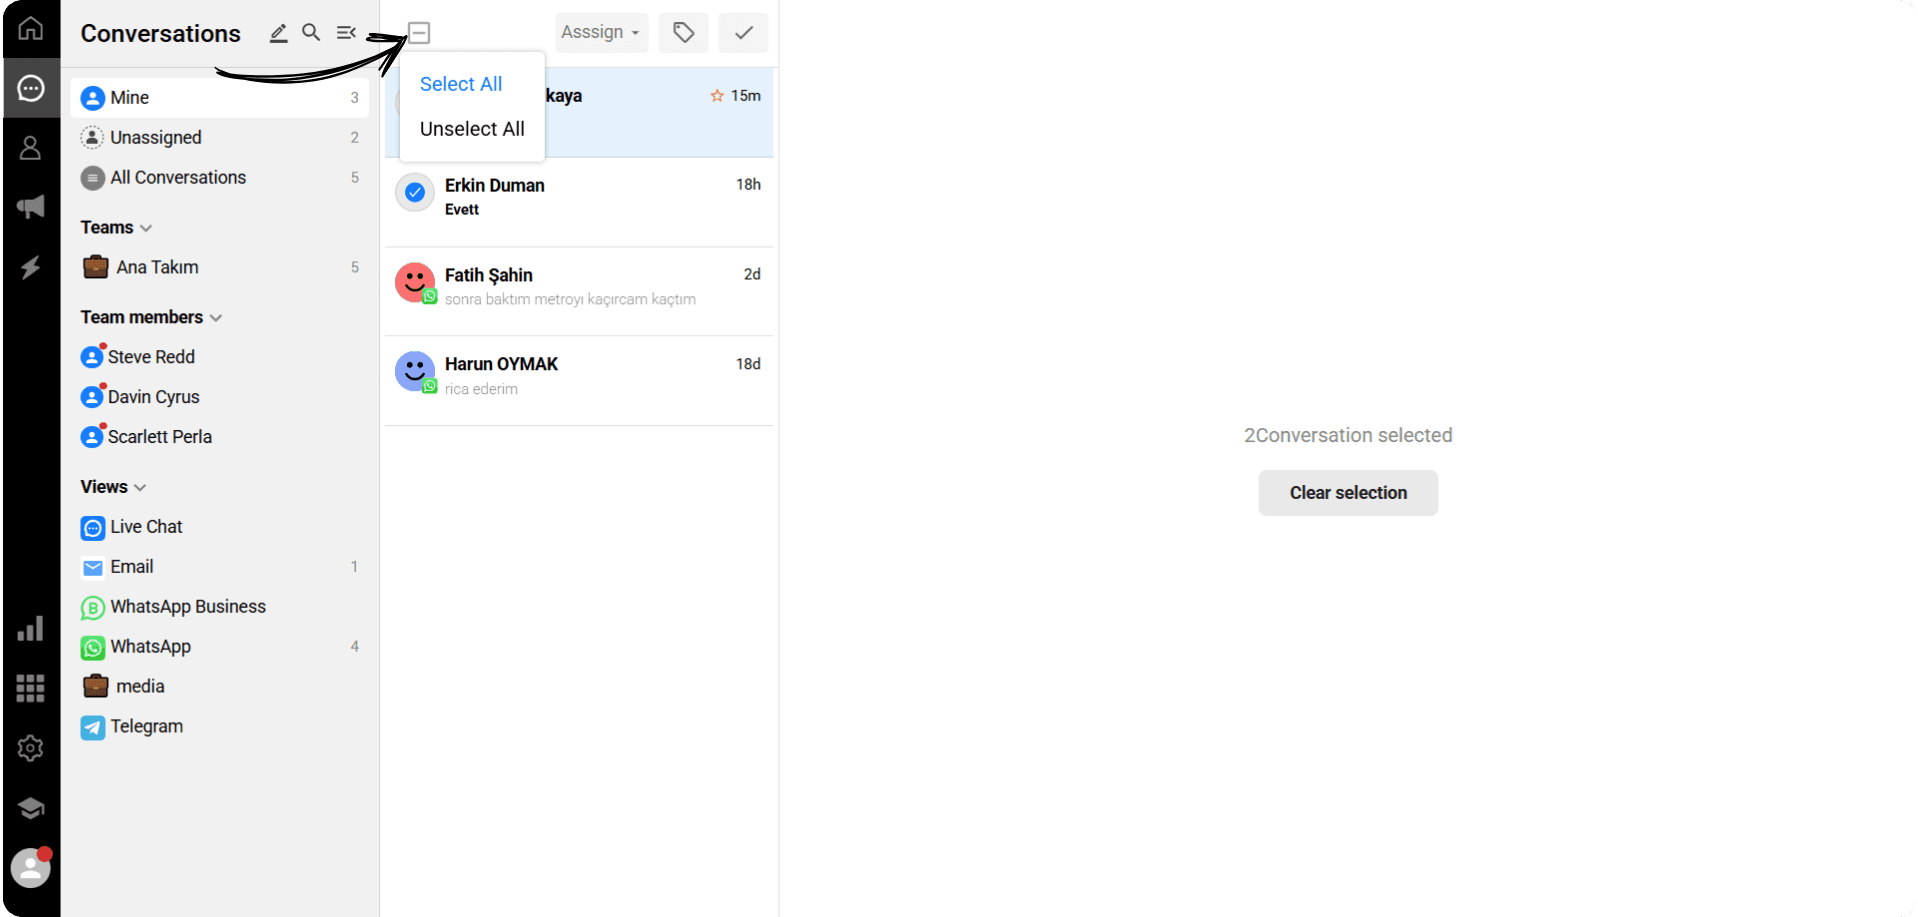
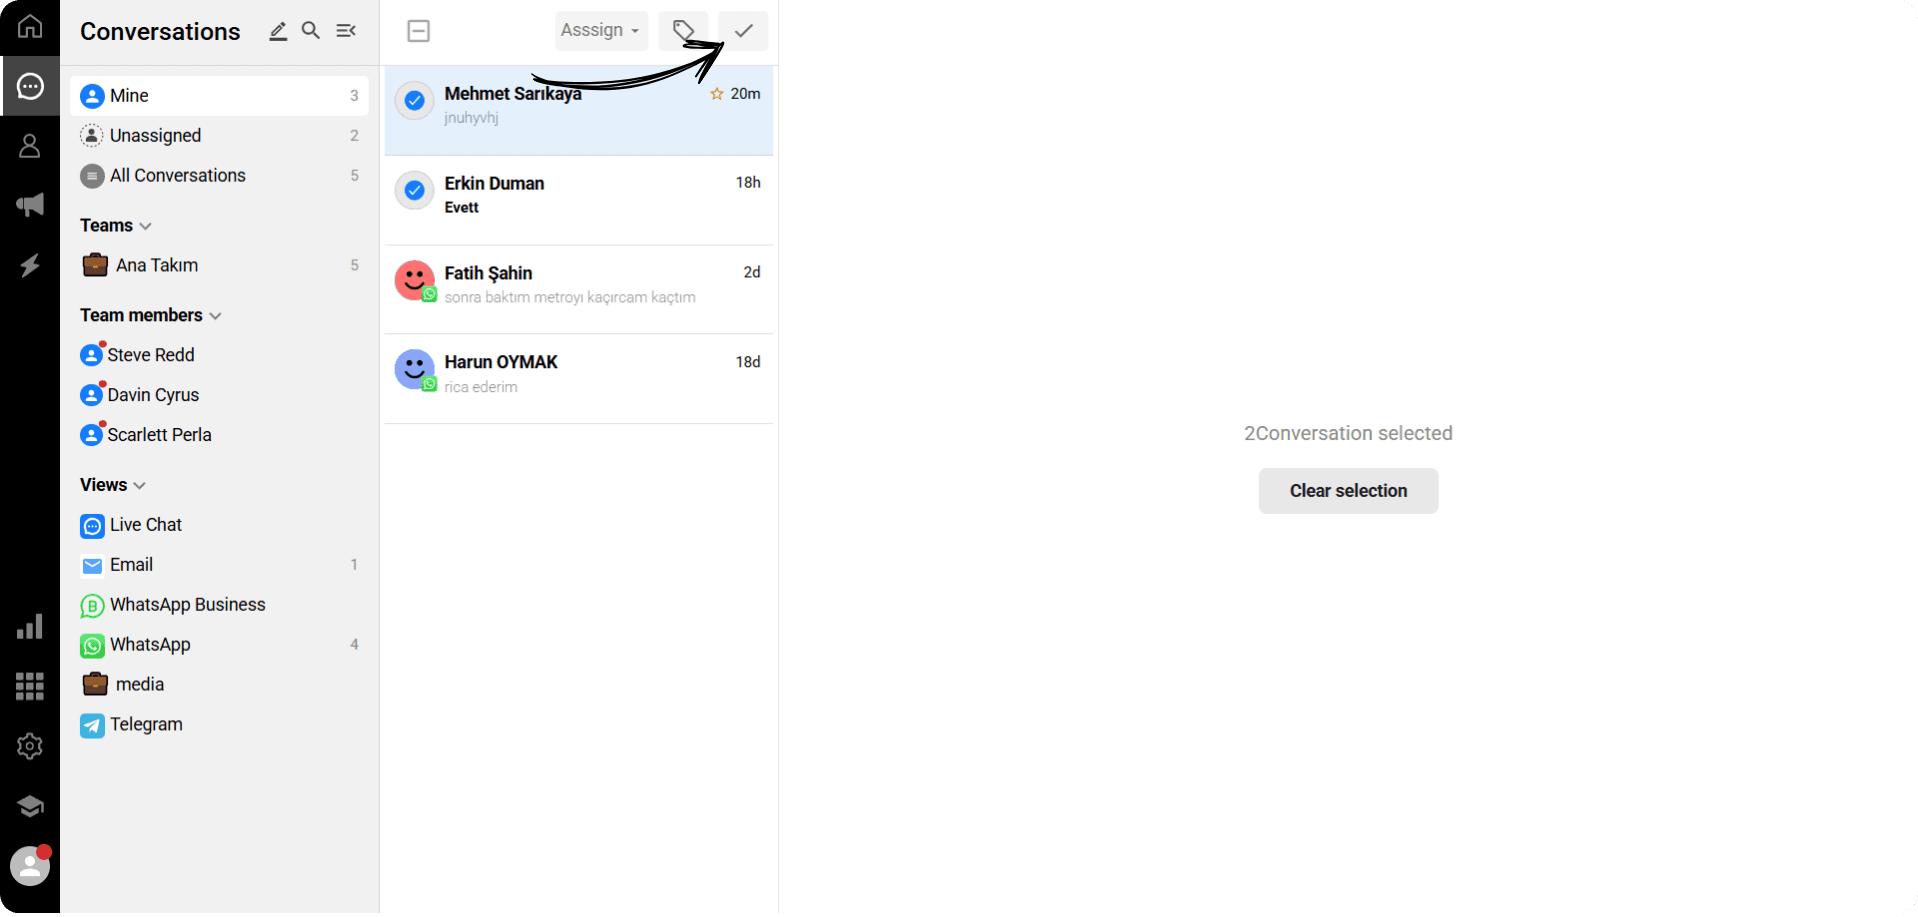
In the conversation list, you can select a conversation by clicking the avatar icon next to it. This feature allows you to perform bulk actions easily.
To select multiple conversations, click the avatars of the conversations you want to choose one by one.
By clicking the arrow icon at the top of the list, a menu will appear where you can:
Use the “Select All” button to select all conversations at once,
Or deselect them from the same menu.
This way, you can manage your conversations easily, either individually or in bulk.
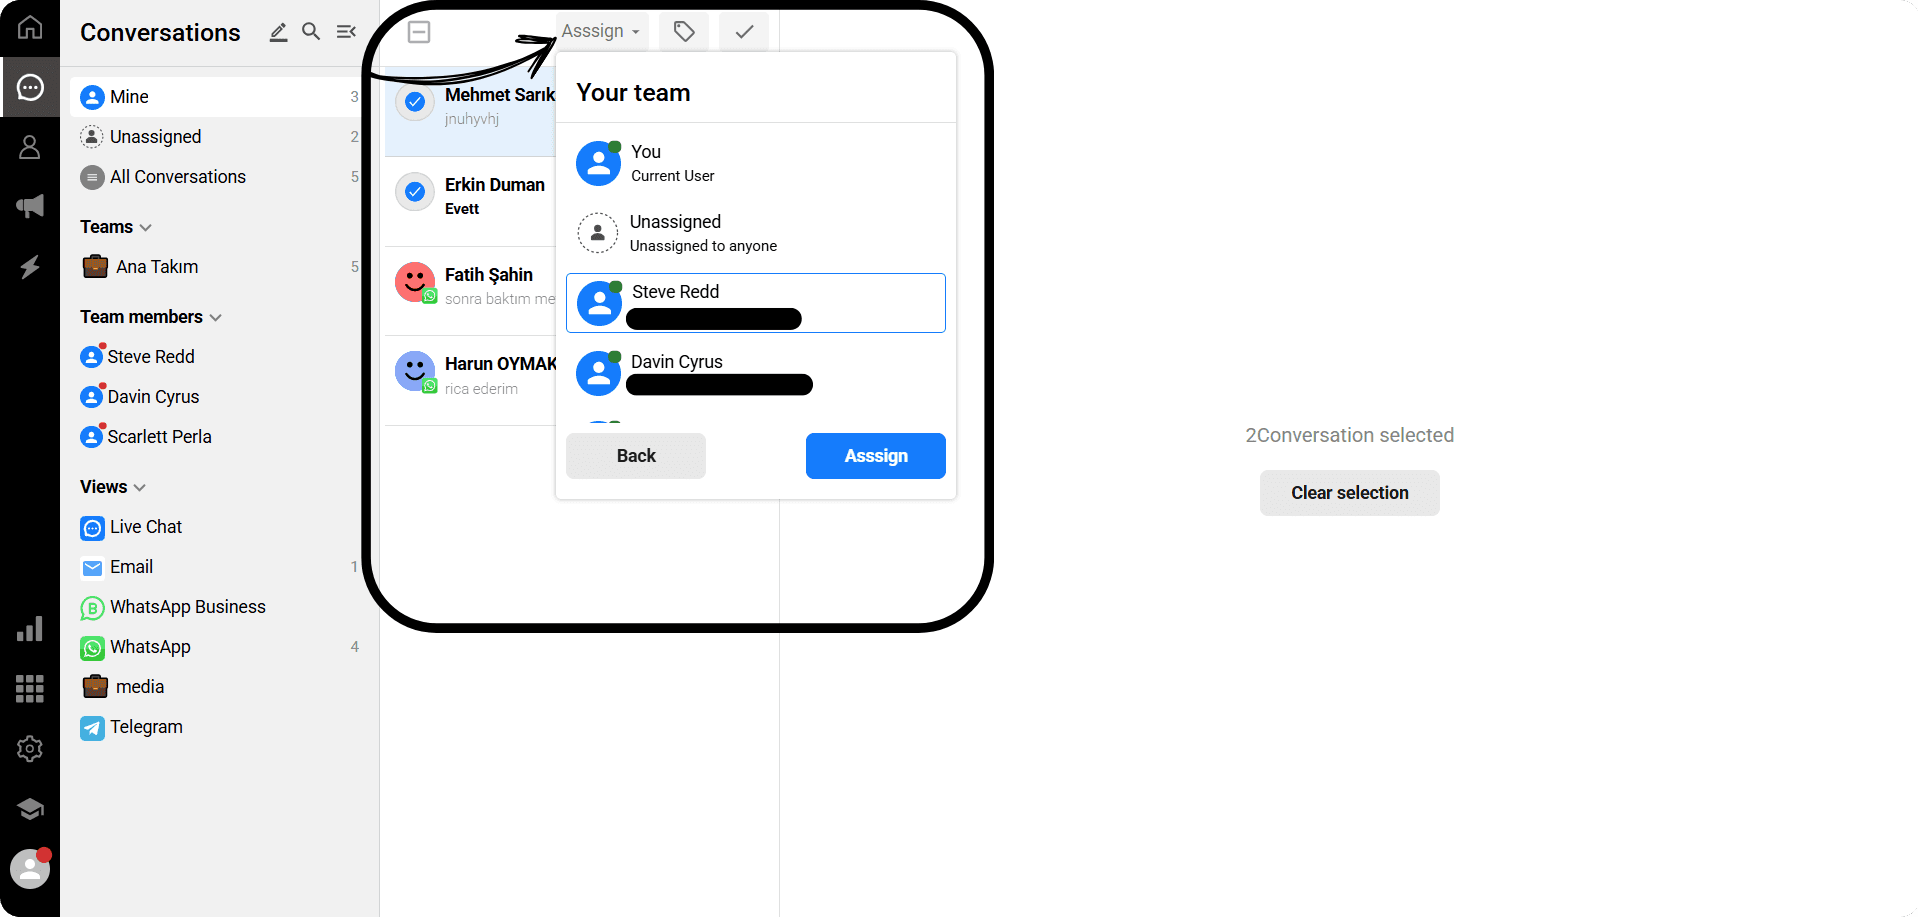
After making your selections, click the “Assign” button in the top menu.
A list of members in your team will appear.
Select the person to whom you want to assign the selected conversations.
Finally, click the “Assign” button again to complete the bulk assignment process.
This allows you to quickly and easily direct conversations to the appropriate team members.
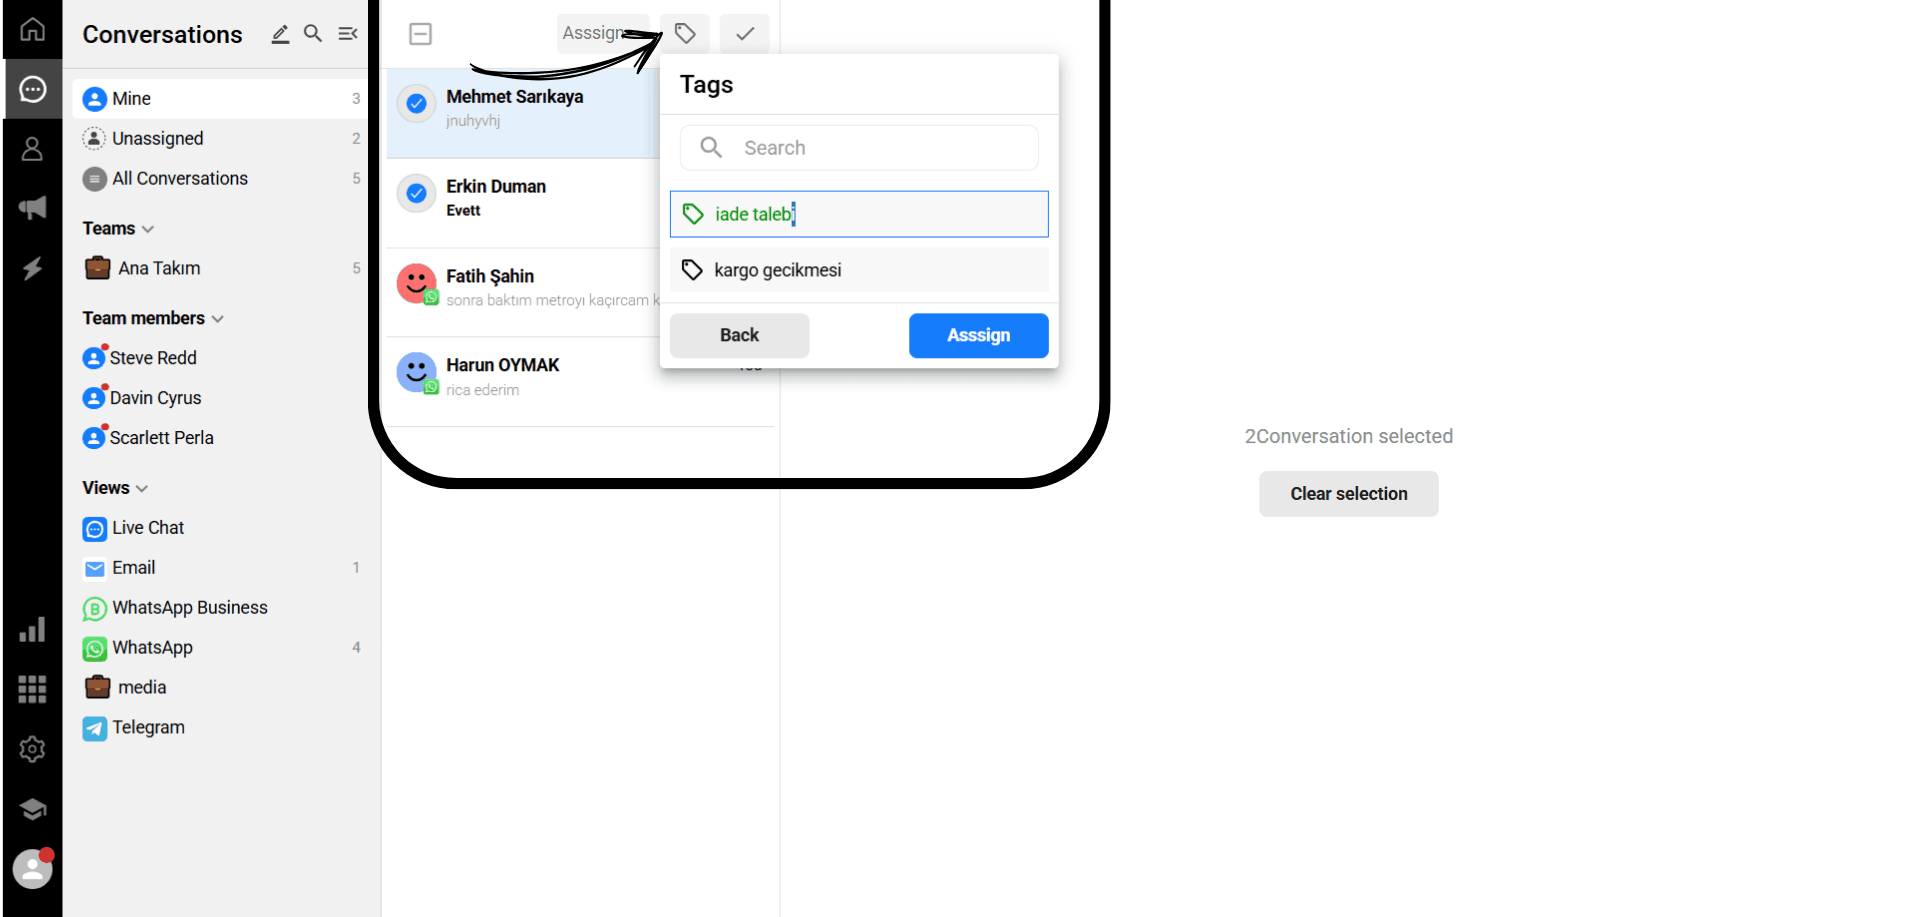
After selecting your conversations, click the “Tag” button in the top menu.
A list of your existing tags will appear.
Choose the tag you want to add to the selected conversations.
Finally, click the “Assign” button to complete the bulk tagging process.
This feature allows you to easily categorize your conversations and quickly access the ones you’re looking for.
After selecting your conversations, click the “Delete” button in the top menu.
This action allows you to delete all selected conversations in bulk.
Once you confirm the deletion, the conversations cannot be recovered, so it is recommended to use this feature with caution.
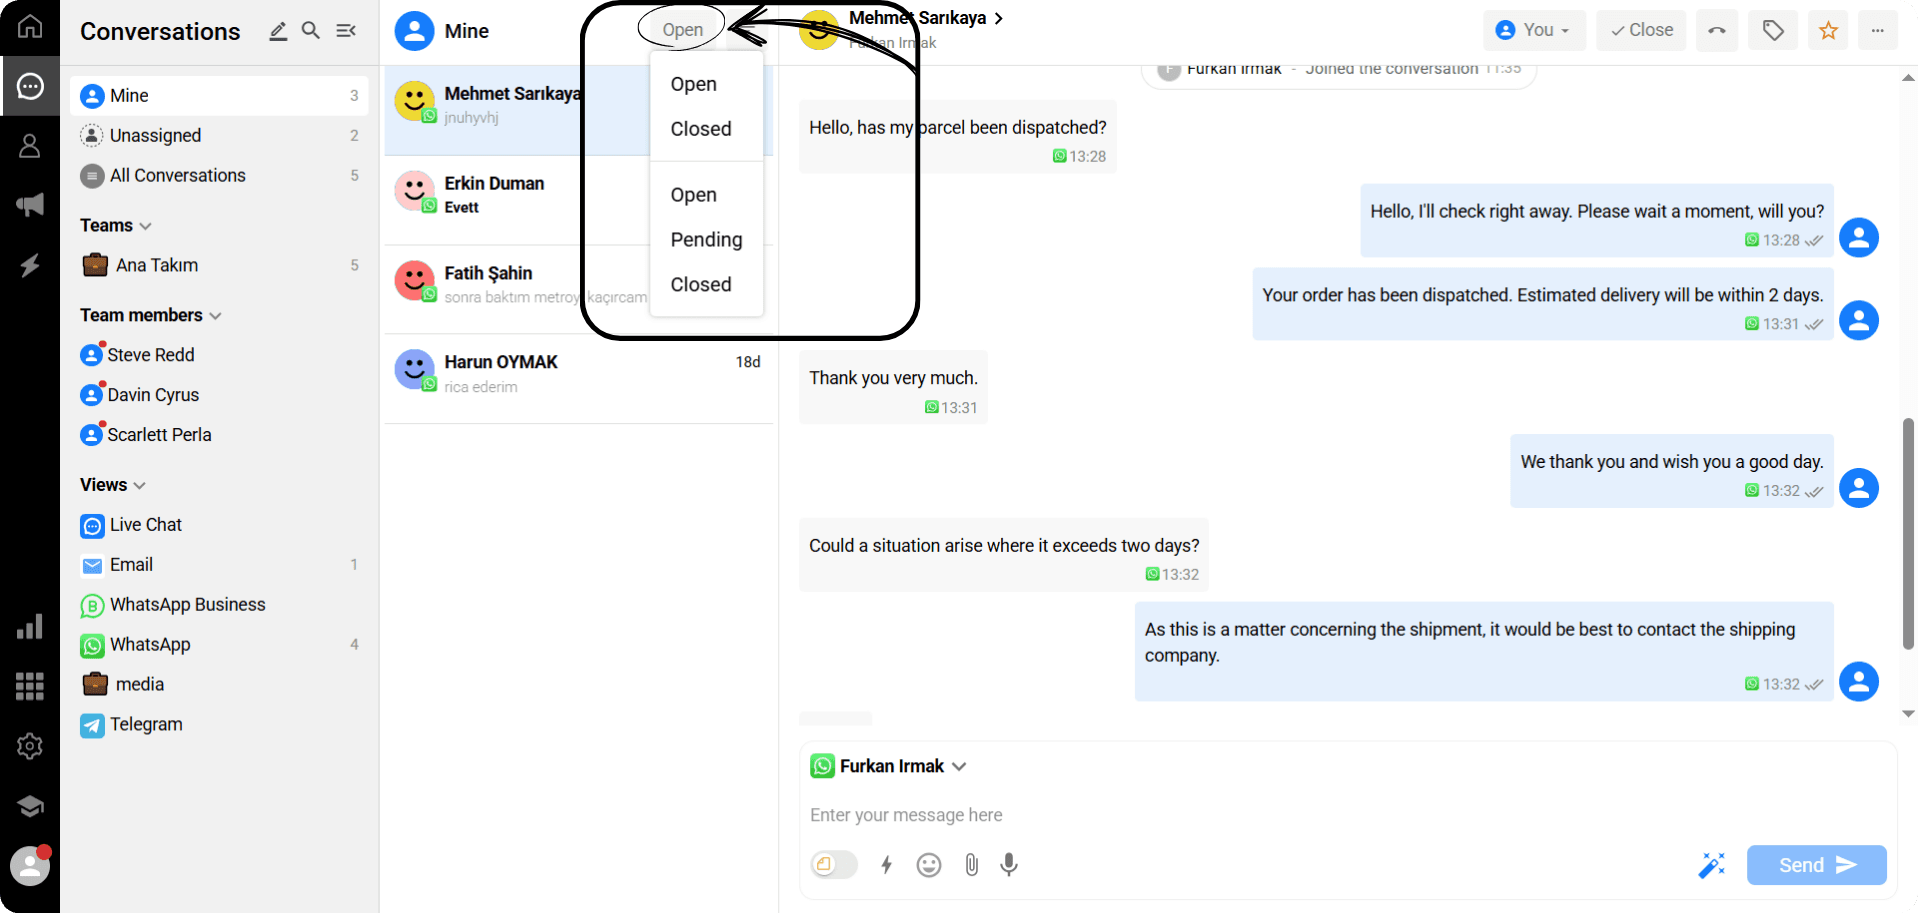
When you click the arrow icon at the top of the conversation list, a filter panel opens just below it.
From this panel, you can select which conversations to display based on their status.
For example, by selecting the “Open” filter, you can view only the conversations that have not yet been closed.
This allows you to easily see only the conversations in the status you need.
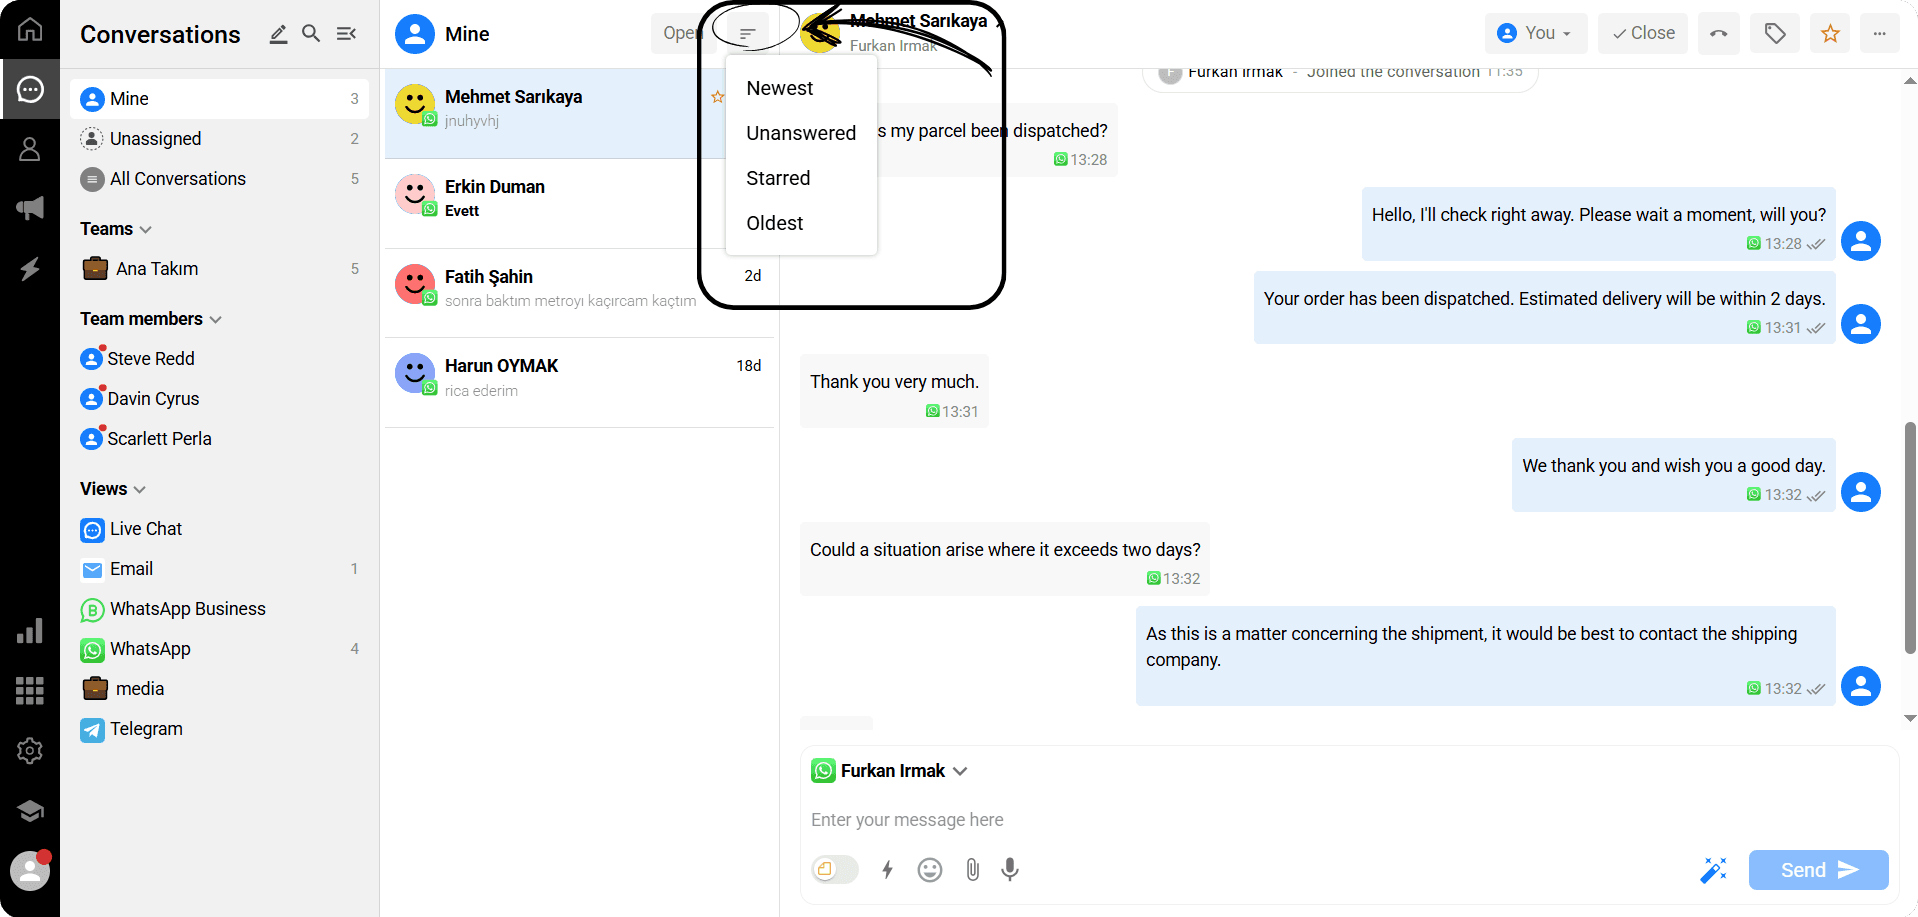
When you click the arrow icon in the conversation list, a sorting menu will open.
From this menu, you can sort your conversations according to the criteria you want.
For example:
Newest Messages
Unanswered
Starred Messages
Oldest Messages
This way, you can view your conversations based on your needs and easily manage your priorities.
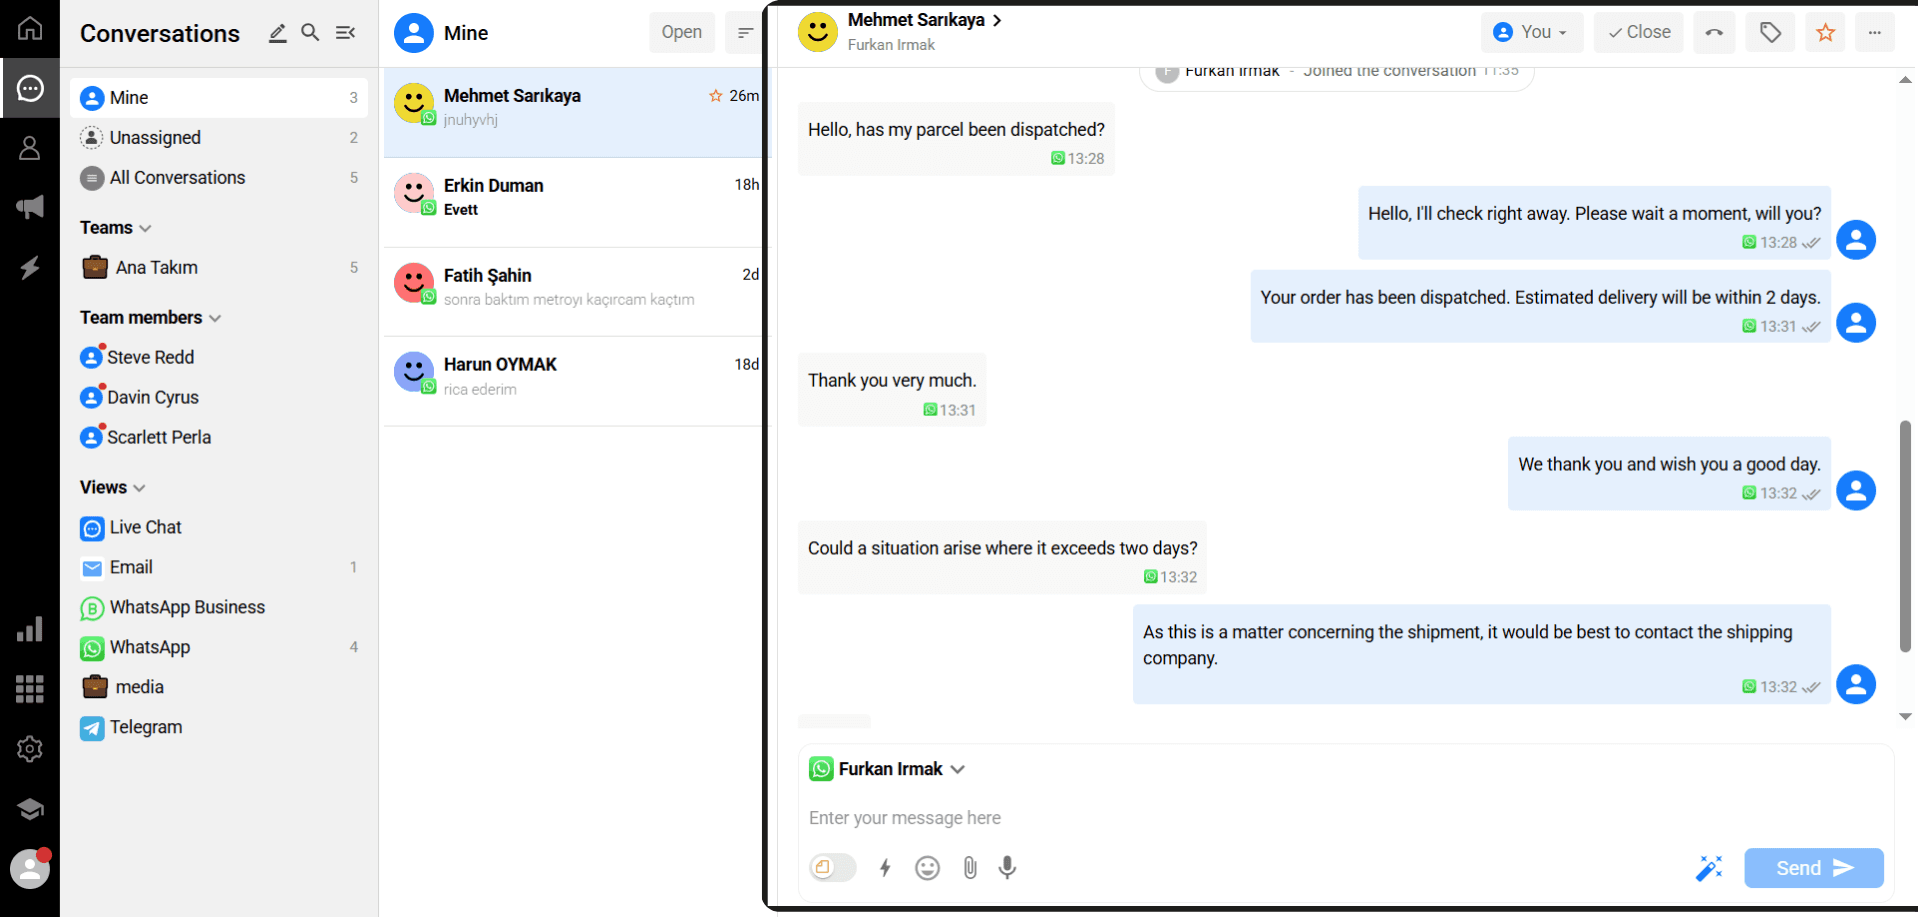
In this section, you can communicate with the customer one-on-one.
The user’s name is displayed at the top.
Below, your messages and the customer’s messages are listed in order.
You can quickly reply using the message input field at the bottom.
This way, all communication is managed clearly and efficiently on a single screen.
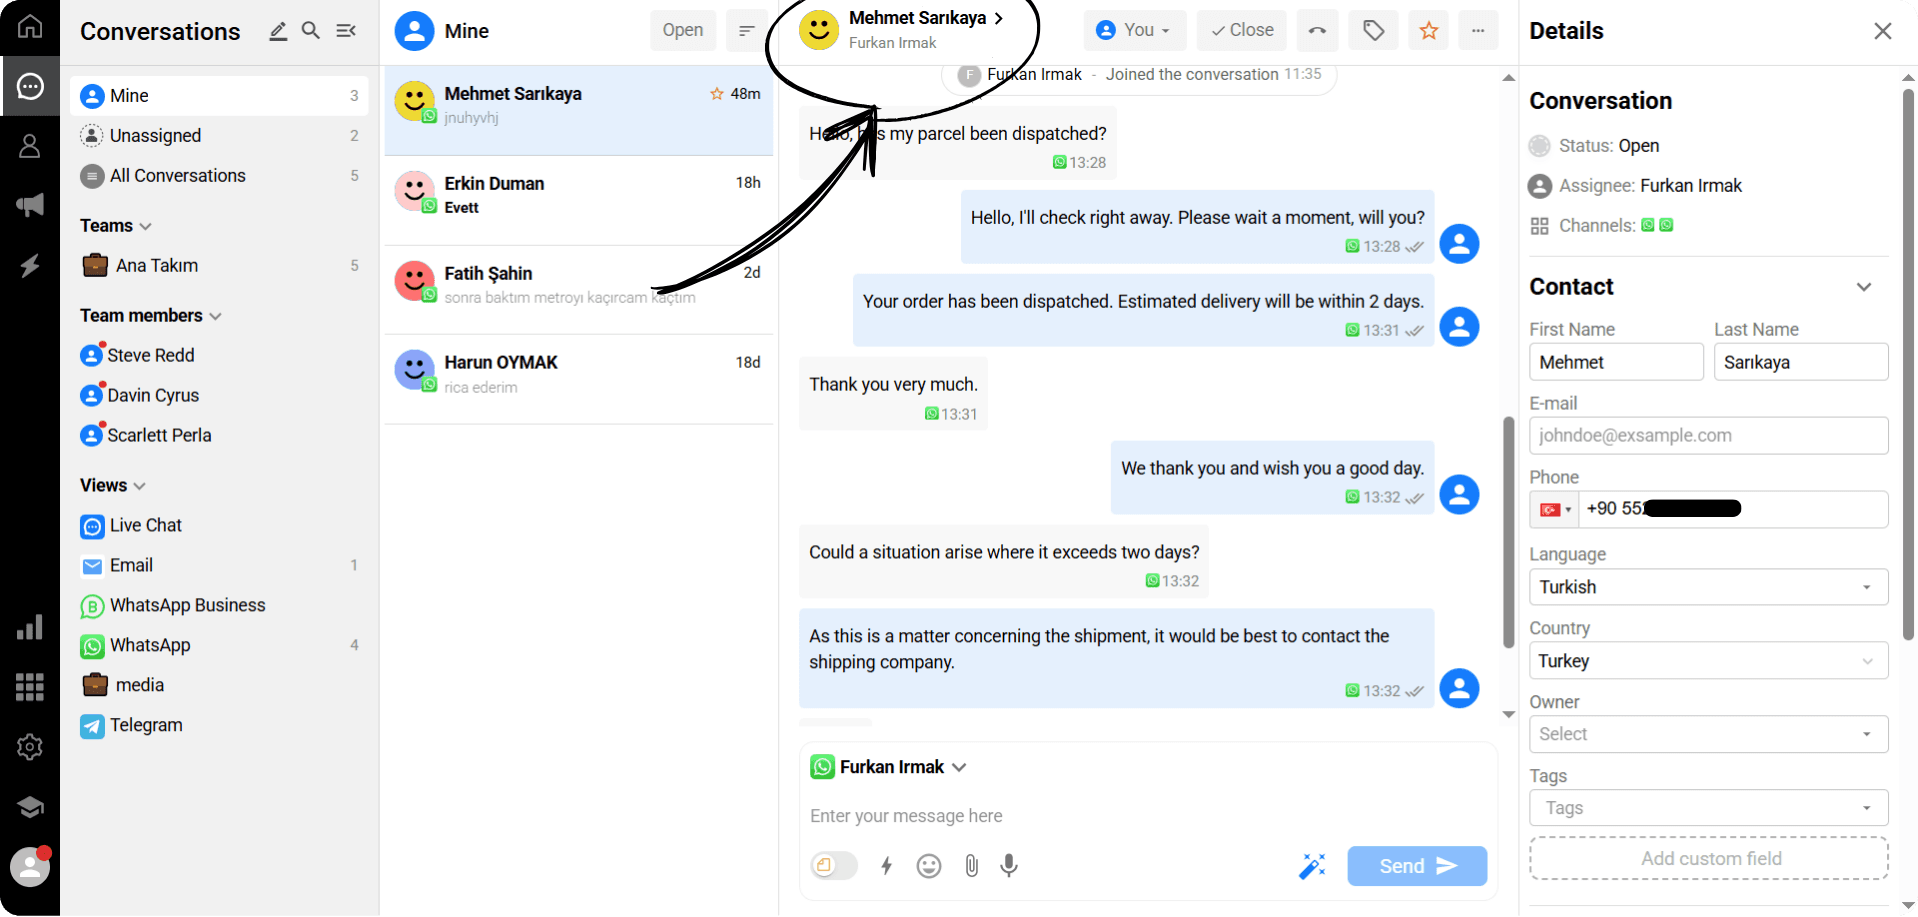
When you click on the relevant area in the conversation list, the details panel of the contact who opened the conversation will appear on the right side.
In this panel, you can view the contact’s information and other details.
This allows you to quickly access necessary information during the conversation and communicate more effectively.
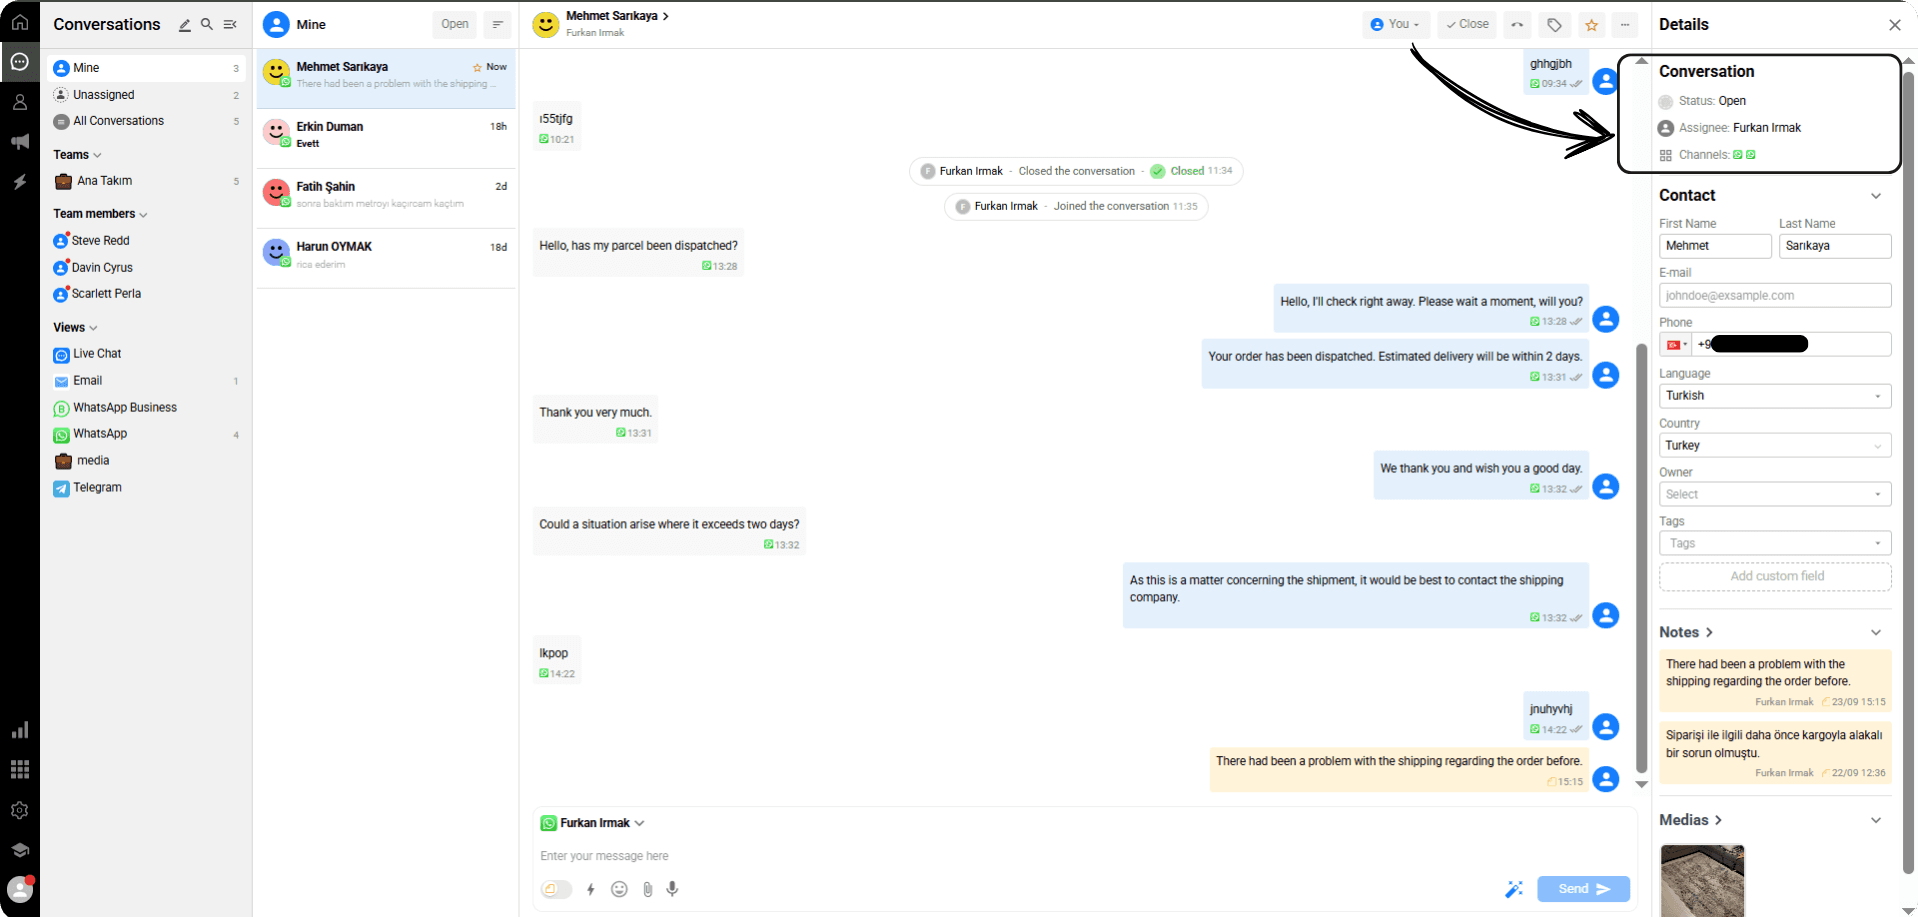
In the conversation panel, you can see the following information for each conversation:
Conversation status: Is it open or closed?
Assigned contact: Who the conversation is assigned to
Channel: Which platform the conversation is happening on
With this information, you can quickly track, manage, and prioritize your conversations.
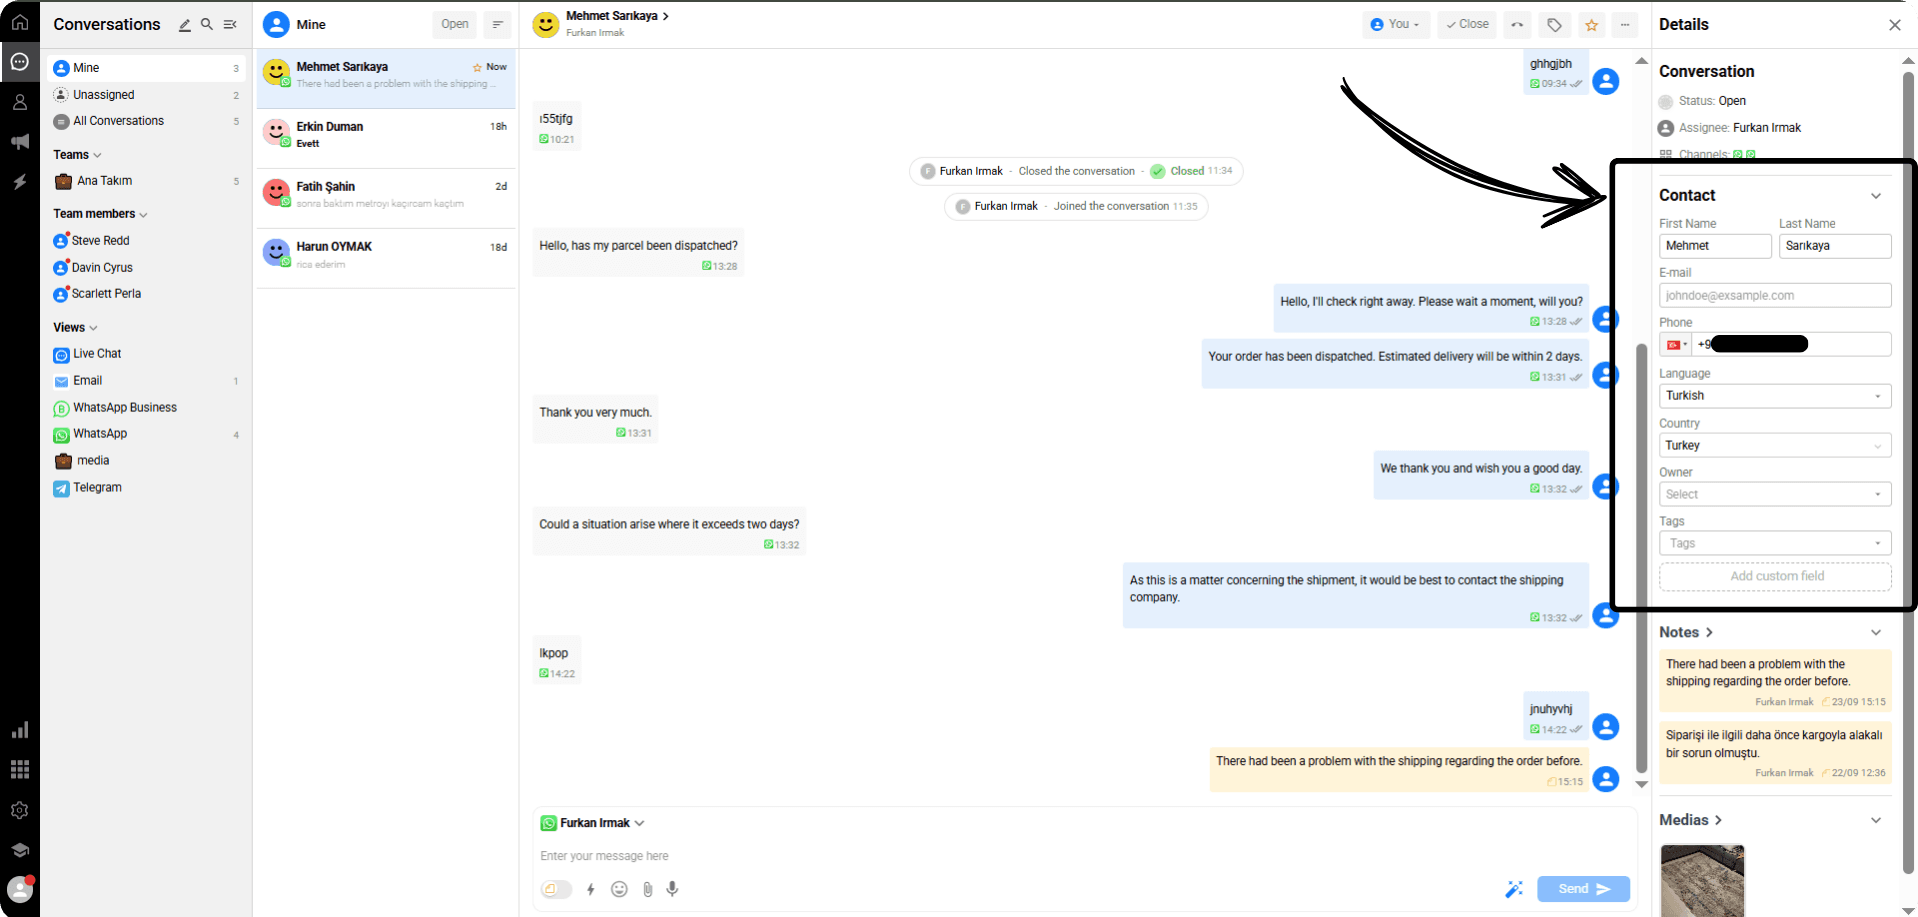
In the contact panel, you can view information such as the user’s first name, last name, phone number, e-mail, language, and tags.
You can make changes or add information in these fields.
You can also include any custom fields you previously created, allowing you to tailor the contact information according to your needs.
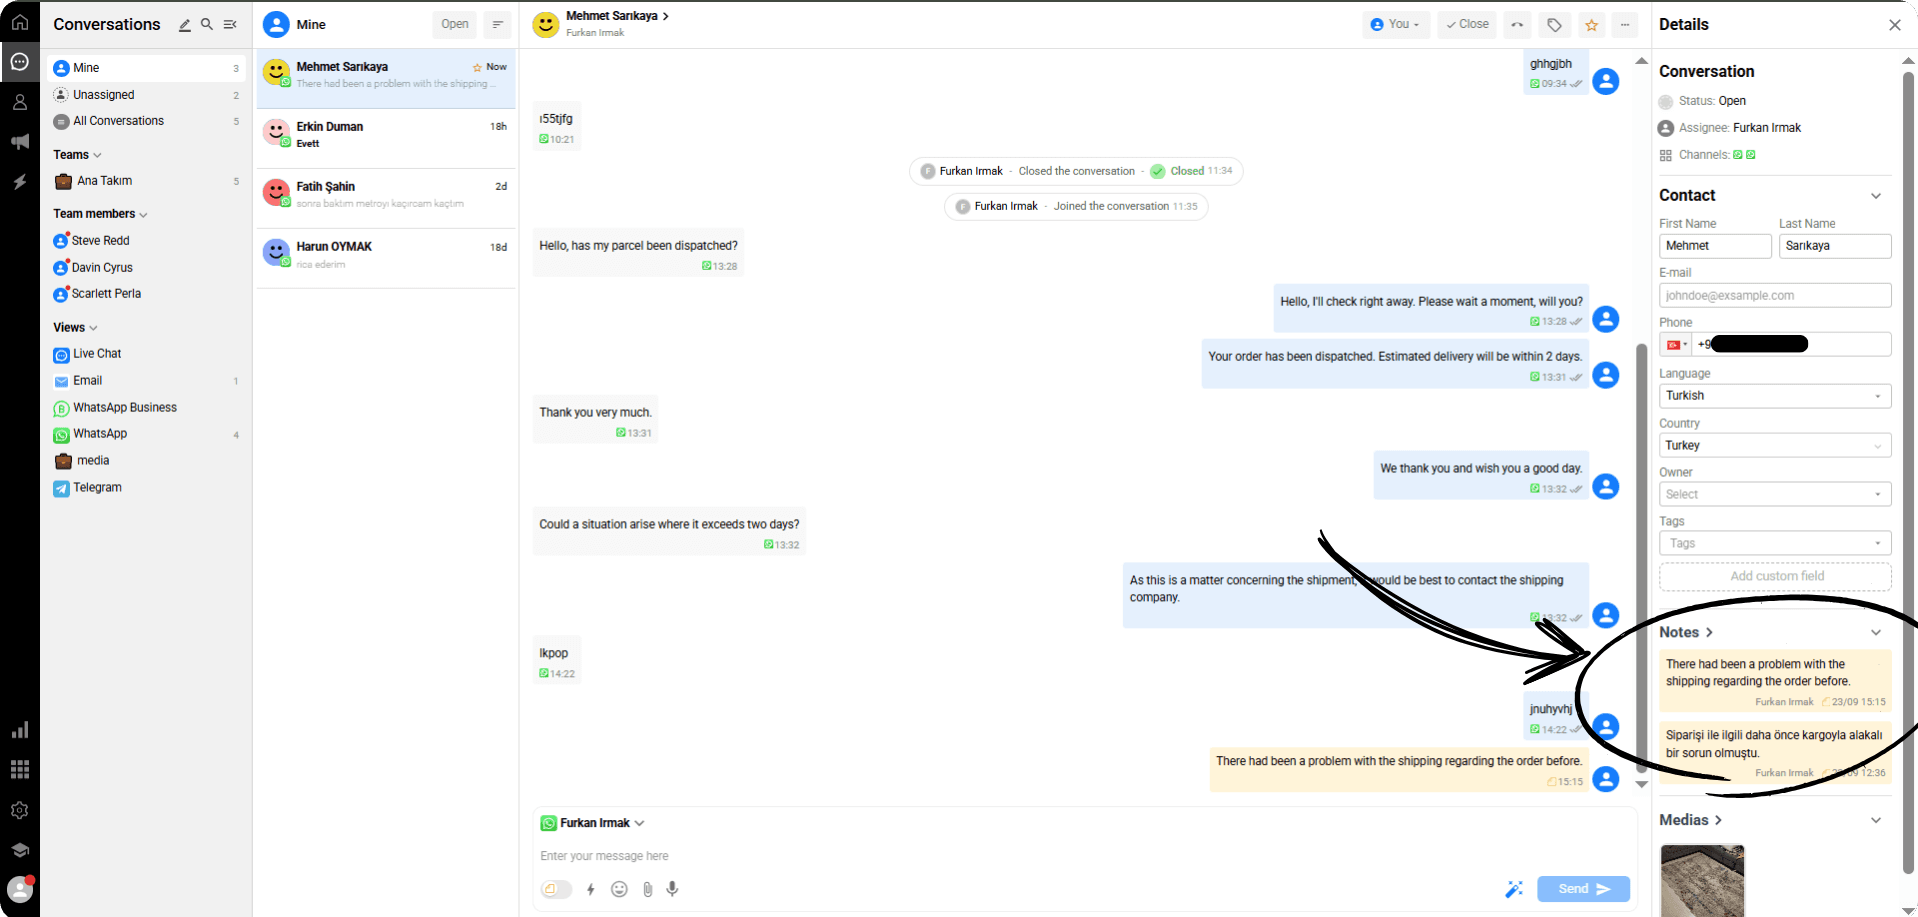
The Notes section allows you to view all the notes you’ve taken throughout the conversation.
This way, you can quickly recall important information and easily access your notes whenever needed.
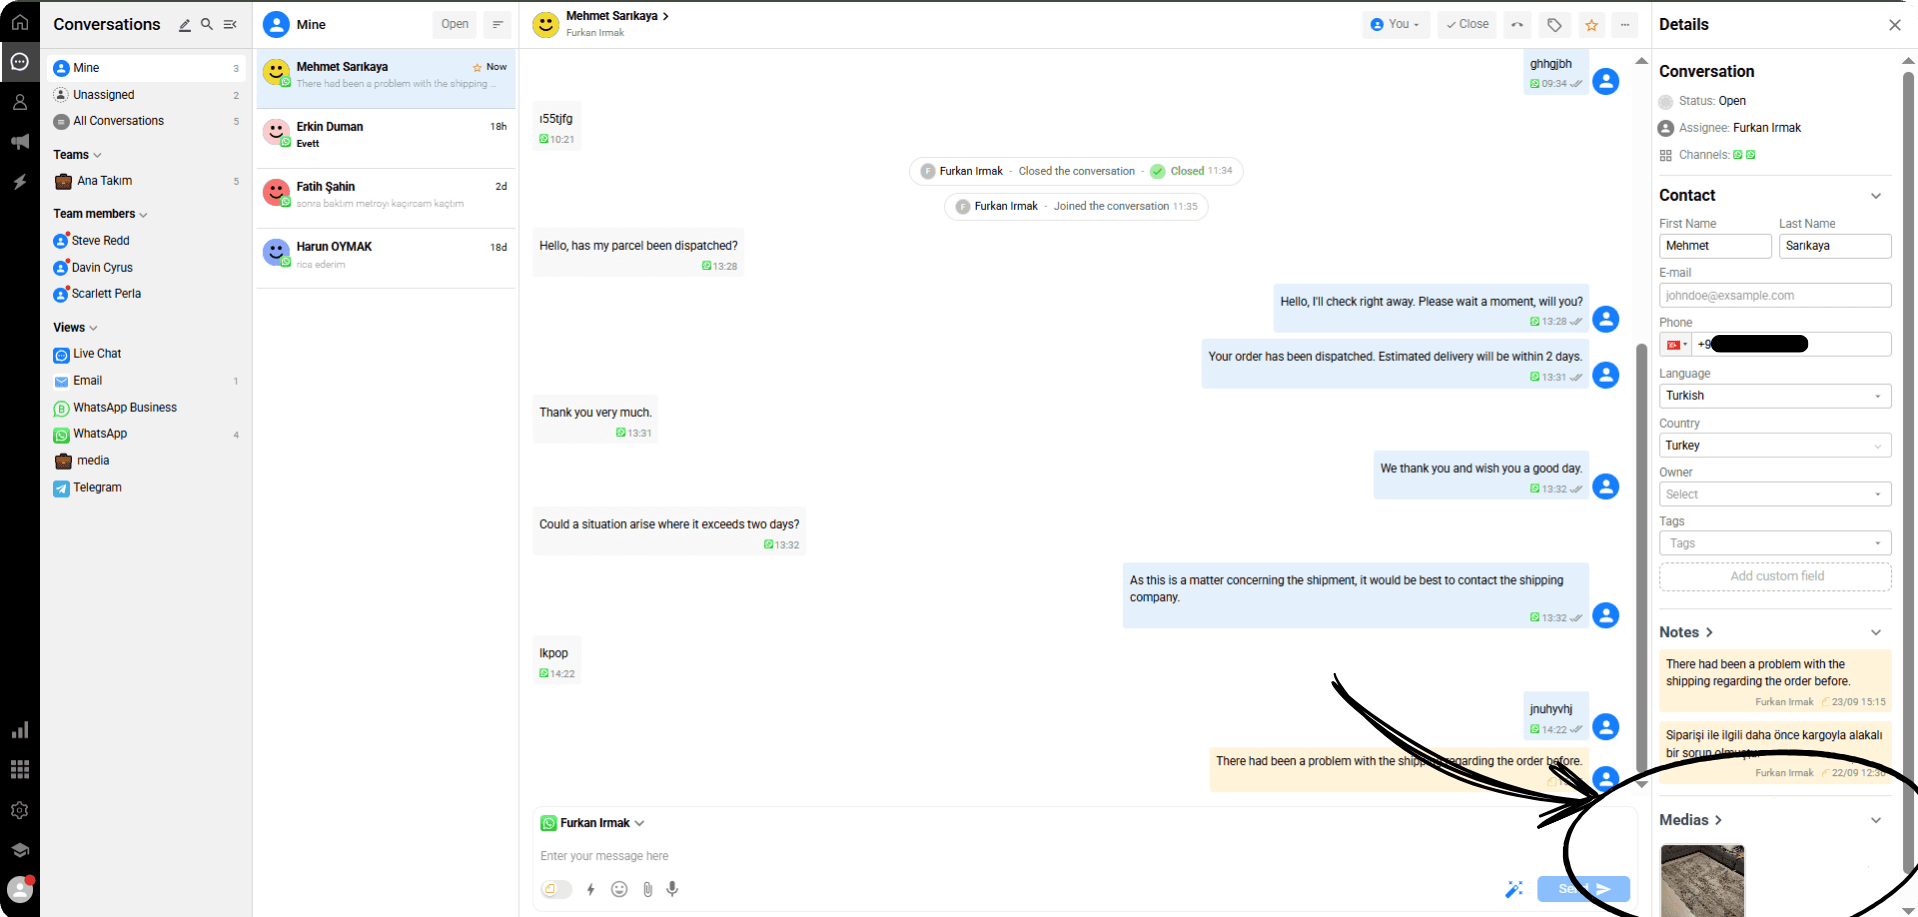
The Media section allows you to view all photos, videos, and voice recordings exchanged during the conversation.
This way, you can quickly access shared content and review it whenever needed.
Assignment to a Person
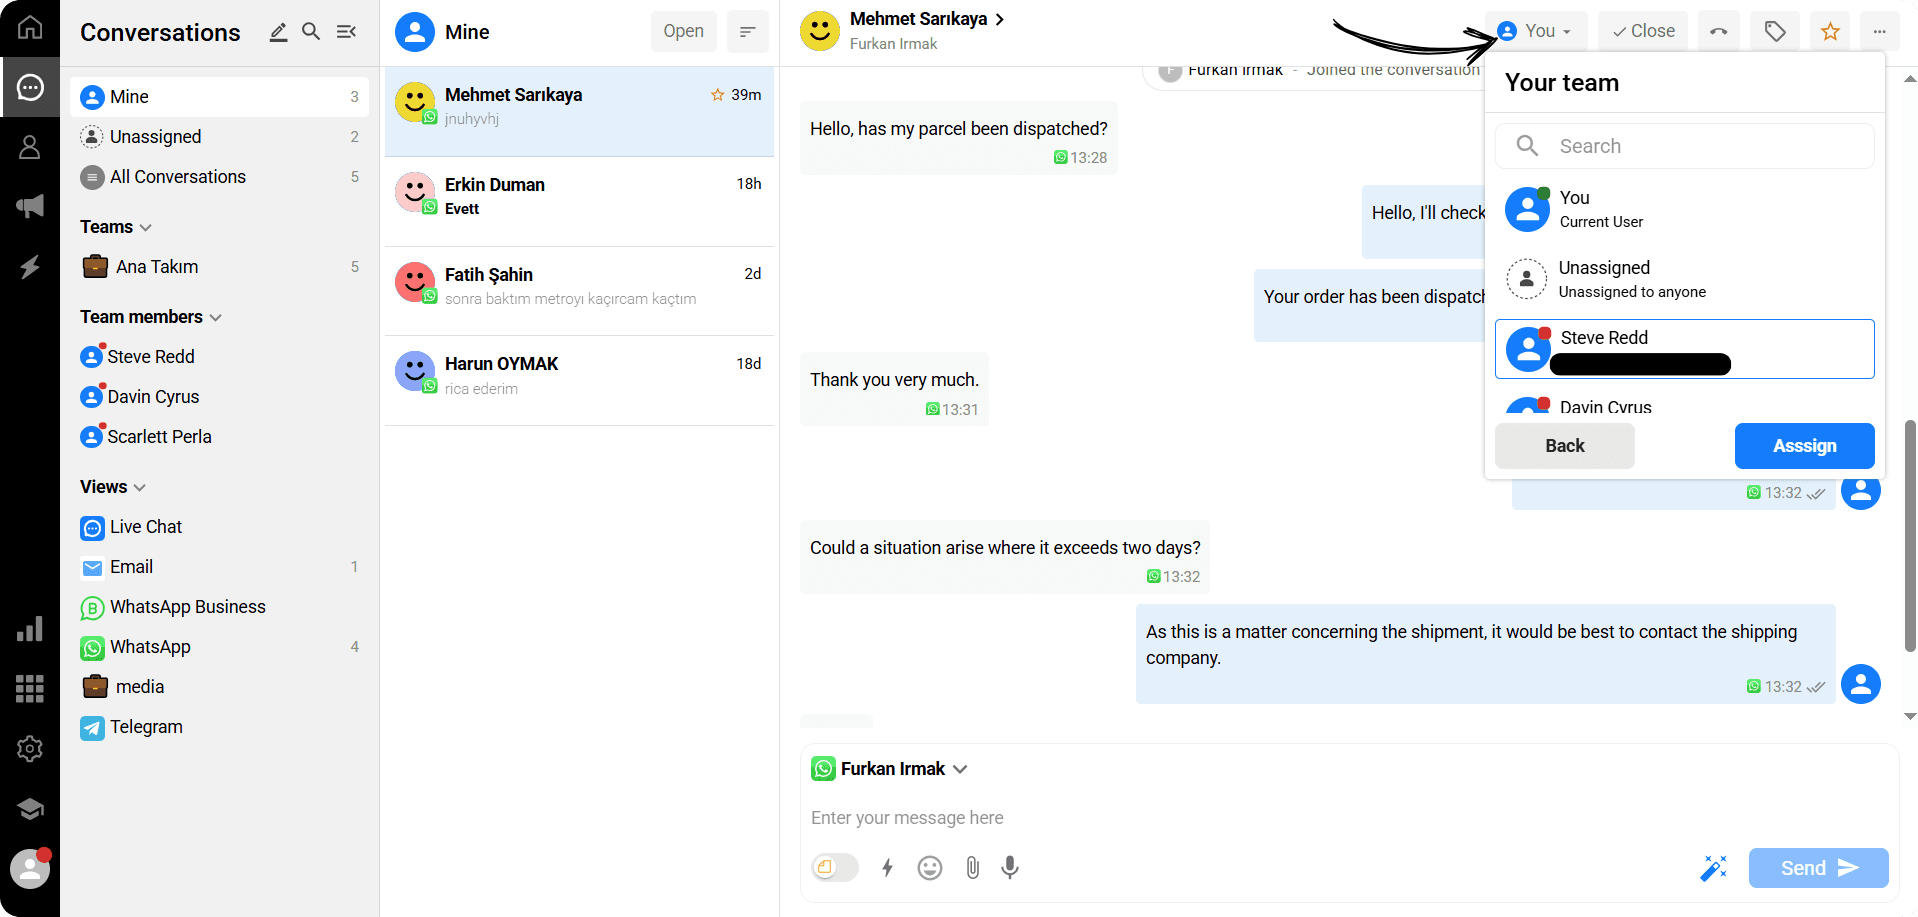
The “You” field next to the messages in the conversation list shows who the open conversation is assigned to.
Clicking this field opens a panel displaying a list of your team members.
Select the person you want to assign the conversation to from the list.
Finally, click the “Assign” button to complete the process.
This feature allows you to easily direct conversations to the appropriate team members, ensuring customer requests are resolved more quickly.
Close Conversation
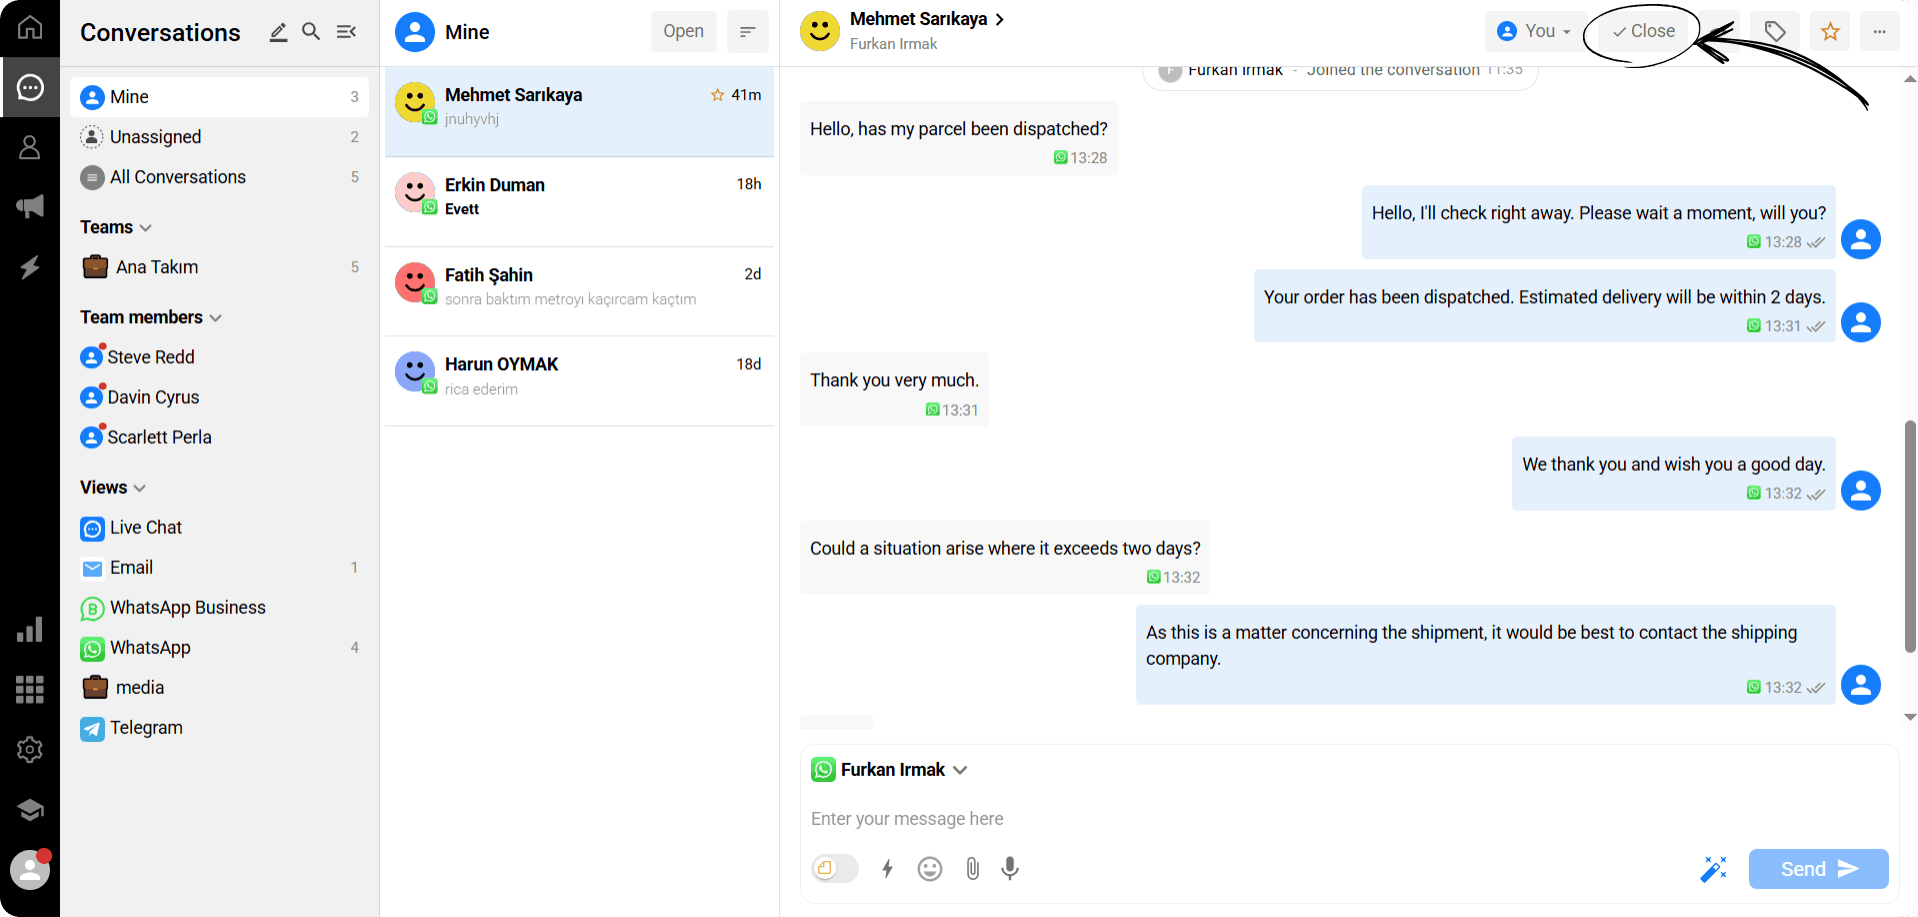
After finishing a conversation with a customer, you can keep your inbox organized by clicking the “Close” button to end the conversation.
Closed conversations will no longer appear in the active list, helping your inbox stay free from unnecessary clutter.
You can access past conversations at any time to review closed interactions.
Call
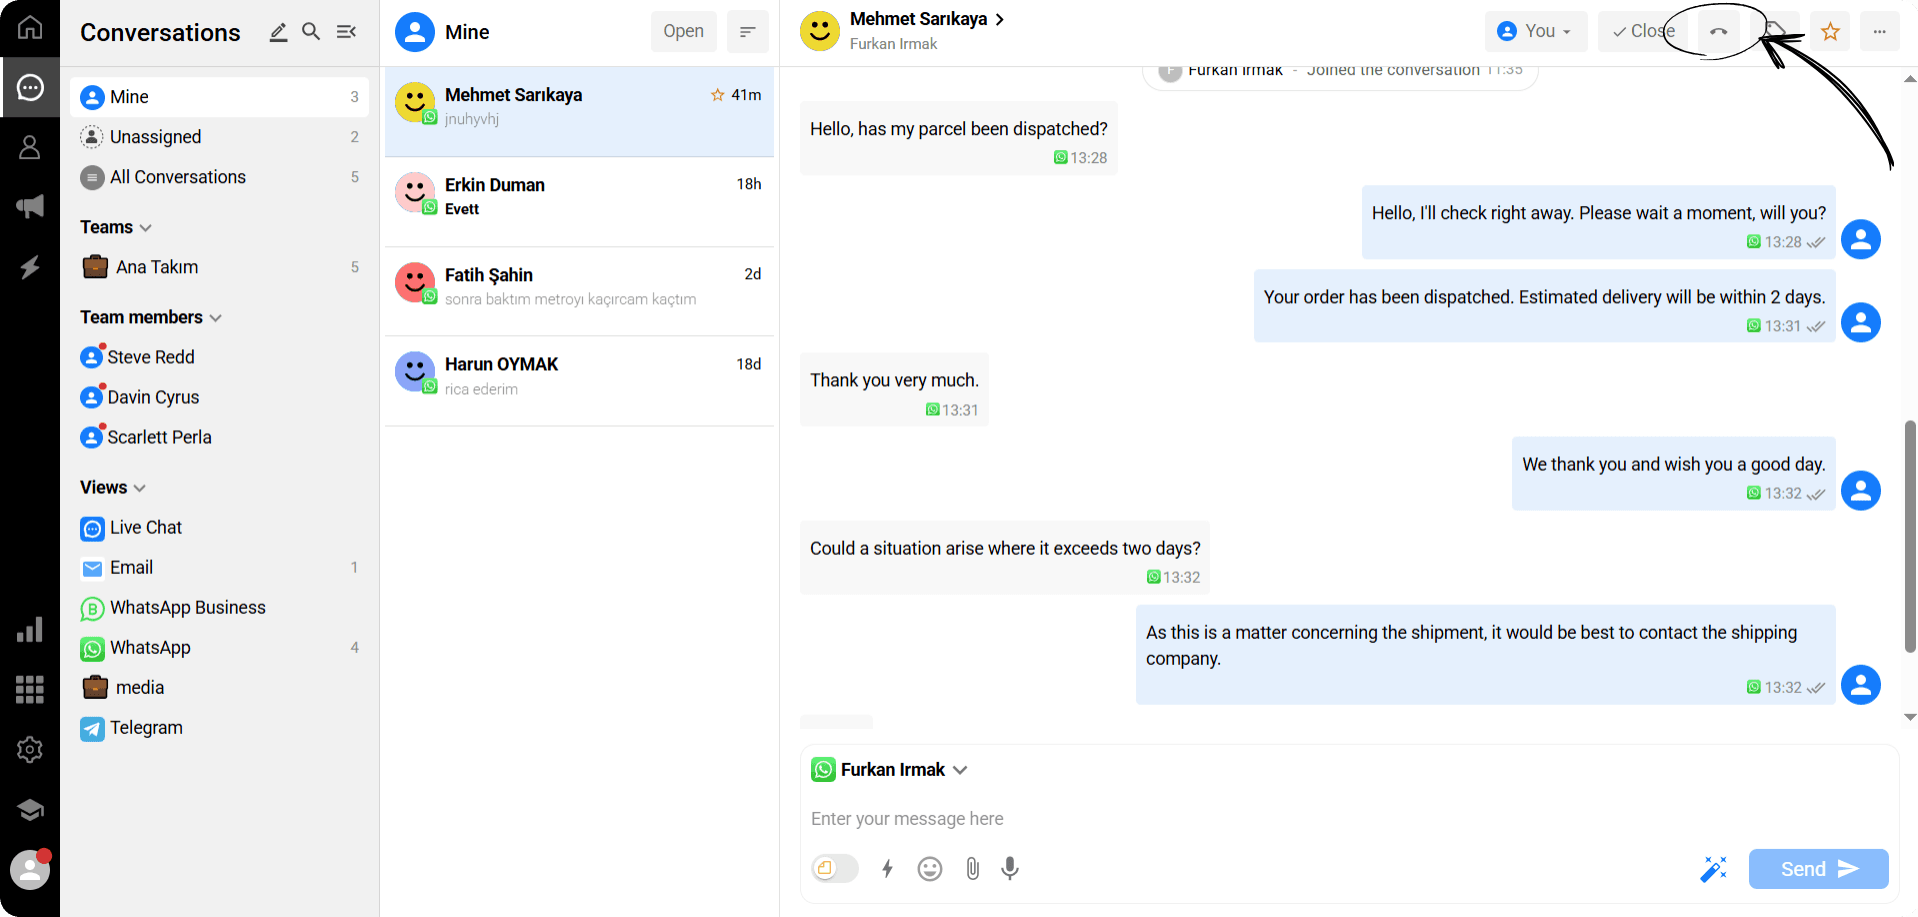
While communicating with an active contact in the conversation screen, you can initiate a call directly by clicking the phone icon.
However, to make a call, your account must have calling permissions enabled.
If your permissions are active, you can start the call with a single click.
Tags
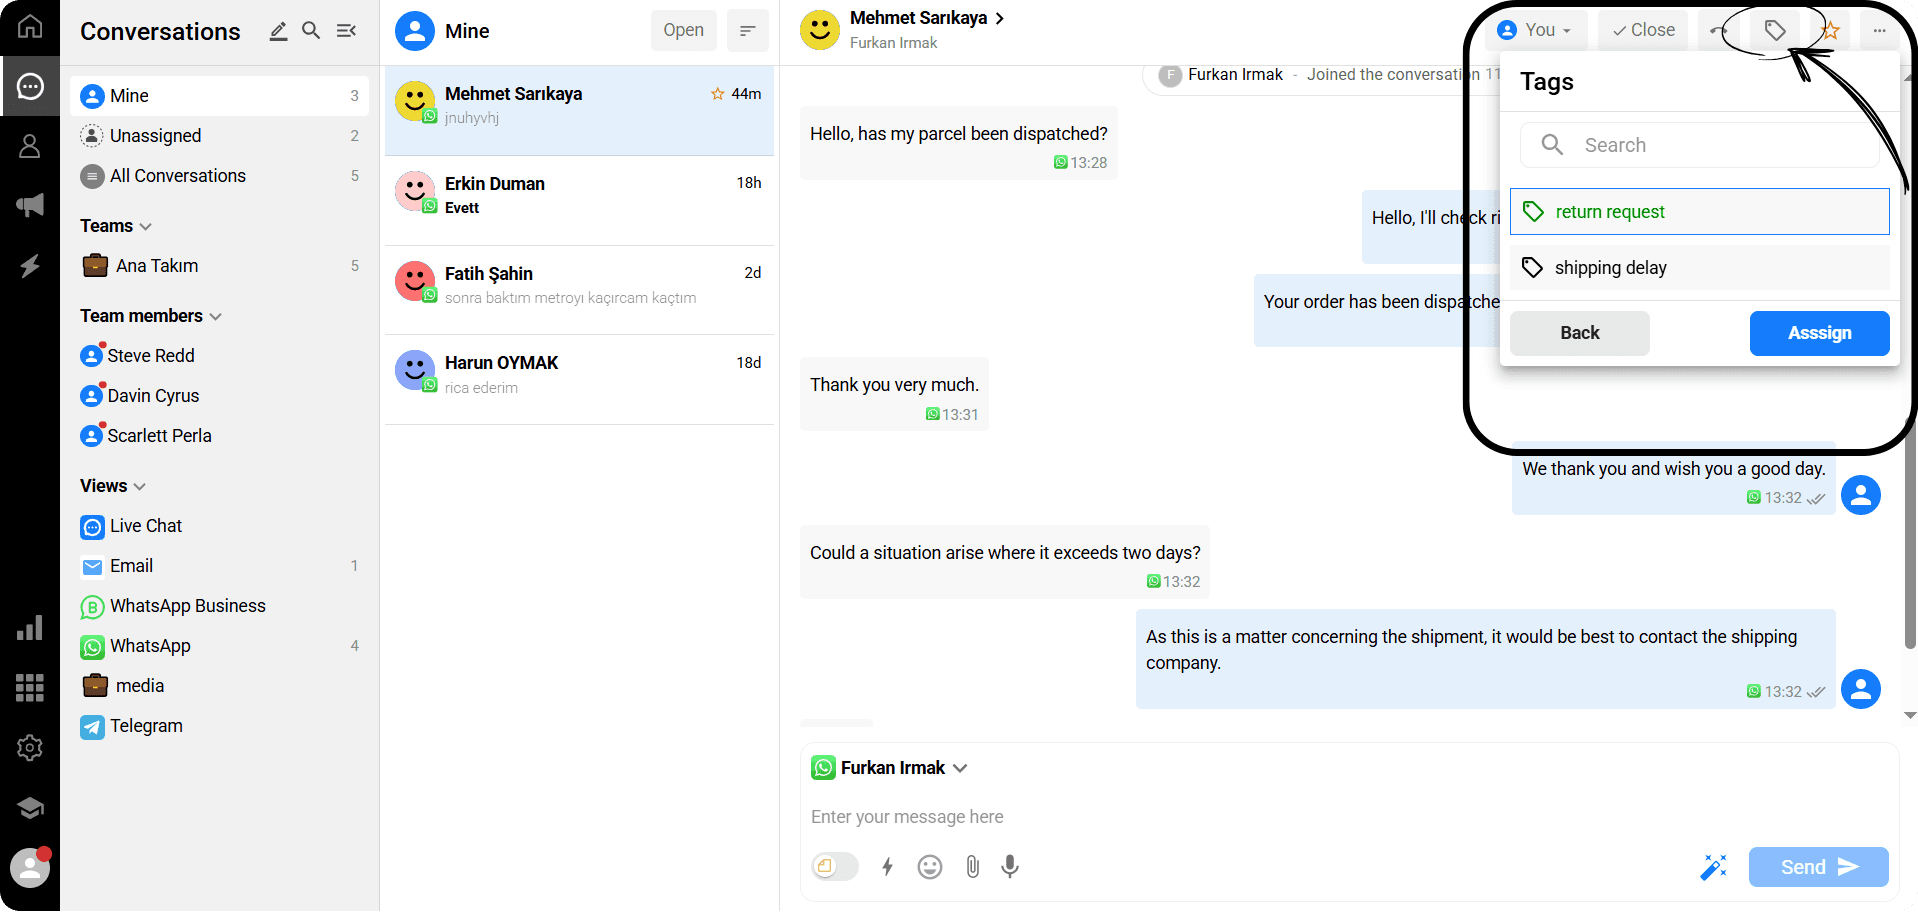
In Qpien, tags allow you to categorize conversations, contacts, or campaigns for more organized and efficient management.
To add a tag to a conversation:
Click on the tag you want to add.
In the panel that opens, select the relevant tag.
Click the “Assign” button to complete the addition.
You can see the added tag in the section where conversations are listed.
To remove a tag:
Open the same panel.
Click on the tag you want to remove again.
Click the “Assign” button to remove the tag.
This way, you can easily classify and manage your conversations according to your desired criteria.
Staring

If an open conversation is important to you, you can click the star icon in the top-right corner to mark it as starred.
Starred conversations will appear in the conversation list with a star icon, making it easy to identify and quickly access your important conversations.
Putting Off the Conversation (Snoozing)
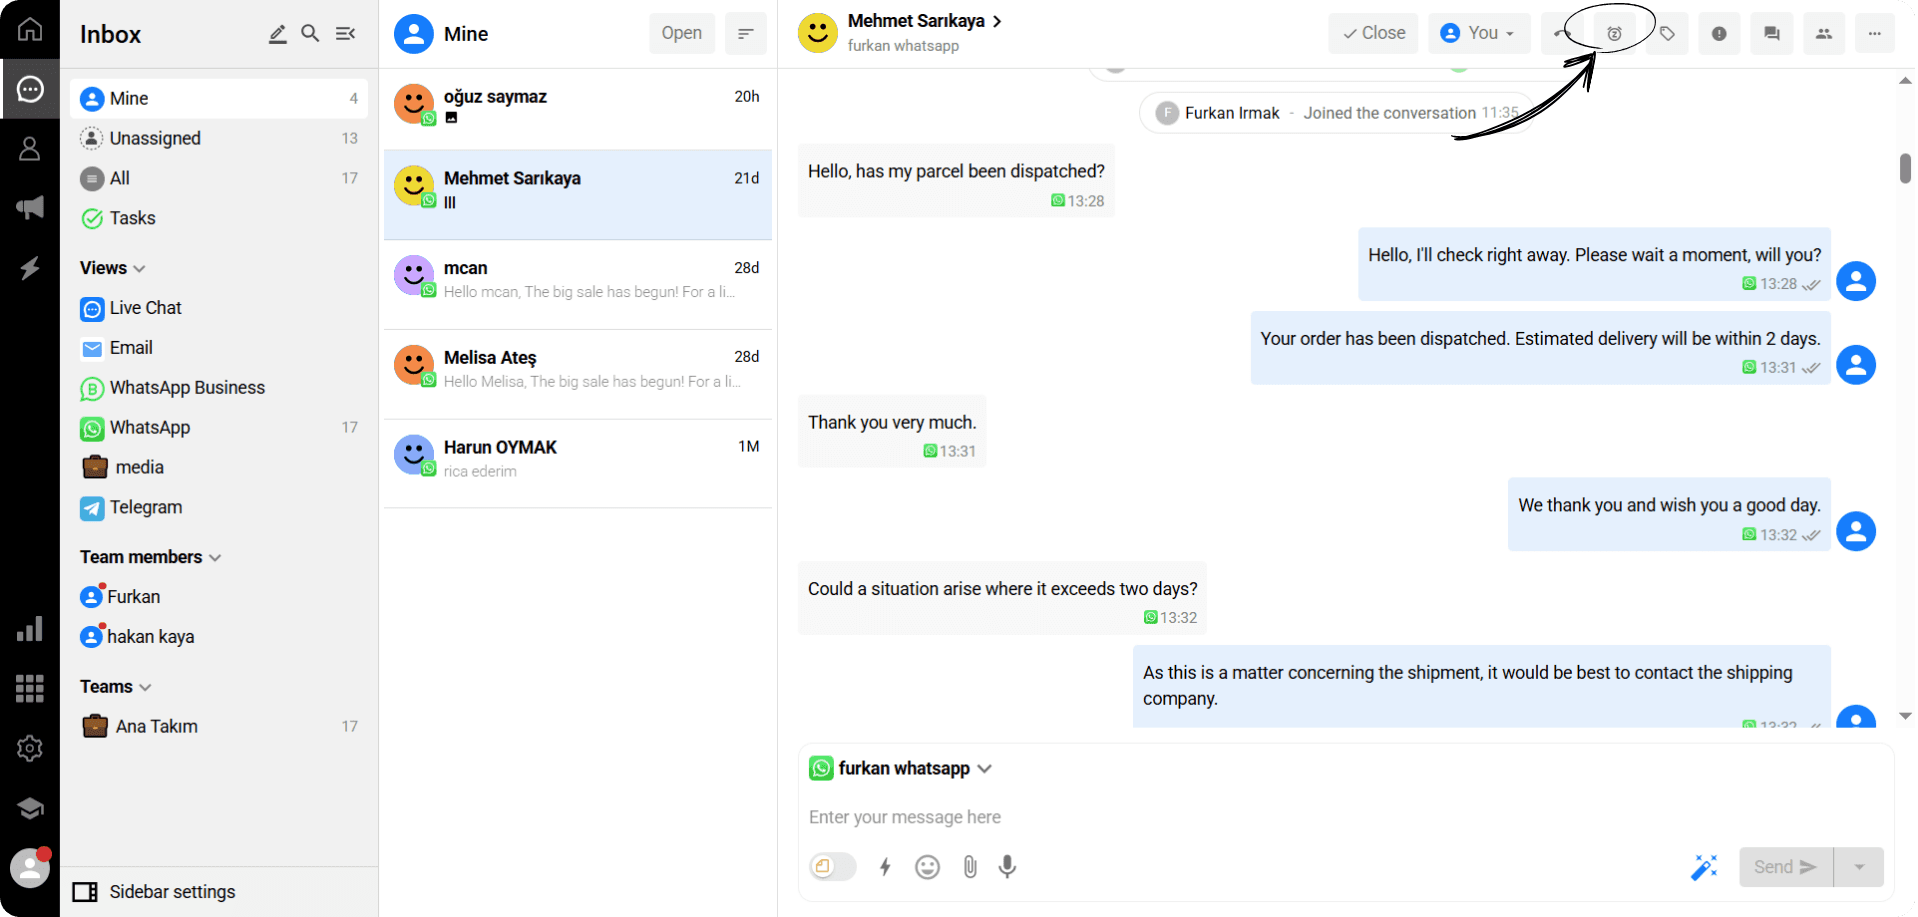
When you want to snooze a conversation until a specific time, select the “Snooze” option located at the top right.

In the panel that opens, you can choose when you want the conversation to become visible again.
When you select the “Custom Date” option, a scheduling screen appears where you can manually set the exact date and time for the conversation to reappear.
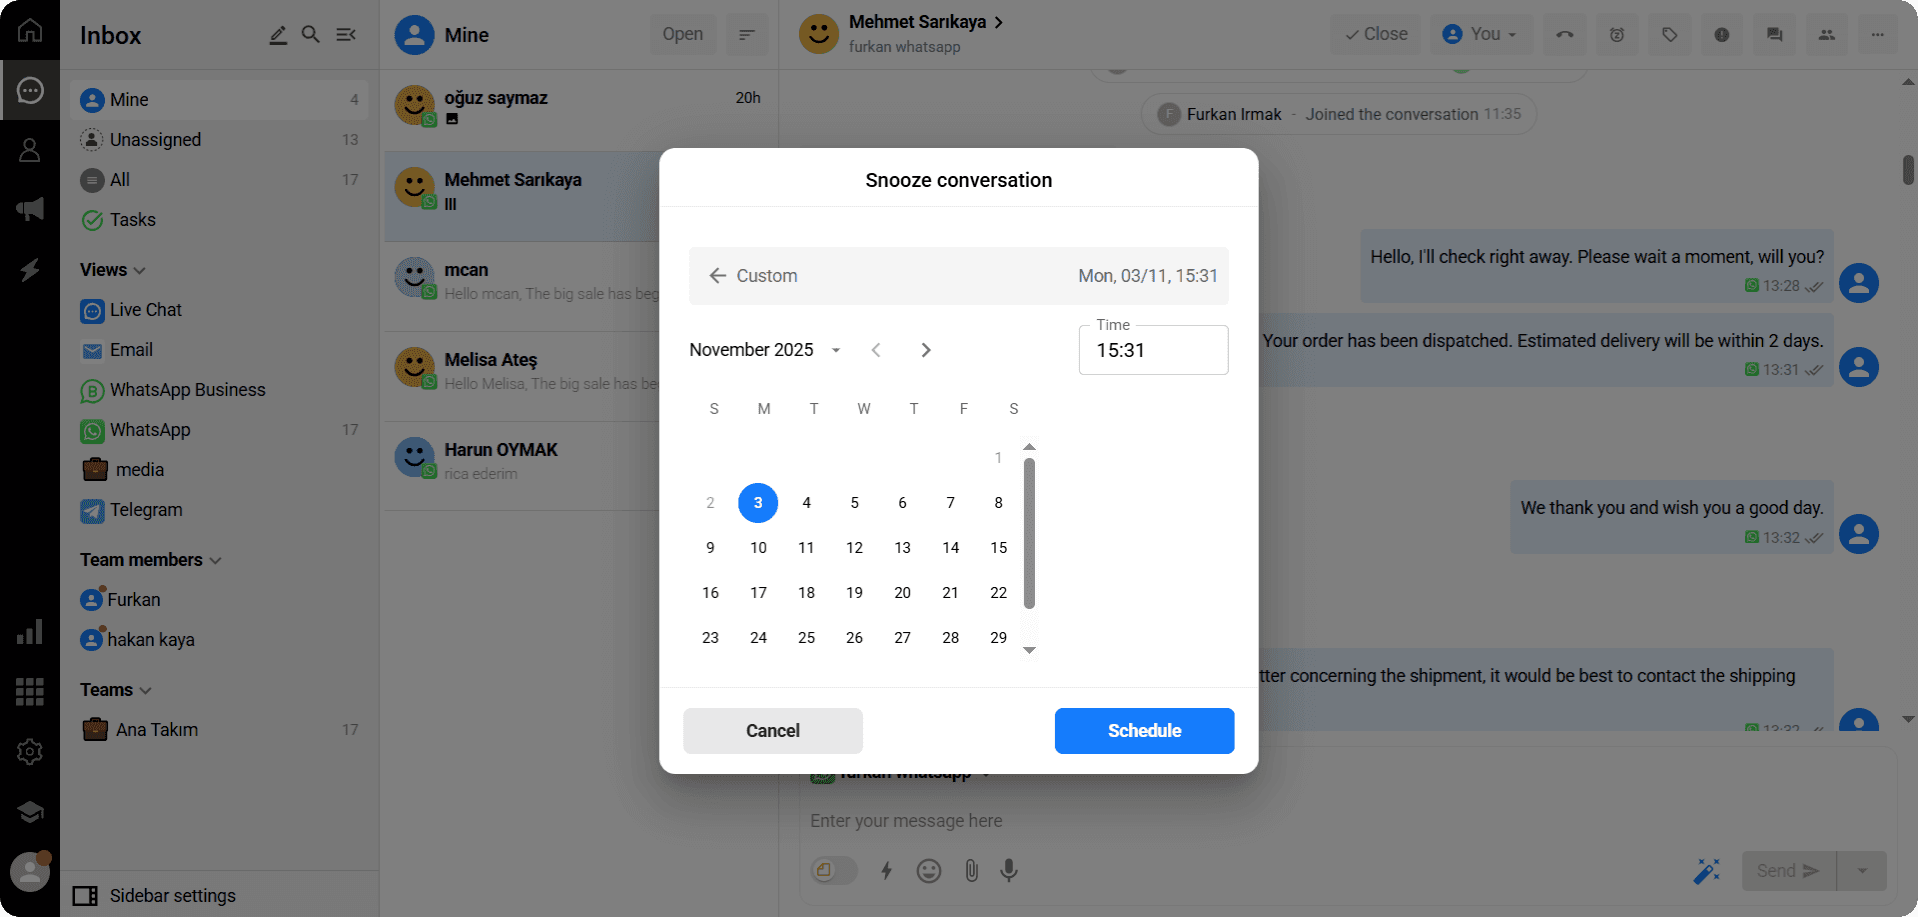
On this screen:
You can select the desired day from the calendar.
On the right side, in the “Time” field, you can enter the hour when the conversation will become active again.
After setting the date and time, click the “Schedule” button at the bottom of the screen.
Once you’ve chosen the time, click “Postpone” to complete the process.
The conversation will be hidden from your inbox until the selected time and will automatically reappear once the scheduled time is reached.
Mark as Spam
When there are unwanted or unnecessary conversations among the messages received through Qpien, you can mark those conversations as spam.
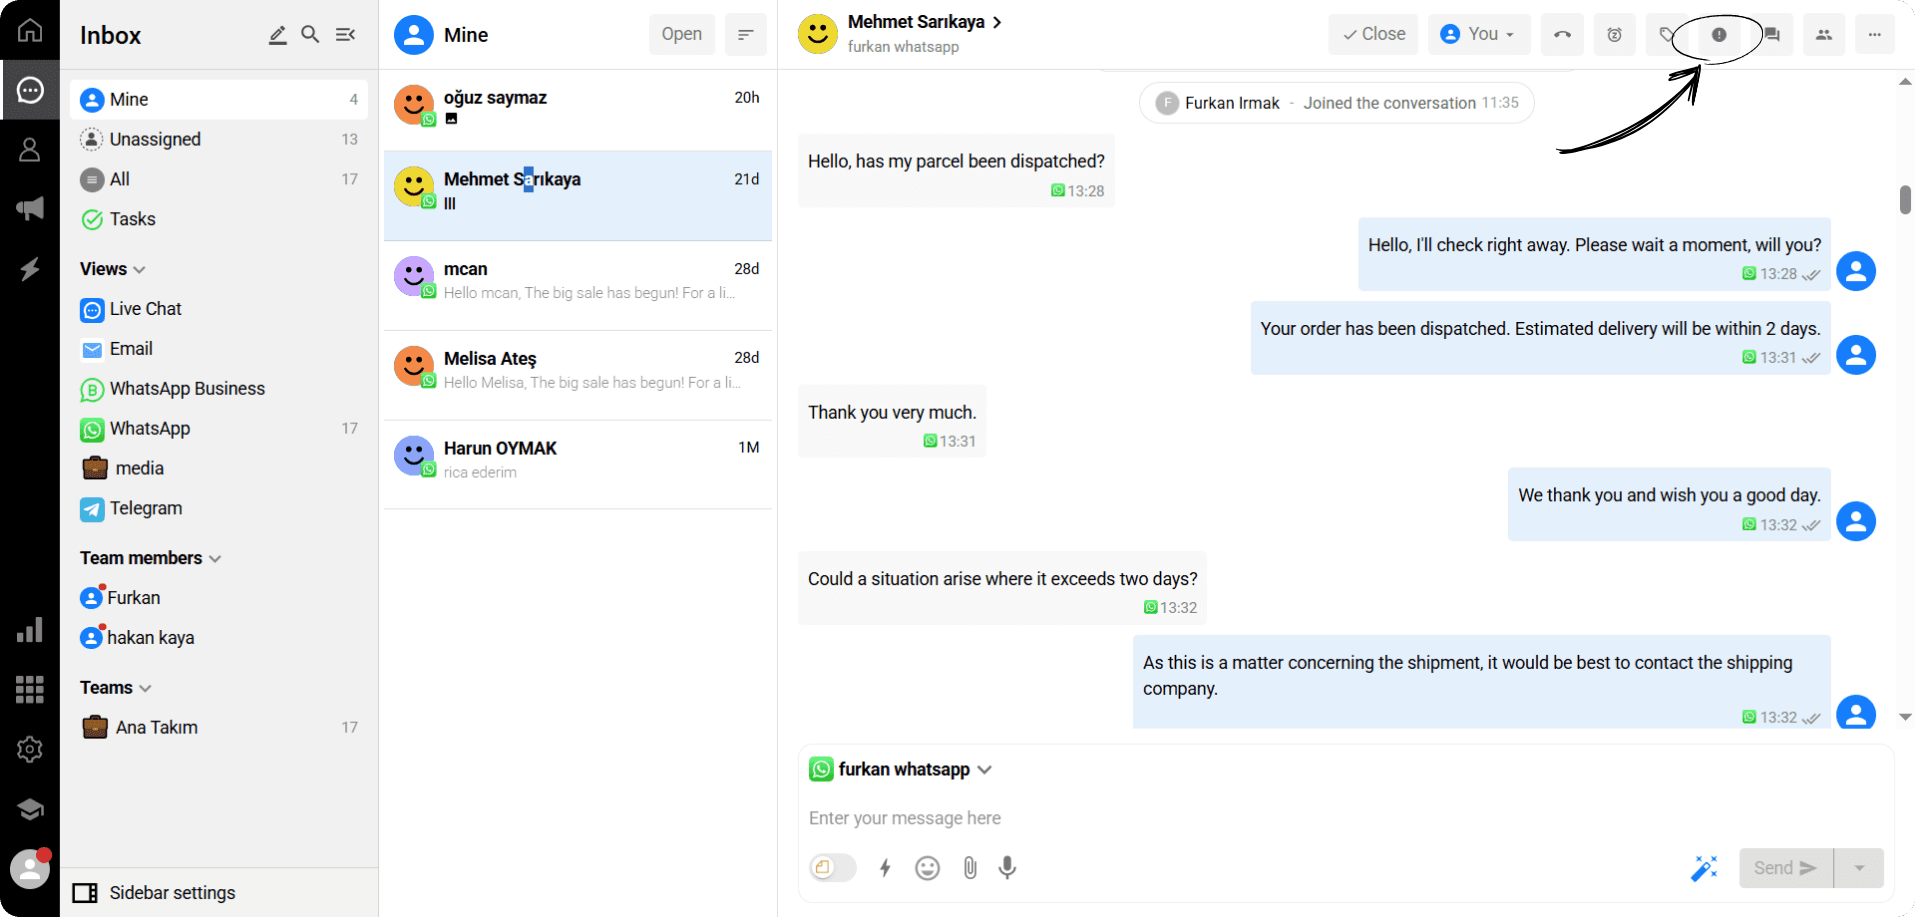
Click the “!” (warning icon) located at the top right corner of the conversation screen.
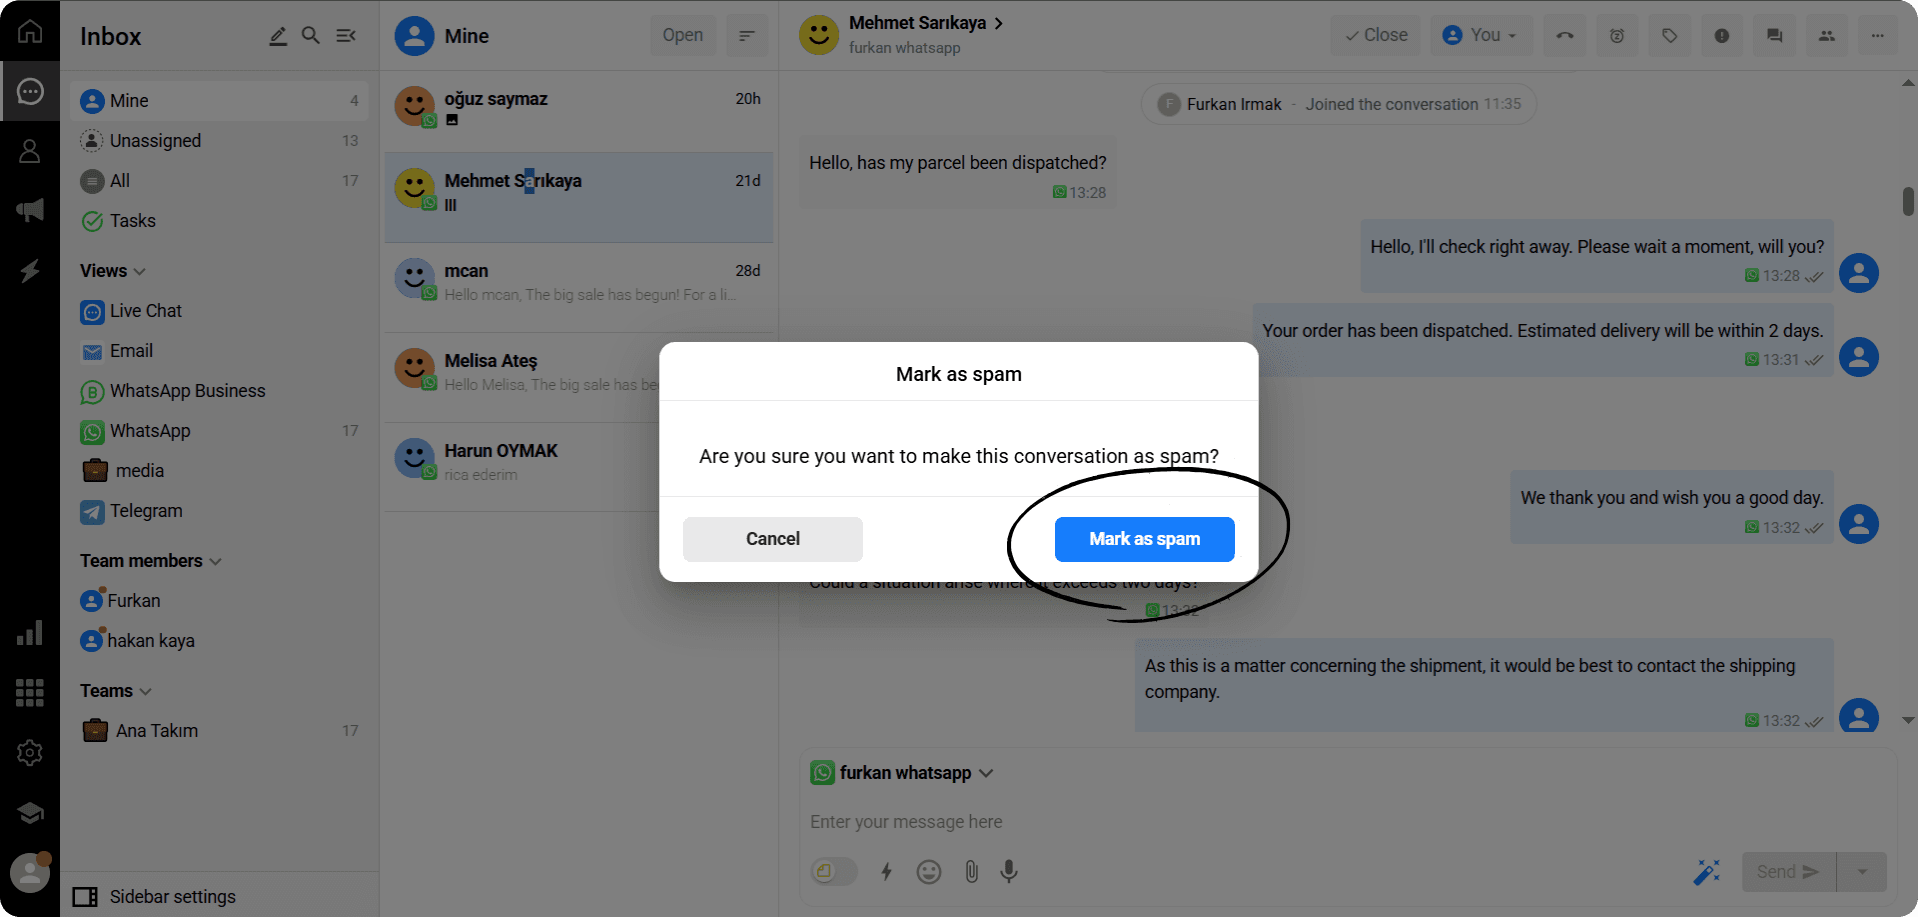
In the panel that opens, click the blue “Mark as Spam” button to complete the process.
The conversation you marked will now be listed as spam and will no longer appear in your inbox.
Notes
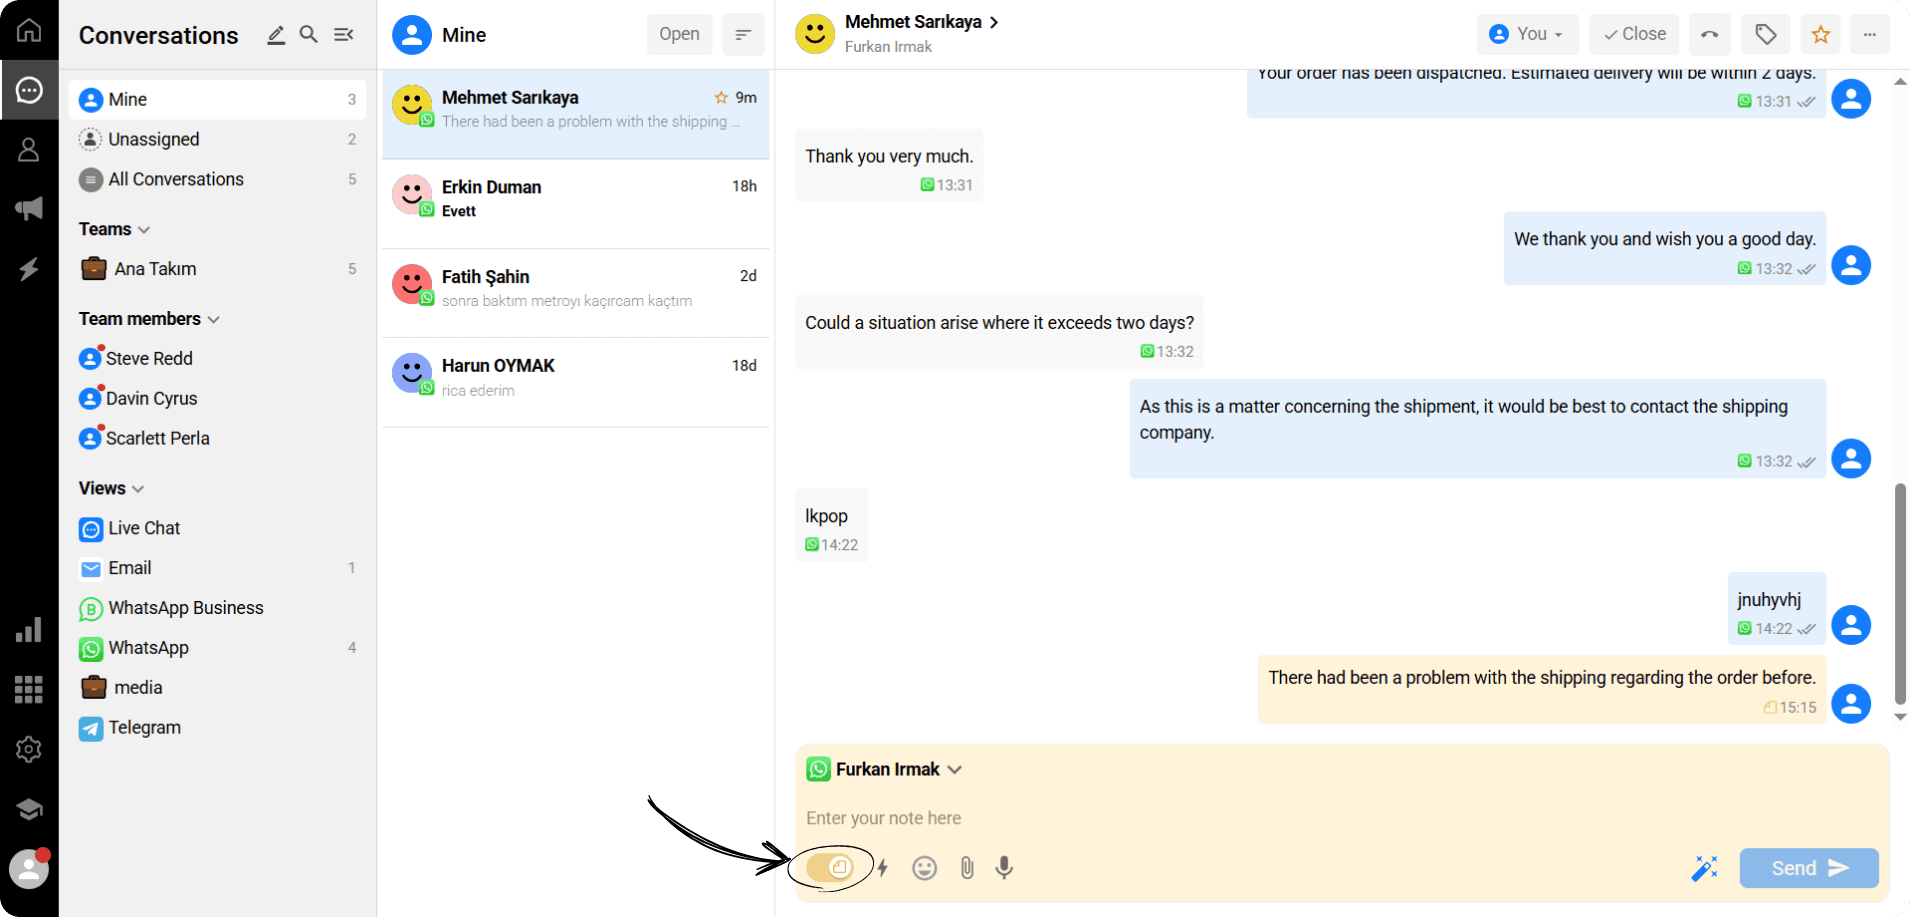
Using the relevant option in the conversation screen, you can switch between the Notes panel and the Messaging panel.
When Messaging Mode is active, anything you type is sent directly to the other party as a message.
When you switch to the Notes panel, your entries are saved as private notes visible only to you.
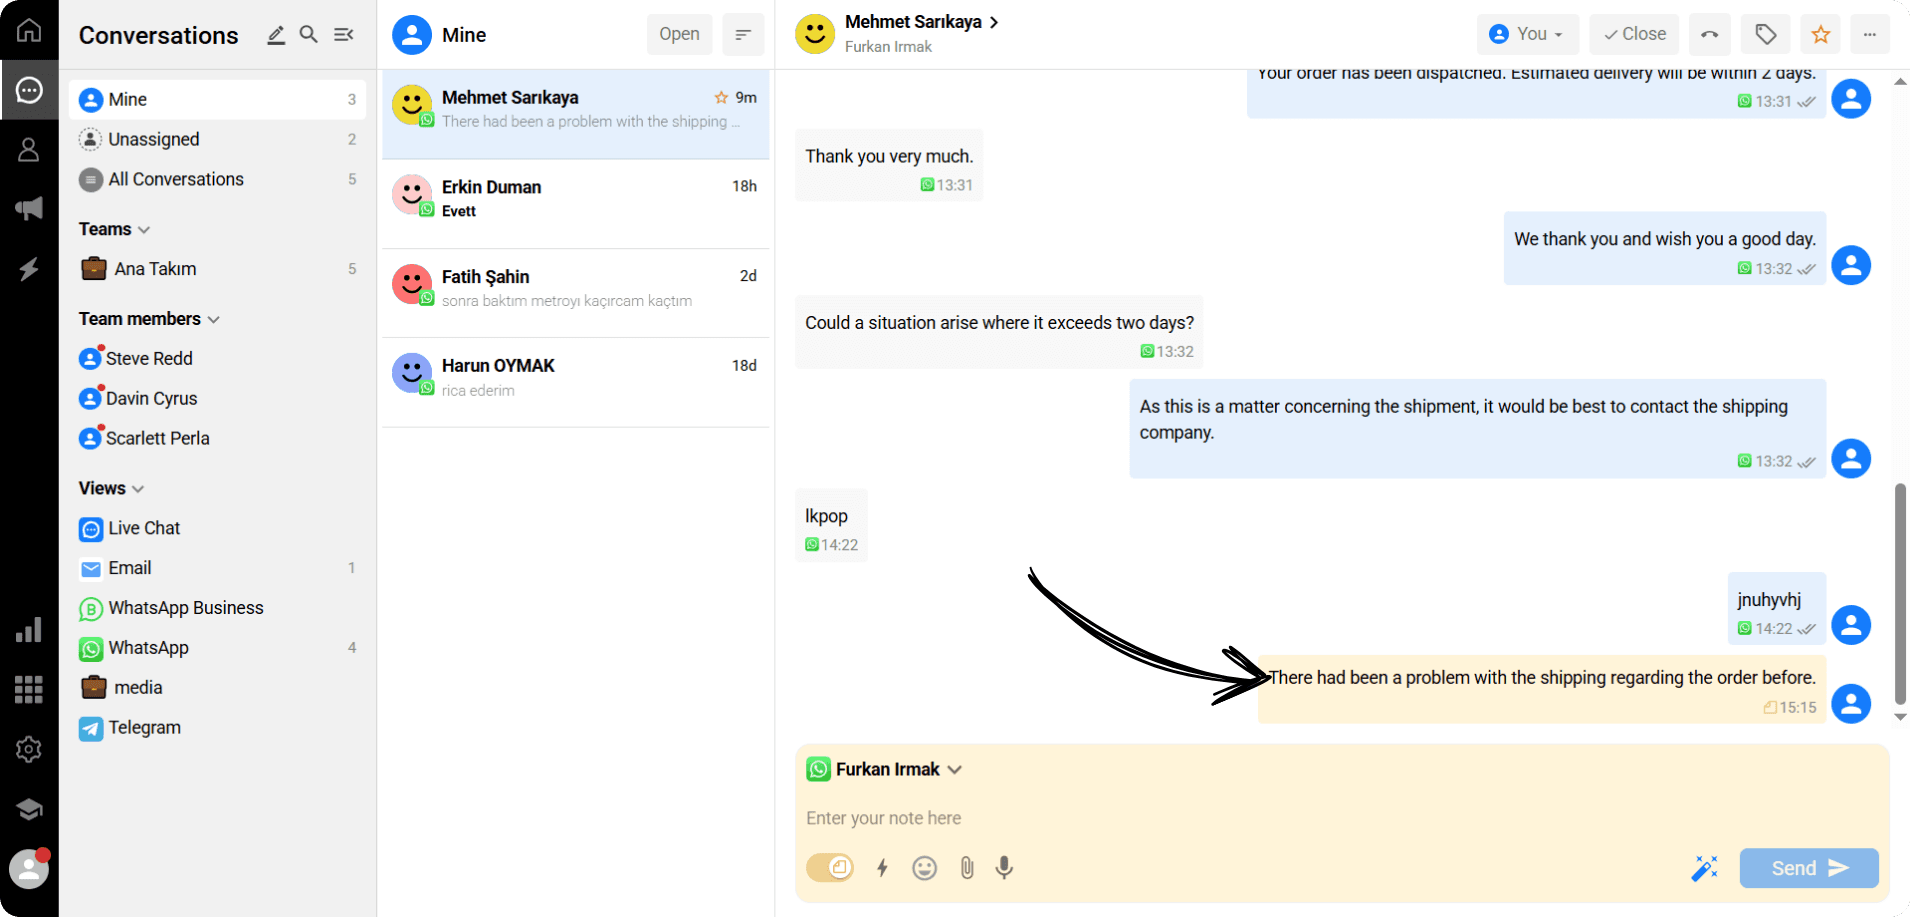
The section marked with an arrow in the conversation screen displays the notes you have taken.
When Note Mode is active, anything you write here is added to the message panel but cannot be seen by the other party.
These notes can be used by you or your team to recall previous actions or track tasks that need to be completed.
Saved Replies

The lightning icon in the message input area opens the panel of previously saved messages.
You can quickly send a message by selecting the appropriate one from this panel.
This feature allows you to send frequently used messages quickly without having to retype them.
İcons
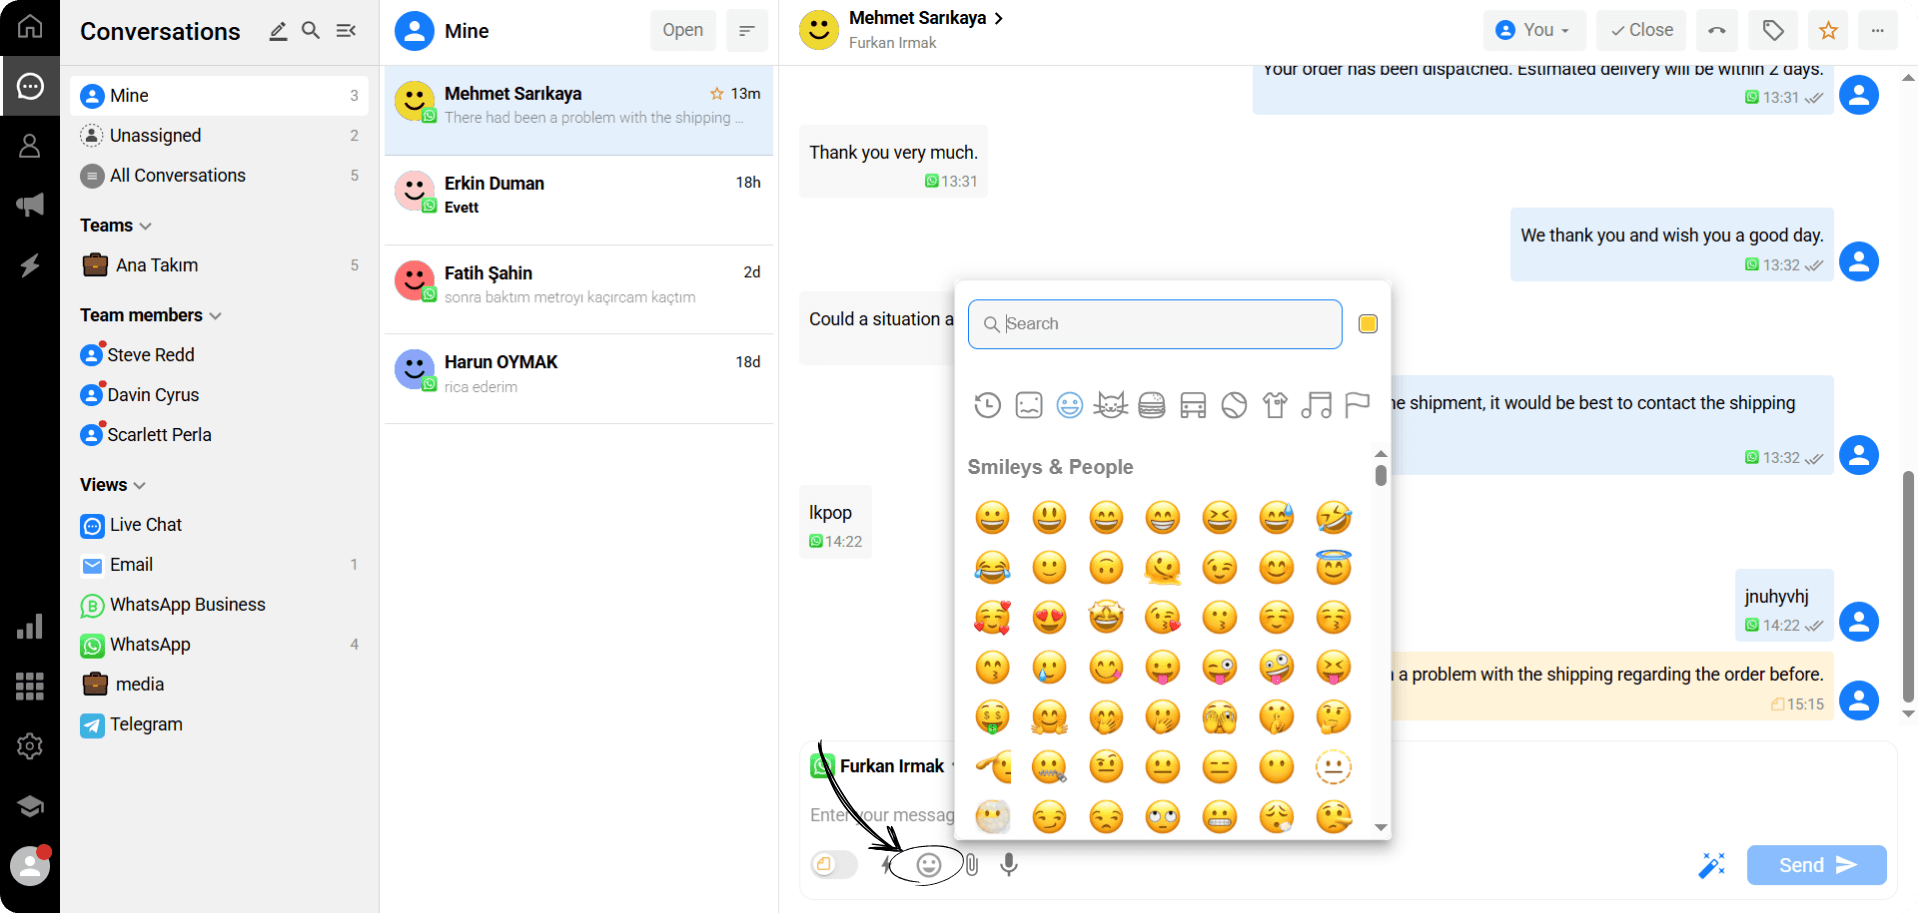
By clicking the smiley face icon in the message input area, you can select emojis to add to your messages.
This allows you to add emotion and expression to your messages, making your communication more engaging and lively.
Files
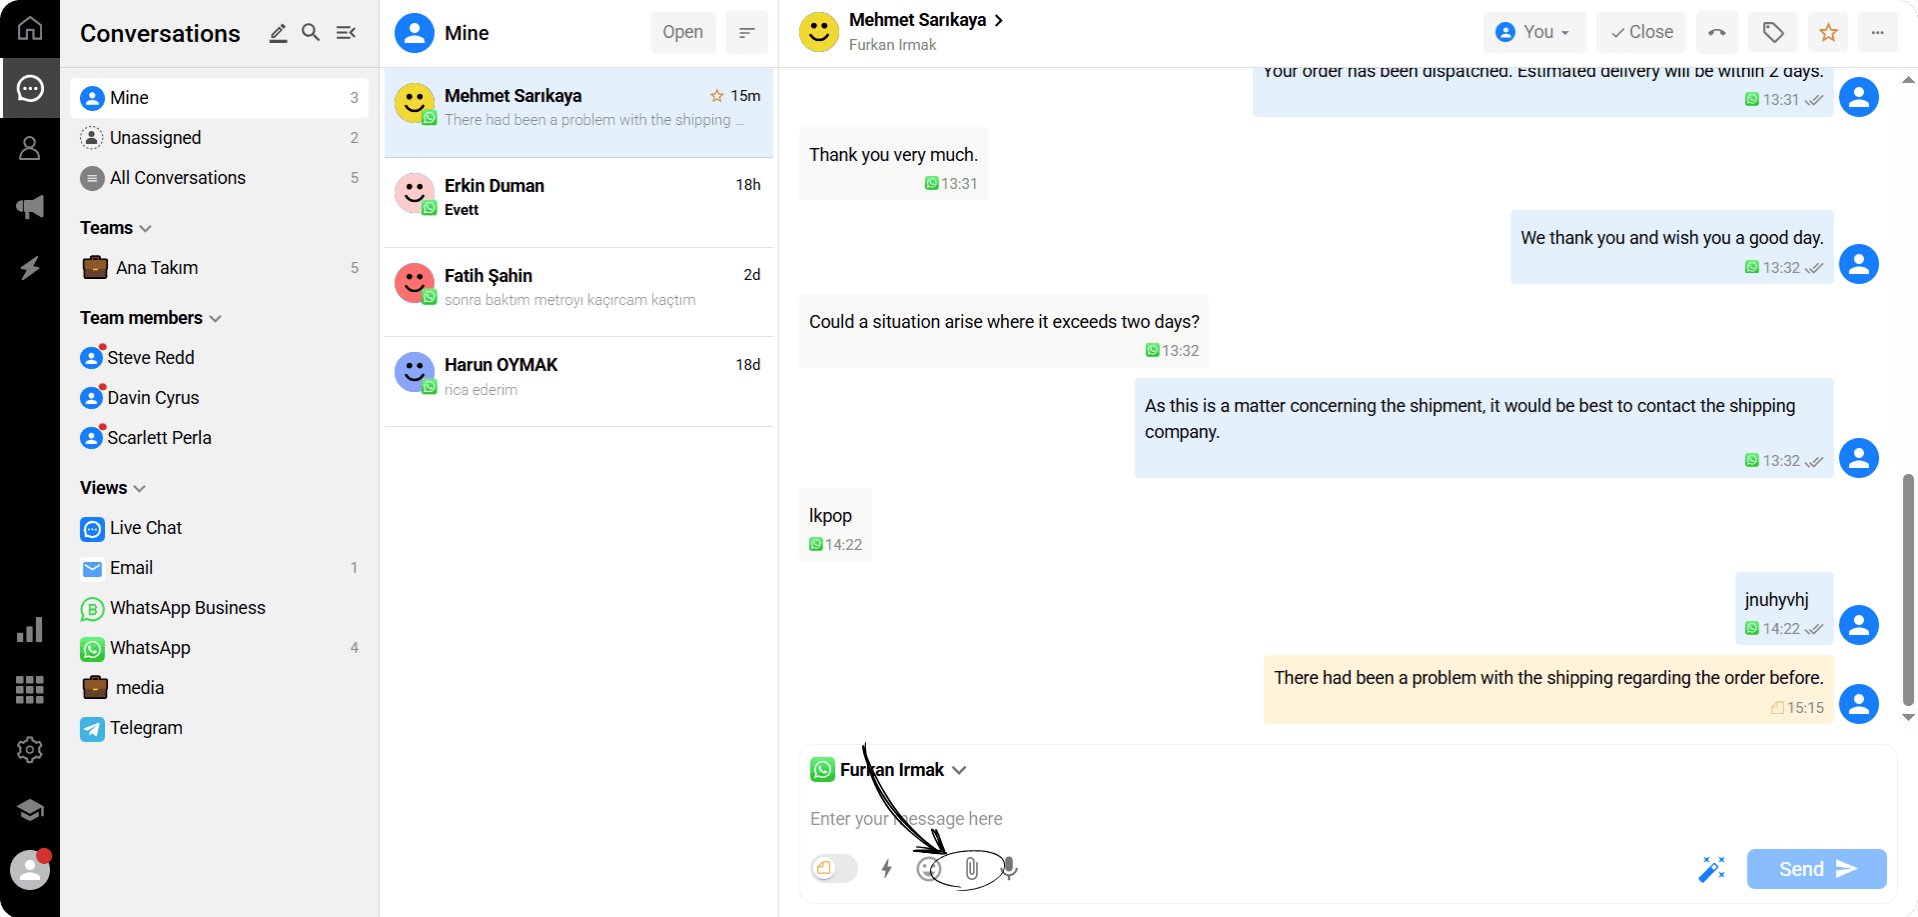
To attach files you want to send in the conversation, click the attachment icon.
From the window that opens, select the file you want to send and add it to the conversation.
This allows you to quickly attach photos, documents, or other files to your conversation.
Voice Recording
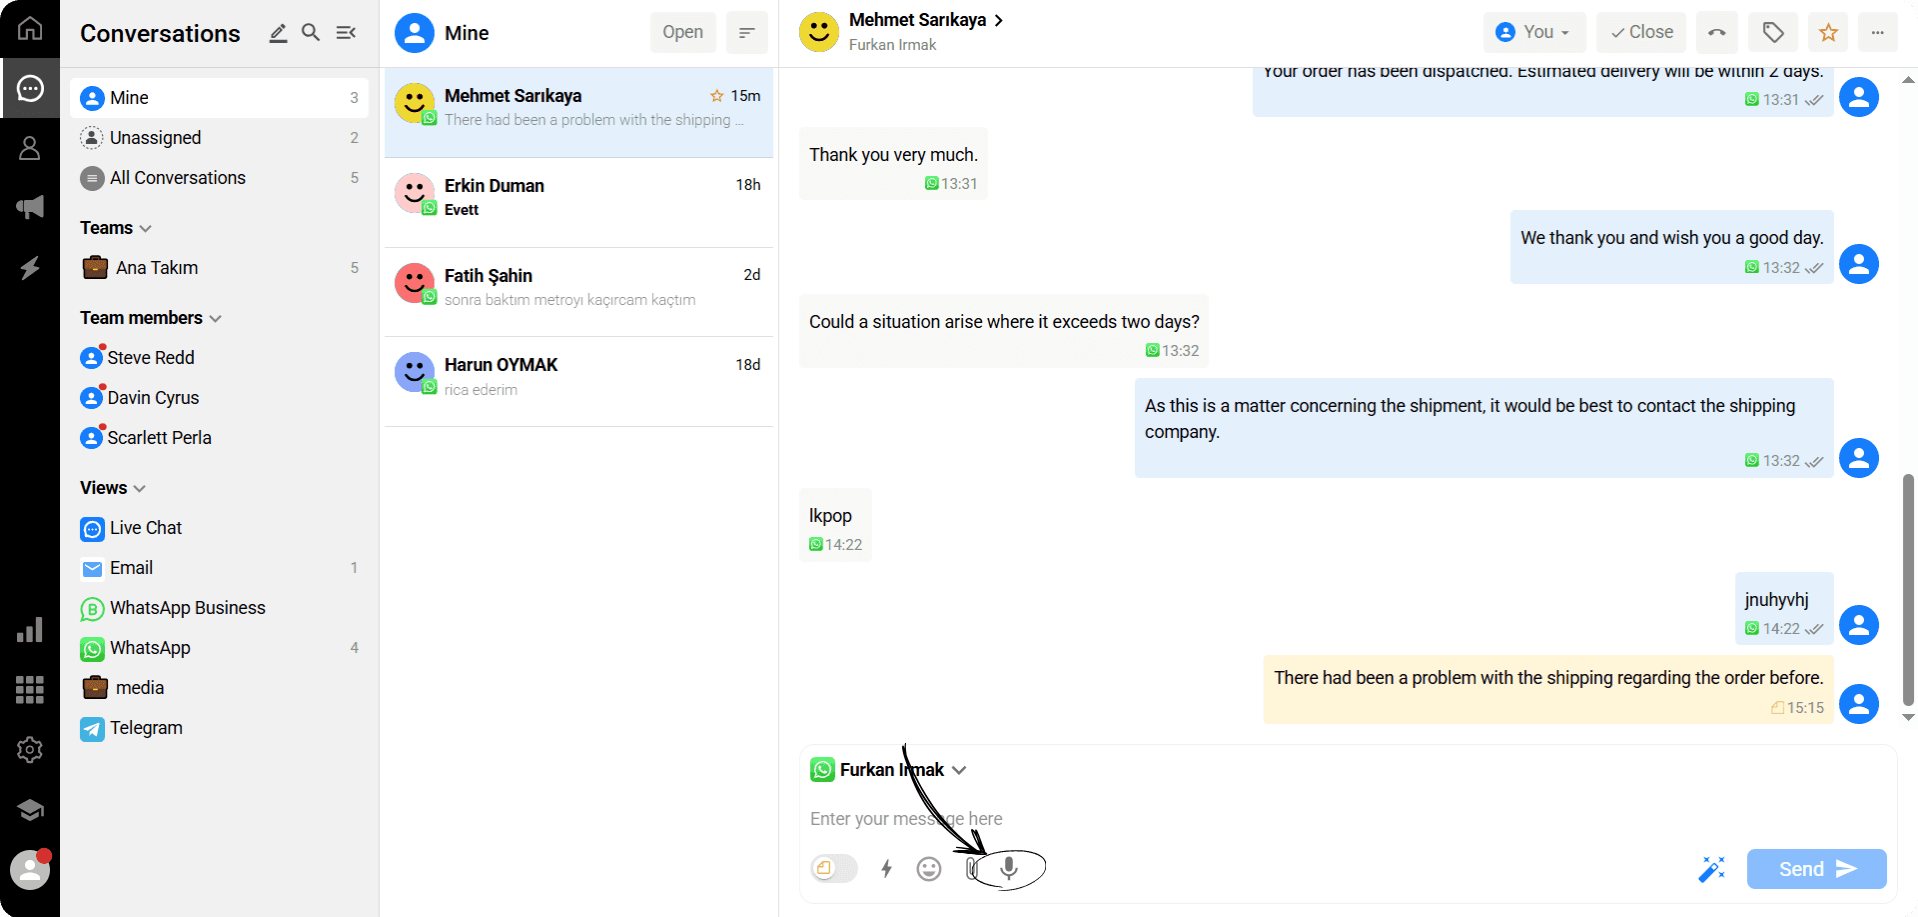
To send a voice message in the conversation, click the microphone icon.
Then, speak to record your message and add it to the conversation.
This feature allows you to quickly send a voice message instead of typing.
Qpien AI
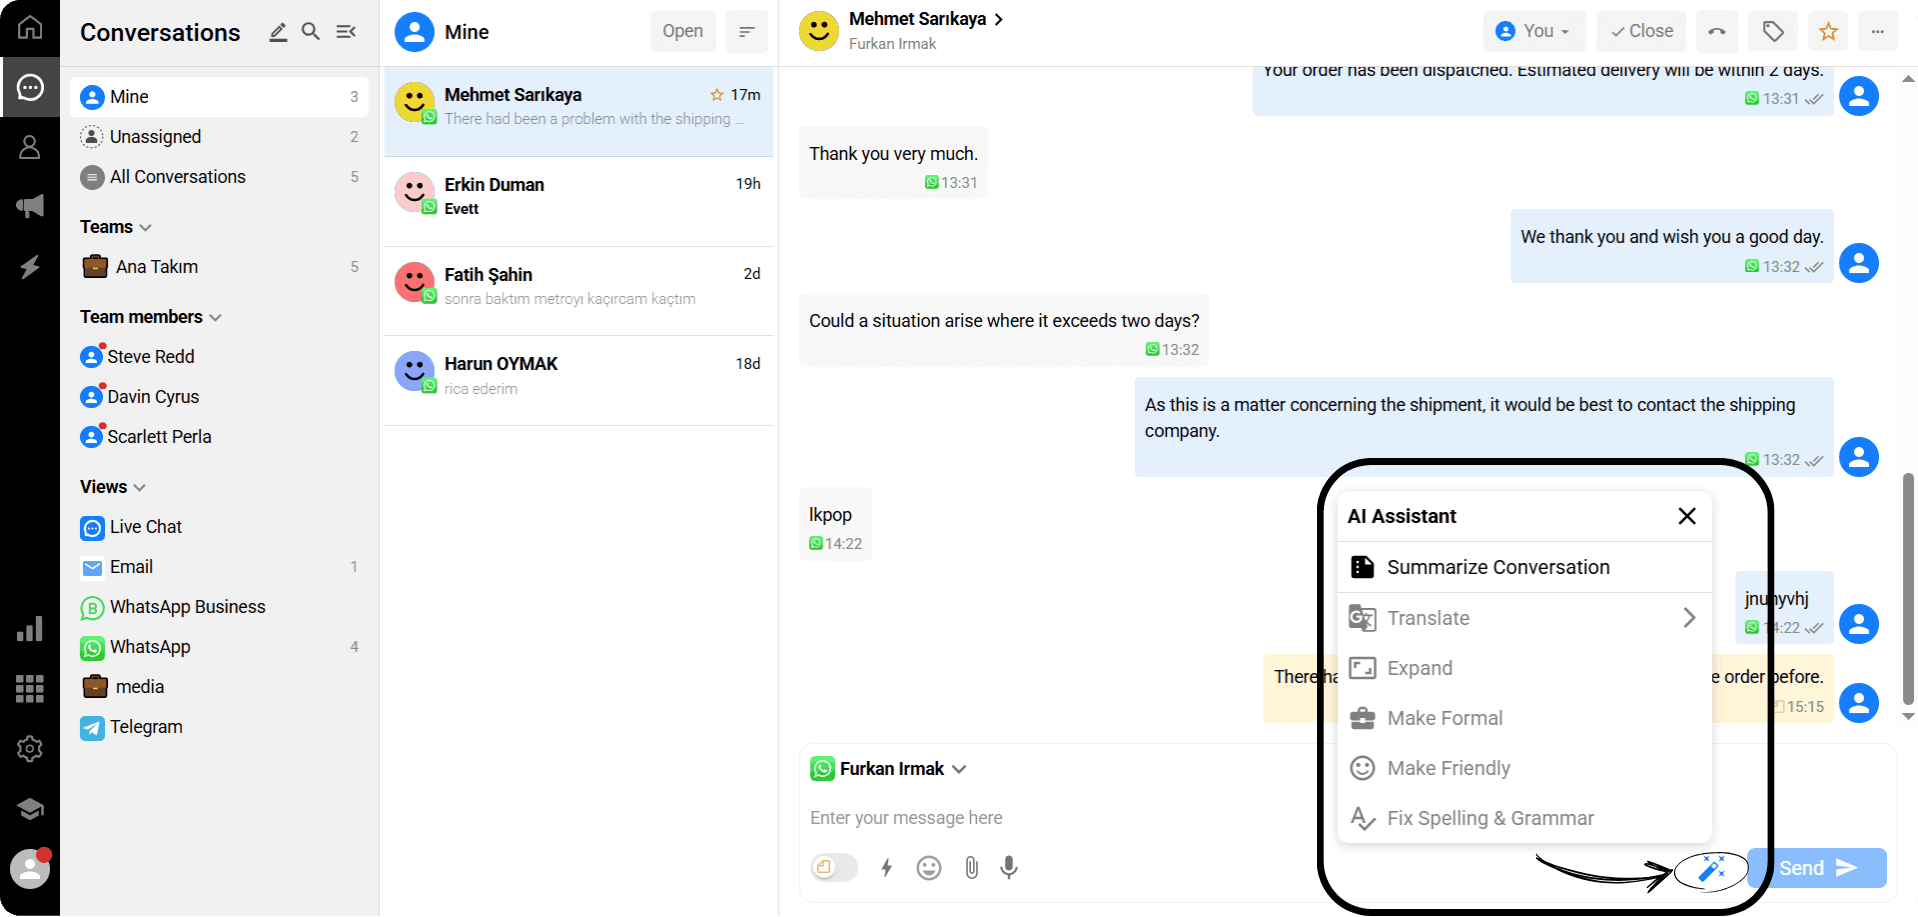
By clicking the AI icon in the message input area, you can take advantage of Qpien’s artificial intelligence features.
With AI assistance, you can:
Summarize your messages,
Translate them into your desired language,
Make your messages longer or more detailed,
Adjust the tone to be more formal or friendly,
Quickly correct spelling and grammar errors.
For detailed explanations and a complete usage guide, you can visit our Qpien AI page.
Sidebar Settings
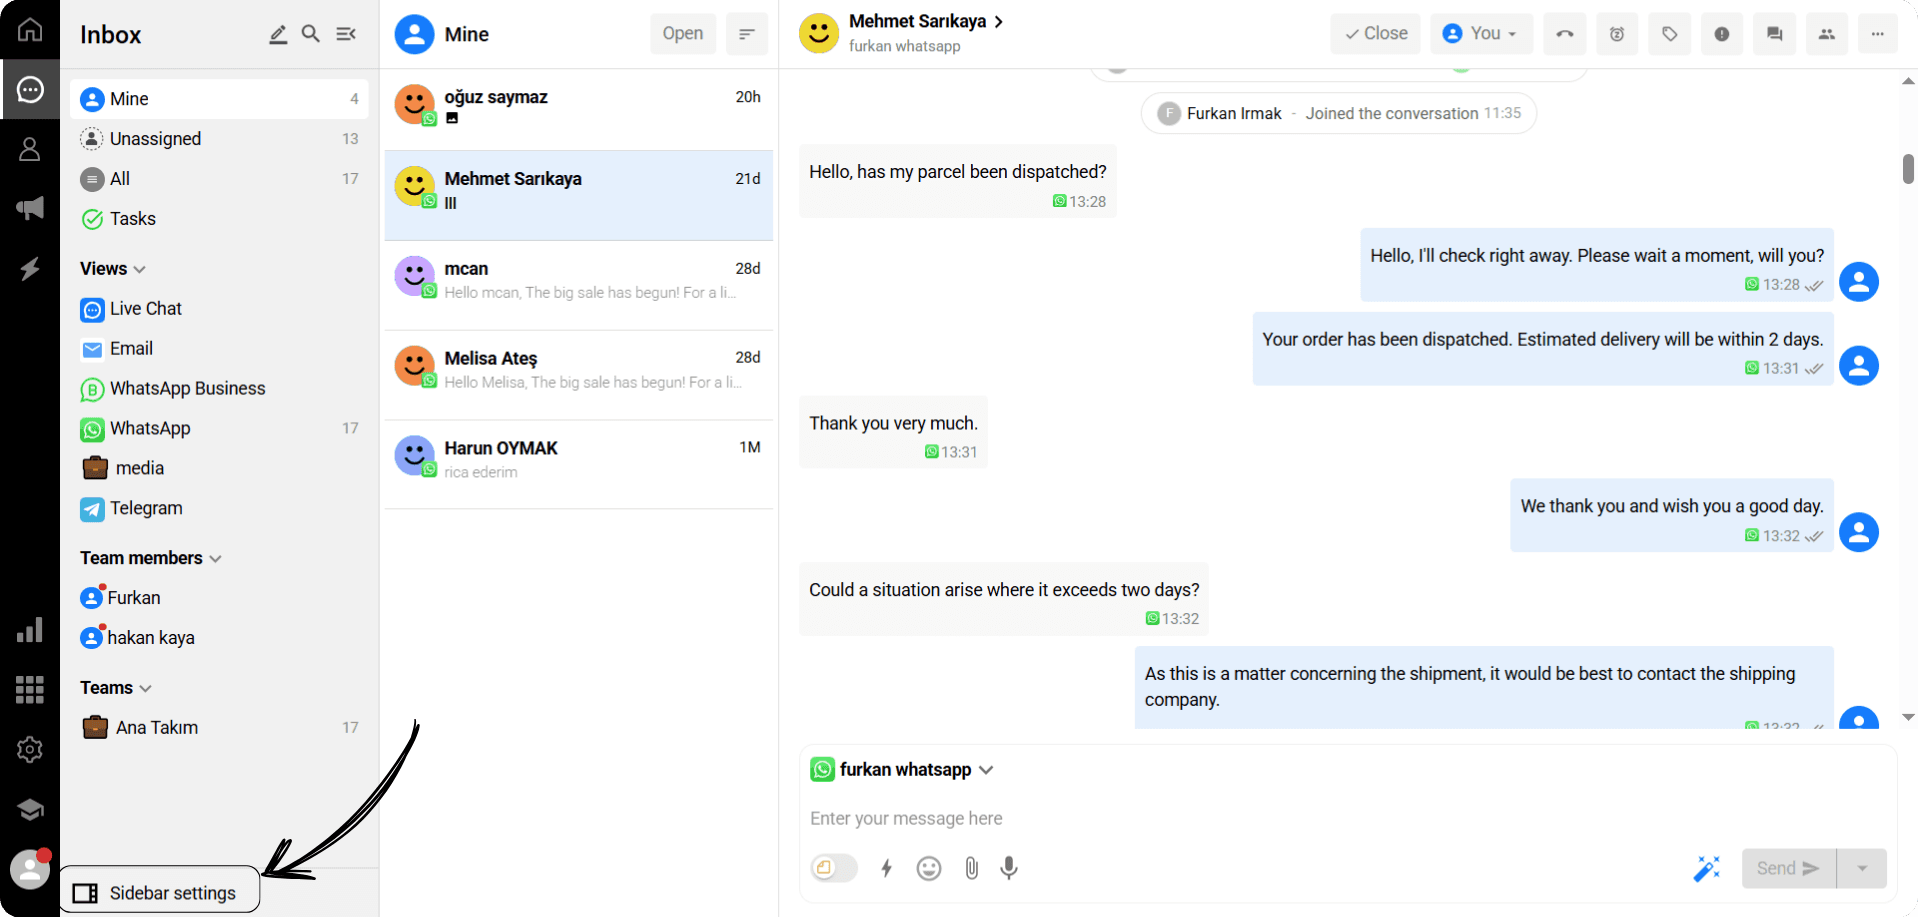
Click the “Sidebar Settings” button located at the bottom left.
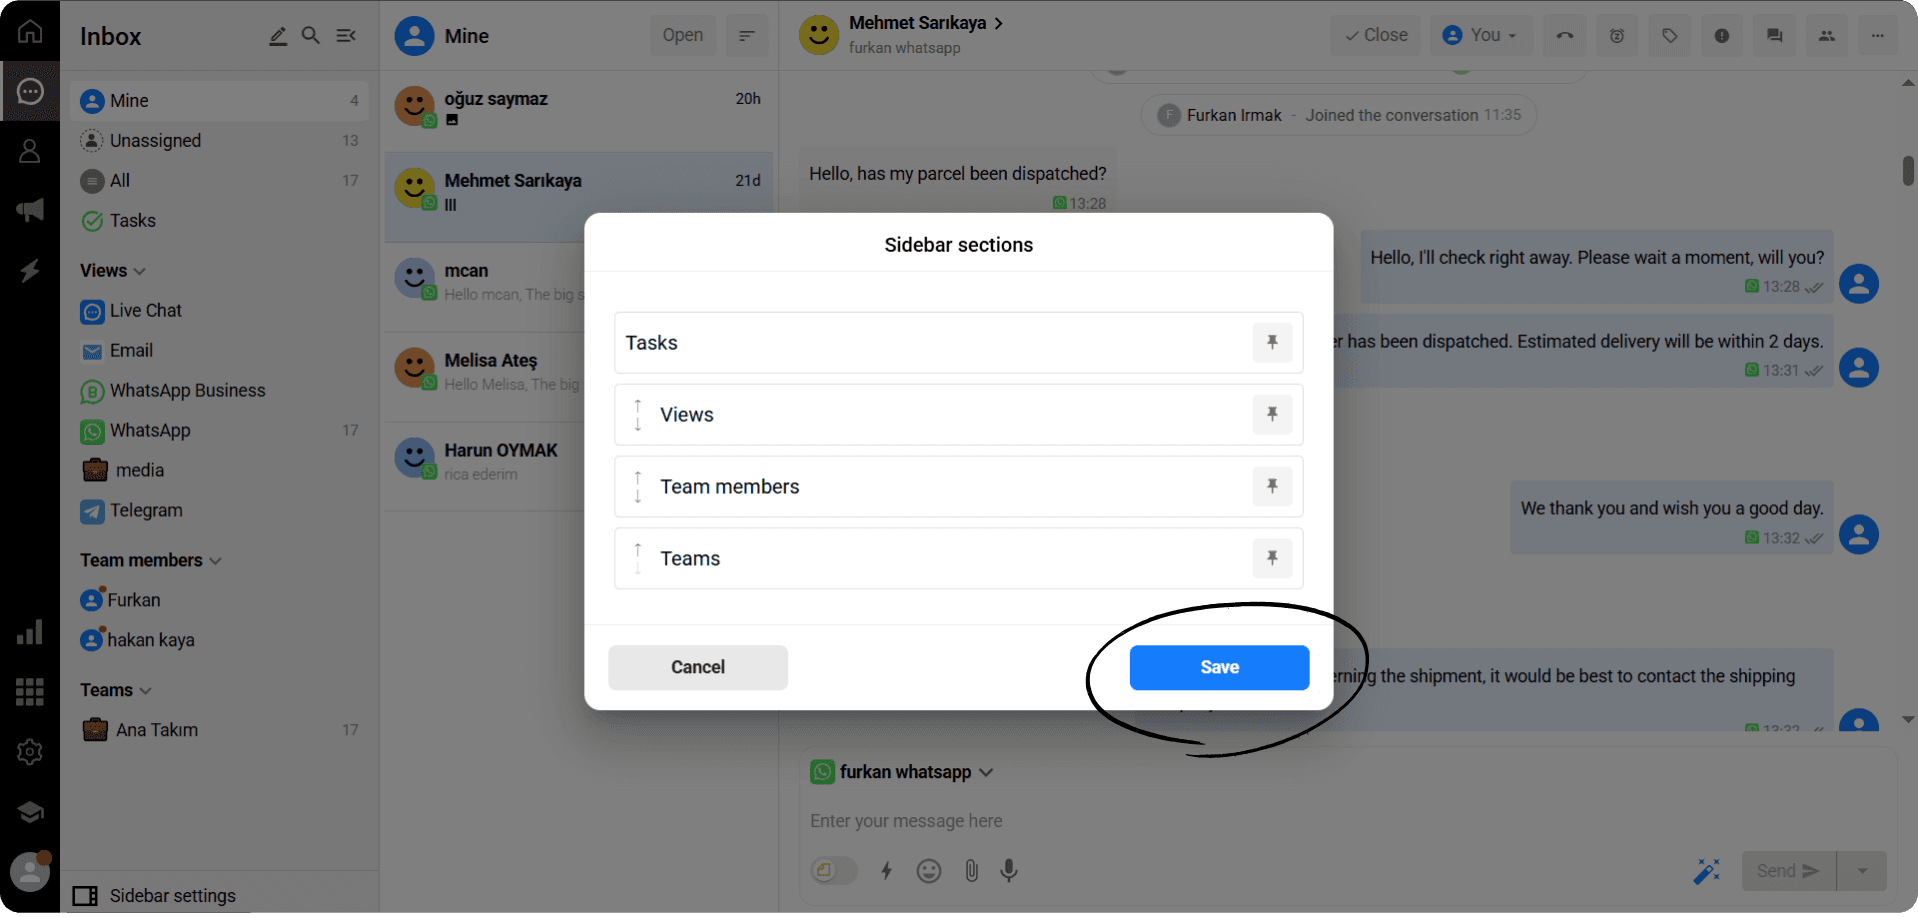
In the panel, you can select or remove sections such as “Tasks,” “Teams,” “Team Members,” and “Custom Filters.”
Using the icons (📌 or up/down arrows) next to each section, you can change their order or pin the ones that are most important to you.
Apply your changes by clicking the “Save” button, or cancel them using “Cancel.”
This feature helps you personalize your workspace, making it more organized and efficient for your needs.
Conversation Settings
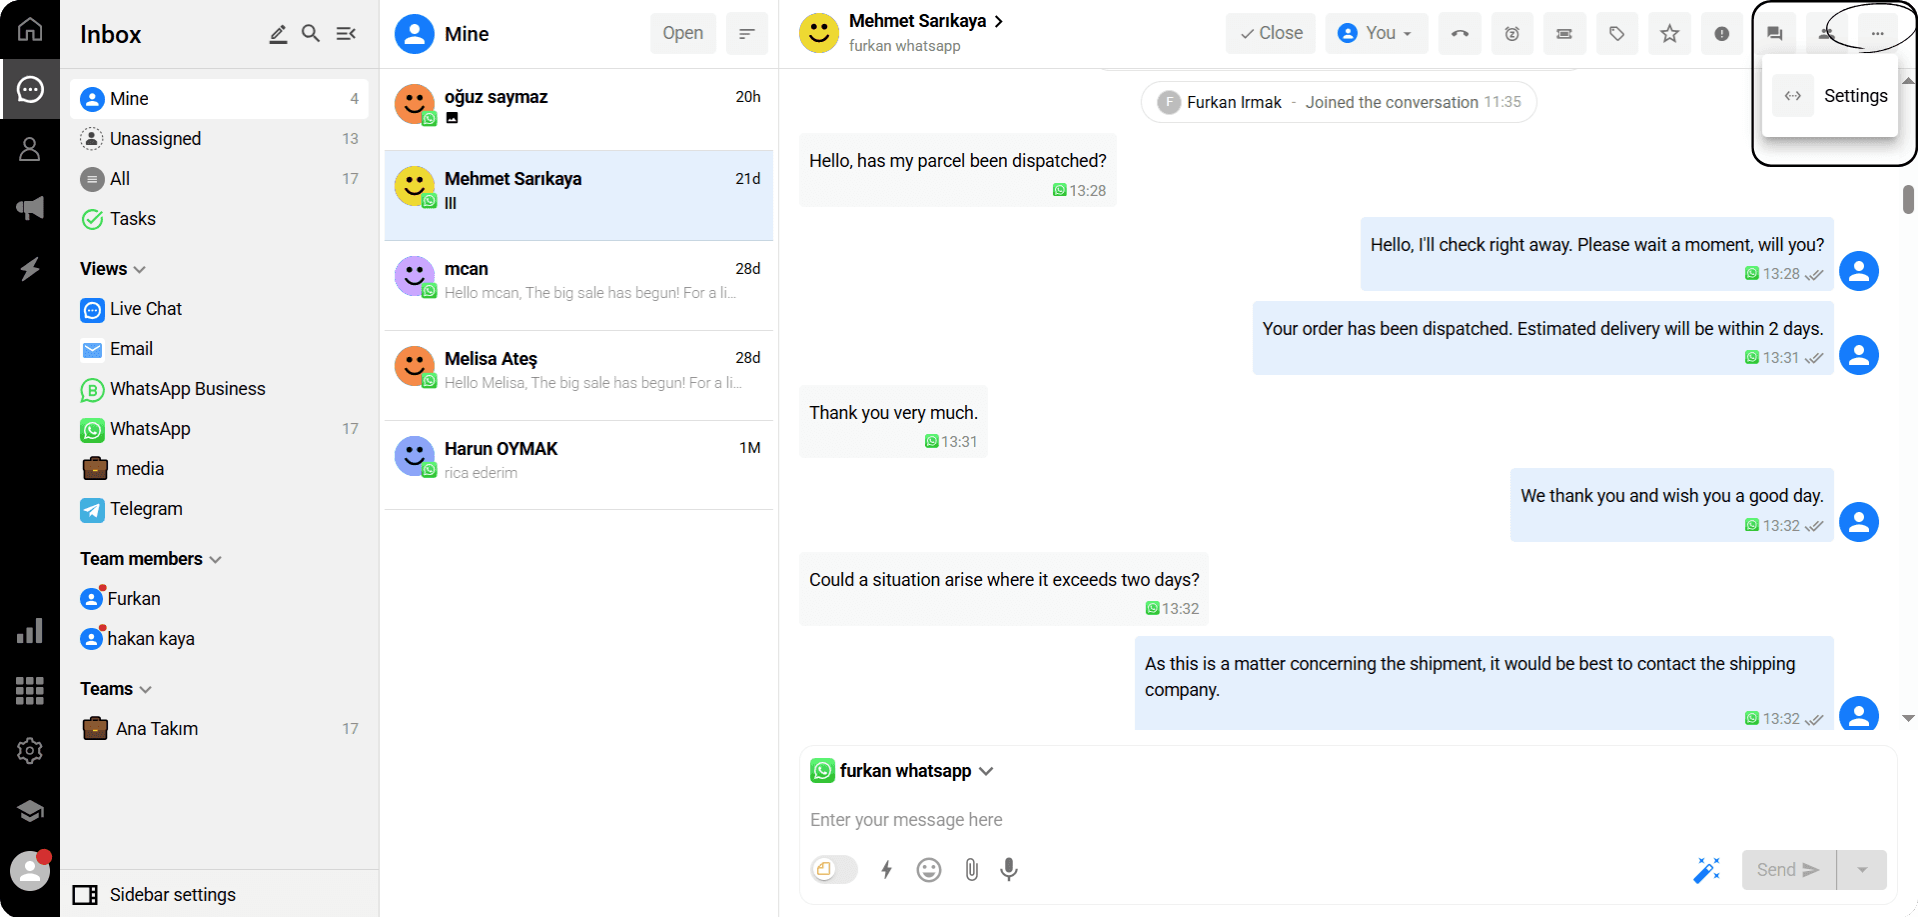
While managing your conversations through the Helpdesk, you can now access the Conversation Settings panel from the settings menu (⋯) located in the conversation screen.
With this panel, you can customize, reorder, or pin the features you want to display in the conversation screen according to your personal preferences.
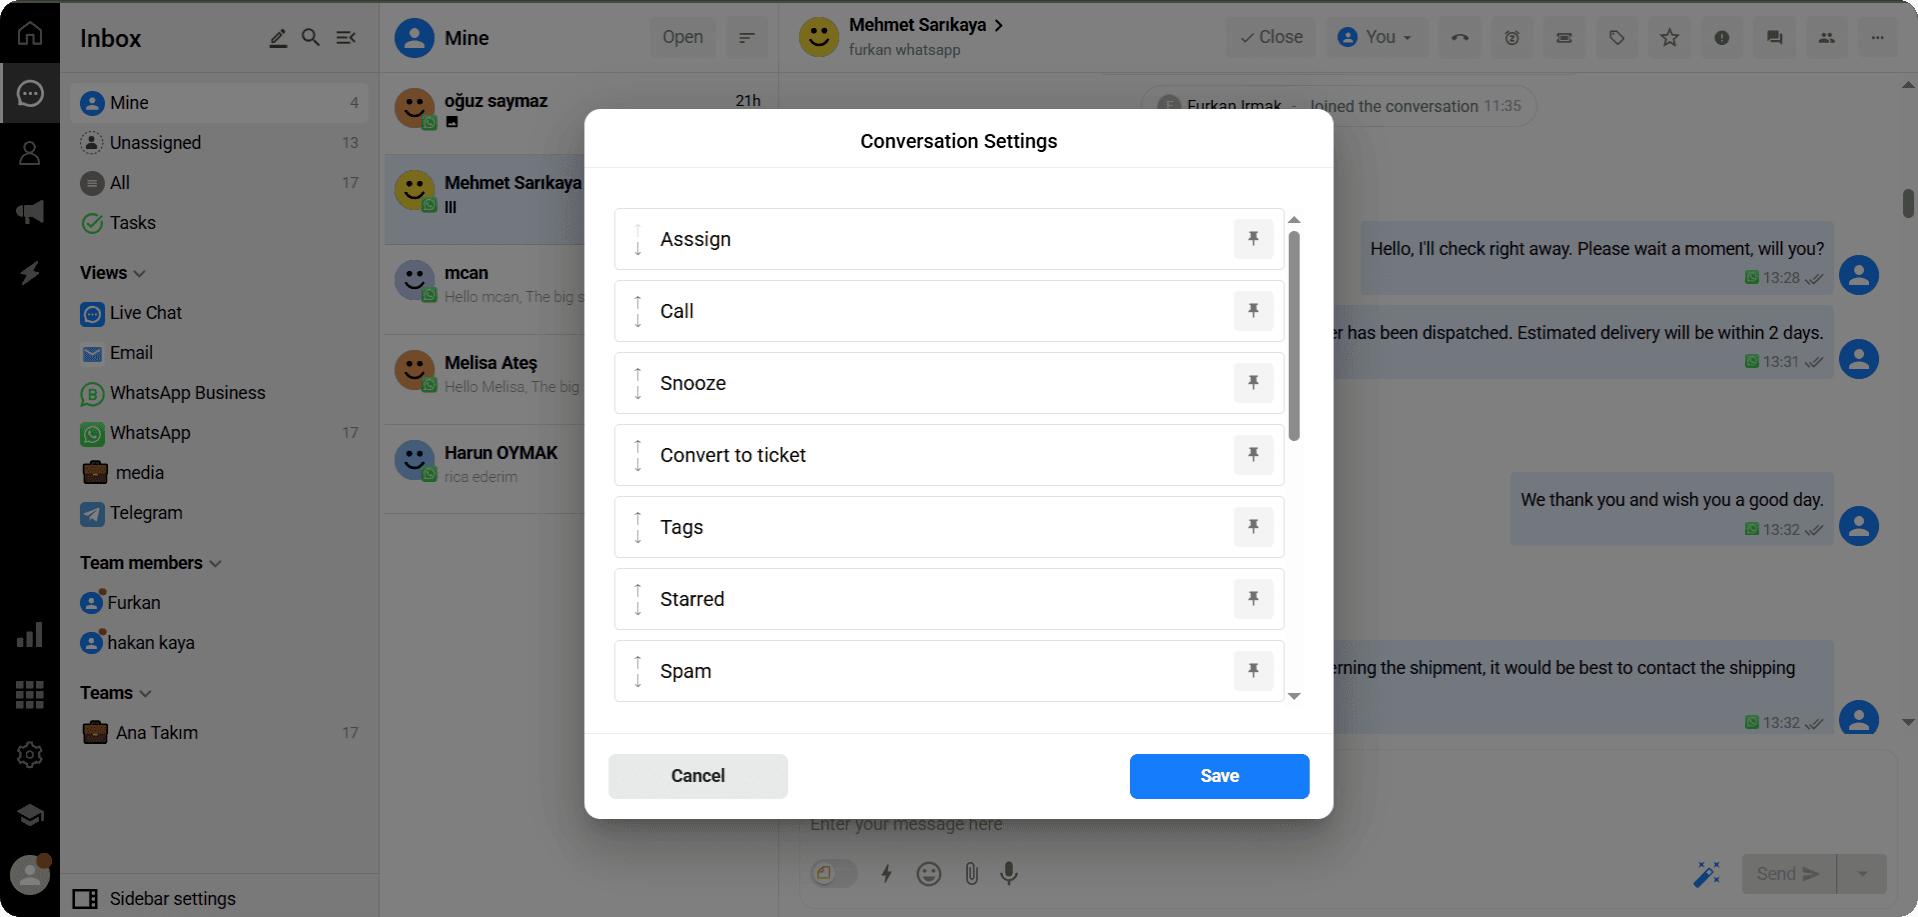
Using the pin (📌) icon on the right side, you can either pin that feature or make it invisible.
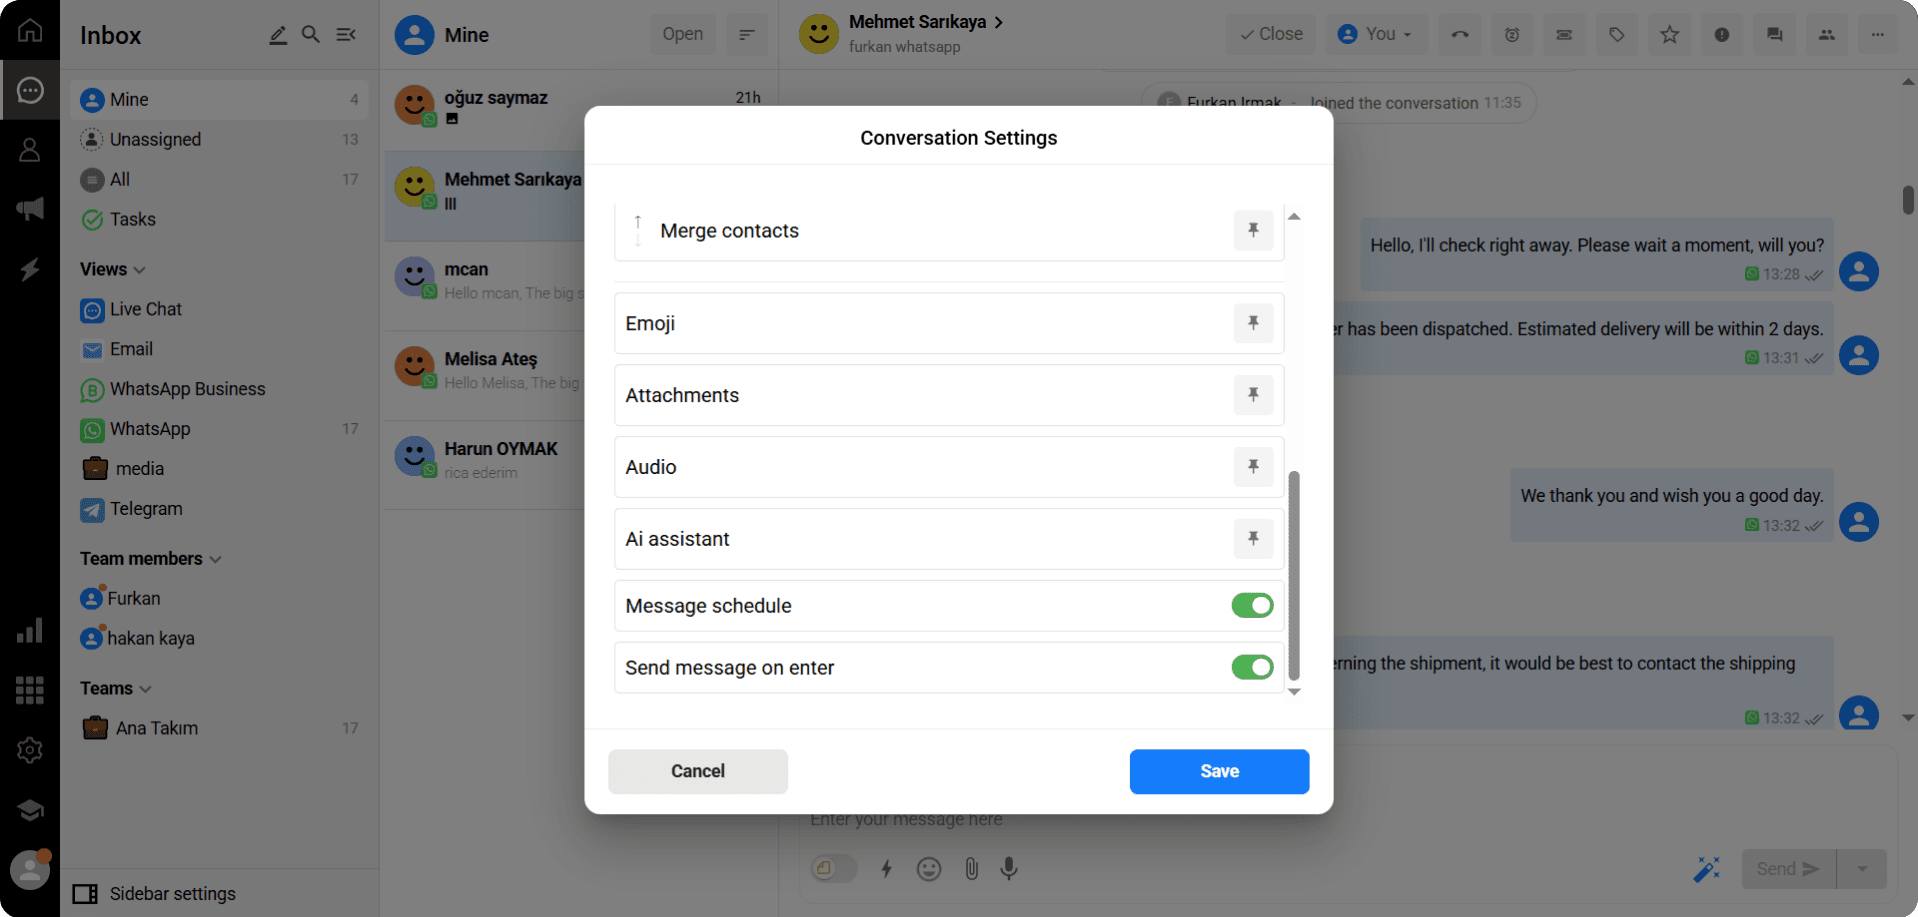
You can change the order by using the drag icon (⇅) located on the left side of each feature.
After completing your adjustments, click the “Save” button to apply the settings.
If you prefer, you can exit without saving the changes by clicking the “Cancel” button.
Detail Settings
When you click on the relevant area in the conversation list, the details panel of the contact who opened the conversation will appear on the right side.
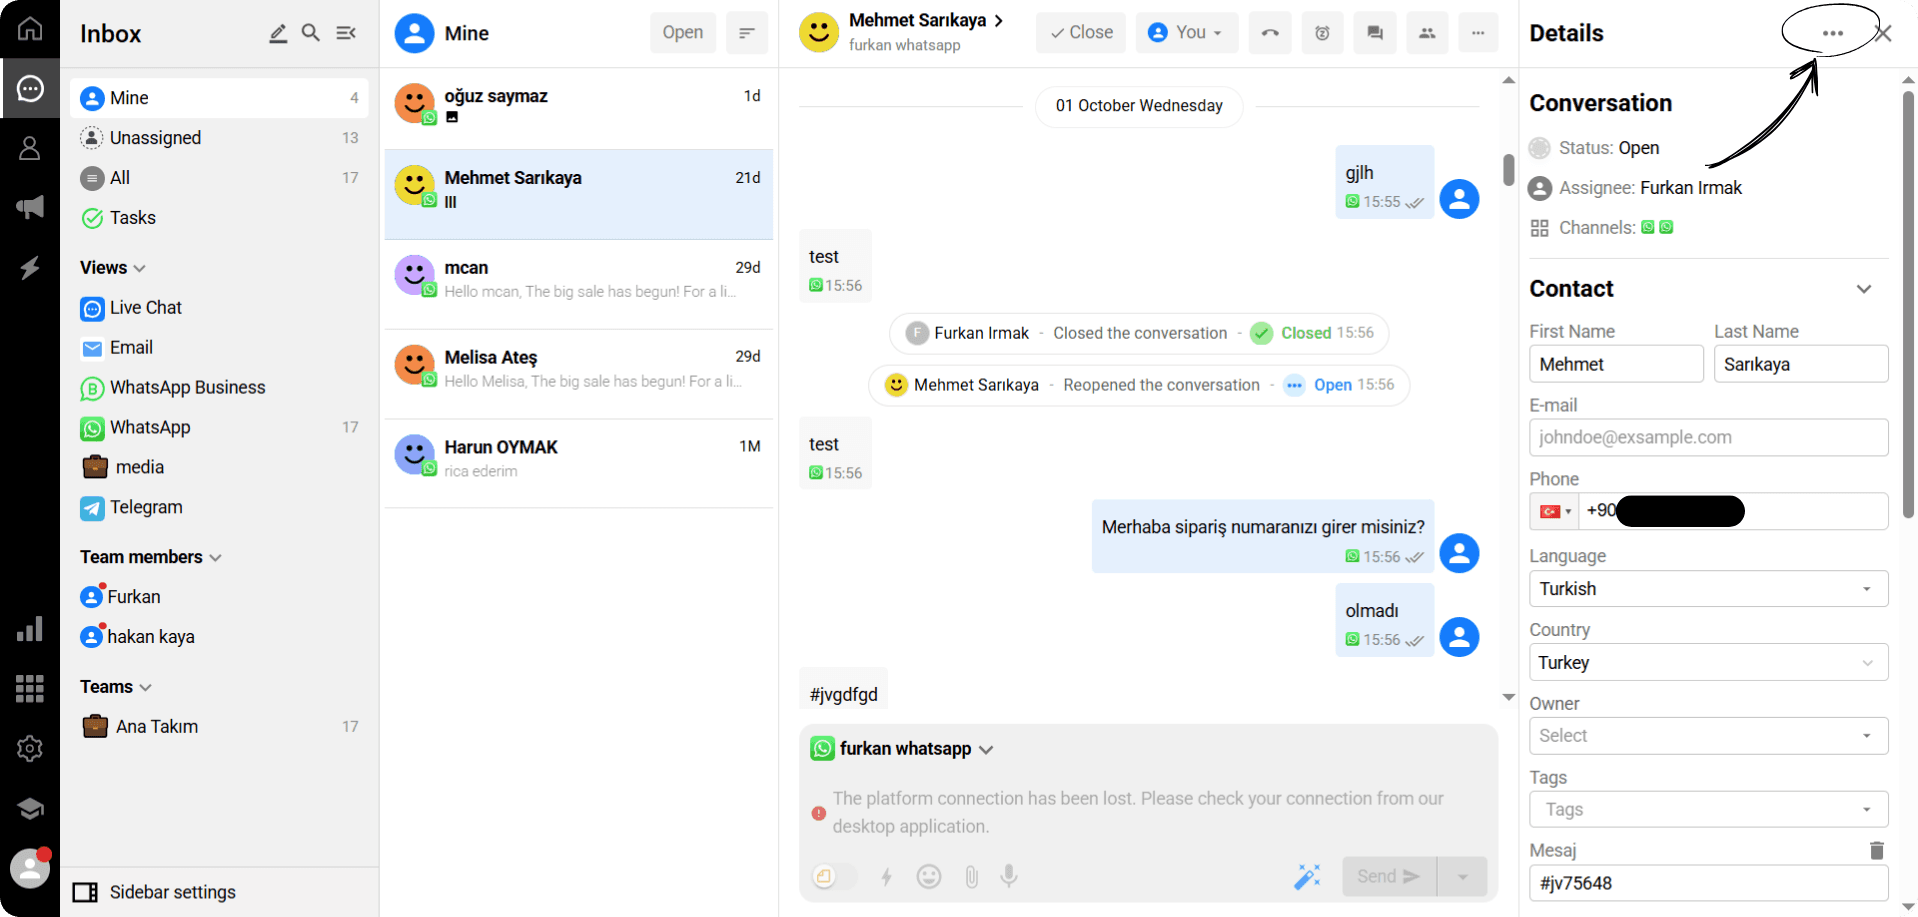
Click the three dots at the top right corner of the detail panel.
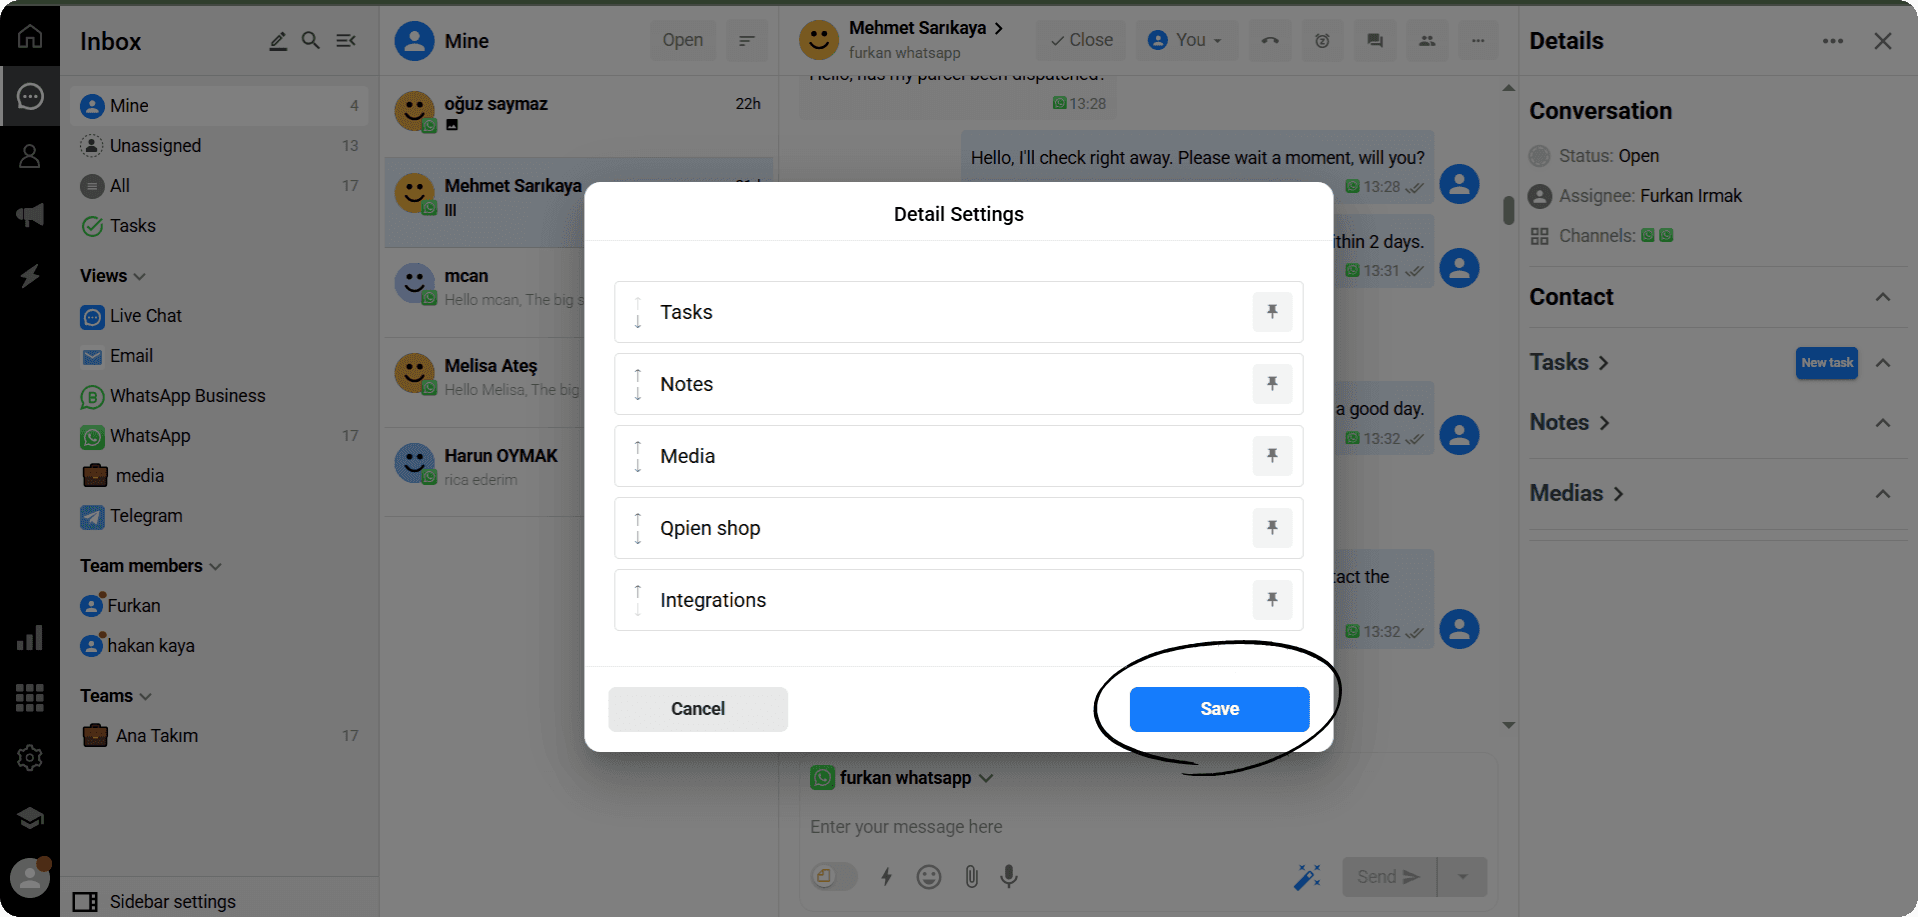
In the window that opens, you can use the pin (📌) icon on the right side of each feature on the detail page to pin or hide that feature.
You can change the order by using the drag icon (⇅) located on the left side of each feature.
After completing your adjustments, click the “Save” button to apply the settings.
If you prefer, you can exit without saving the changes by clicking the “Cancel” button.
In the Conversations section, you can view all your communications in an organized manner. Here, you can:
Categorize your conversations,
View your teams and team members,
Quickly access the conversations you need using custom filters you set.
This way, you can easily organize customer communication and work more efficiently with your team.
Click the magnifying glass icon to search for conversation by contact name.
Click the magnifying glass icon to search for conversation by contact name.
In the conversations screen, you can easily access all your messages under different headings:
Mine → Displays all conversations assigned to you or those you have taken over.
Unassigned → Shows conversations that have reached the system but are still waiting for a response because they haven’t been assigned to anyone yet.
All Conversations → Includes all conversations belonging to all team members, allowing you to track all customer communications in a single view.
Teams
In Qpien, you can create teams for different tasks and responsibilities. Each team member is added to the designated teams, ensuring that the right people handle the appropriate conversations.
Teams are listed here.
Users can only see the teams they are members of.
This structure allows communication to be managed more efficiently and in an organized manner.
Team Members
You can view the team members in the shared teams you belong to in this section.
By clicking on a team member from the list, you can see the conversations assigned to that person.
This way, you can easily track who is handling which customer and make collaboration within the team more efficient.
Views
With views, you can separate your conversations according to specific criteria and keep your screen more organized.
Filters help you quickly reach the right conversations, especially during high message traffic.
This way, your teams can manage customer requests more efficiently and in an organized manner.
Conversation List
The messages under the selected conversation category, team, or custom filter are listed in this section.
For example:
When WhatsApp is selected, only messages received via WhatsApp that have not yet been closed are displayed here.
This structure allows you to quickly access the conversations you need and enjoy a clutter-free conversation experience.
In the conversation list, you can select a conversation by clicking the avatar icon next to it. This feature allows you to perform bulk actions easily.
To select multiple conversations, click the avatars of the conversations you want to choose one by one.
By clicking the arrow icon at the top of the list, a menu will appear where you can:
Use the “Select All” button to select all conversations at once,
Or deselect them from the same menu.
This way, you can manage your conversations easily, either individually or in bulk.
After making your selections, click the “Assign” button in the top menu.
A list of members in your team will appear.
Select the person to whom you want to assign the selected conversations.
Finally, click the “Assign” button again to complete the bulk assignment process.
This allows you to quickly and easily direct conversations to the appropriate team members.
After selecting your conversations, click the “Tag” button in the top menu.
A list of your existing tags will appear.
Choose the tag you want to add to the selected conversations.
Finally, click the “Assign” button to complete the bulk tagging process.
This feature allows you to easily categorize your conversations and quickly access the ones you’re looking for.
After selecting your conversations, click the “Delete” button in the top menu.
This action allows you to delete all selected conversations in bulk.
Once you confirm the deletion, the conversations cannot be recovered, so it is recommended to use this feature with caution.
When you click the arrow icon at the top of the conversation list, a filter panel opens just below it.
From this panel, you can select which conversations to display based on their status.
For example, by selecting the “Open” filter, you can view only the conversations that have not yet been closed.
This allows you to easily see only the conversations in the status you need.
When you click the arrow icon in the conversation list, a sorting menu will open.
From this menu, you can sort your conversations according to the criteria you want.
For example:
Newest Messages
Unanswered
Starred Messages
Oldest Messages
This way, you can view your conversations based on your needs and easily manage your priorities.
In this section, you can communicate with the customer one-on-one.
The user’s name is displayed at the top.
Below, your messages and the customer’s messages are listed in order.
You can quickly reply using the message input field at the bottom.
This way, all communication is managed clearly and efficiently on a single screen.
When you click on the relevant area in the conversation list, the details panel of the contact who opened the conversation will appear on the right side.
In this panel, you can view the contact’s information and other details.
This allows you to quickly access necessary information during the conversation and communicate more effectively.
In the conversation panel, you can see the following information for each conversation:
Conversation status: Is it open or closed?
Assigned contact: Who the conversation is assigned to
Channel: Which platform the conversation is happening on
With this information, you can quickly track, manage, and prioritize your conversations.
In the contact panel, you can view information such as the user’s first name, last name, phone number, e-mail, language, and tags.
You can make changes or add information in these fields.
You can also include any custom fields you previously created, allowing you to tailor the contact information according to your needs.
The Notes section allows you to view all the notes you’ve taken throughout the conversation.
This way, you can quickly recall important information and easily access your notes whenever needed.
The Media section allows you to view all photos, videos, and voice recordings exchanged during the conversation.
This way, you can quickly access shared content and review it whenever needed.
Assignment to a Person
The “You” field next to the messages in the conversation list shows who the open conversation is assigned to.
Clicking this field opens a panel displaying a list of your team members.
Select the person you want to assign the conversation to from the list.
Finally, click the “Assign” button to complete the process.
This feature allows you to easily direct conversations to the appropriate team members, ensuring customer requests are resolved more quickly.
Close Conversation
After finishing a conversation with a customer, you can keep your inbox organized by clicking the “Close” button to end the conversation.
Closed conversations will no longer appear in the active list, helping your inbox stay free from unnecessary clutter.
You can access past conversations at any time to review closed interactions.
Call
While communicating with an active contact in the conversation screen, you can initiate a call directly by clicking the phone icon.
However, to make a call, your account must have calling permissions enabled.
If your permissions are active, you can start the call with a single click.
Tags
In Qpien, tags allow you to categorize conversations, contacts, or campaigns for more organized and efficient management.
To add a tag to a conversation:
Click on the tag you want to add.
In the panel that opens, select the relevant tag.
Click the “Assign” button to complete the addition.
You can see the added tag in the section where conversations are listed.
To remove a tag:
Open the same panel.
Click on the tag you want to remove again.
Click the “Assign” button to remove the tag.
This way, you can easily classify and manage your conversations according to your desired criteria.
Staring
If an open conversation is important to you, you can click the star icon in the top-right corner to mark it as starred.
Starred conversations will appear in the conversation list with a star icon, making it easy to identify and quickly access your important conversations.
Putting Off the Conversation (Snoozing)
When you want to snooze a conversation until a specific time, select the “Snooze” option located at the top right.
In the panel that opens, you can choose when you want the conversation to become visible again.
When you select the “Custom Date” option, a scheduling screen appears where you can manually set the exact date and time for the conversation to reappear.
On this screen:
You can select the desired day from the calendar.
On the right side, in the “Time” field, you can enter the hour when the conversation will become active again.
After setting the date and time, click the “Schedule” button at the bottom of the screen.
Once you’ve chosen the time, click “Postpone” to complete the process.
The conversation will be hidden from your inbox until the selected time and will automatically reappear once the scheduled time is reached.
Mark as Spam
When there are unwanted or unnecessary conversations among the messages received through Qpien, you can mark those conversations as spam.
Click the “!” (warning icon) located at the top right corner of the conversation screen.
In the panel that opens, click the blue “Mark as Spam” button to complete the process.
The conversation you marked will now be listed as spam and will no longer appear in your inbox.
Notes
Using the relevant option in the conversation screen, you can switch between the Notes panel and the Messaging panel.
When Messaging Mode is active, anything you type is sent directly to the other party as a message.
When you switch to the Notes panel, your entries are saved as private notes visible only to you.
The section marked with an arrow in the conversation screen displays the notes you have taken.
When Note Mode is active, anything you write here is added to the message panel but cannot be seen by the other party.
These notes can be used by you or your team to recall previous actions or track tasks that need to be completed.
Saved Replies
The lightning icon in the message input area opens the panel of previously saved messages.
You can quickly send a message by selecting the appropriate one from this panel.
This feature allows you to send frequently used messages quickly without having to retype them.
İcons
By clicking the smiley face icon in the message input area, you can select emojis to add to your messages.
This allows you to add emotion and expression to your messages, making your communication more engaging and lively.
Files
To attach files you want to send in the conversation, click the attachment icon.
From the window that opens, select the file you want to send and add it to the conversation.
This allows you to quickly attach photos, documents, or other files to your conversation.
Voice Recording
To send a voice message in the conversation, click the microphone icon.
Then, speak to record your message and add it to the conversation.
This feature allows you to quickly send a voice message instead of typing.
Qpien AI
By clicking the AI icon in the message input area, you can take advantage of Qpien’s artificial intelligence features.
With AI assistance, you can:
Summarize your messages,
Translate them into your desired language,
Make your messages longer or more detailed,
Adjust the tone to be more formal or friendly,
Quickly correct spelling and grammar errors.
For detailed explanations and a complete usage guide, you can visit our Qpien AI page.
Sidebar Settings
Click the “Sidebar Settings” button located at the bottom left.
In the panel, you can select or remove sections such as “Tasks,” “Teams,” “Team Members,” and “Custom Filters.”
Using the icons (📌 or up/down arrows) next to each section, you can change their order or pin the ones that are most important to you.
Apply your changes by clicking the “Save” button, or cancel them using “Cancel.”
This feature helps you personalize your workspace, making it more organized and efficient for your needs.
Conversation Settings
While managing your conversations through the Helpdesk, you can now access the Conversation Settings panel from the settings menu (⋯) located in the conversation screen.
With this panel, you can customize, reorder, or pin the features you want to display in the conversation screen according to your personal preferences.
Using the pin (📌) icon on the right side, you can either pin that feature or make it invisible.
You can change the order by using the drag icon (⇅) located on the left side of each feature.
After completing your adjustments, click the “Save” button to apply the settings.
If you prefer, you can exit without saving the changes by clicking the “Cancel” button.
Detail Settings
When you click on the relevant area in the conversation list, the details panel of the contact who opened the conversation will appear on the right side.
Click the three dots at the top right corner of the detail panel.
In the window that opens, you can use the pin (📌) icon on the right side of each feature on the detail page to pin or hide that feature.
You can change the order by using the drag icon (⇅) located on the left side of each feature.
After completing your adjustments, click the “Save” button to apply the settings.
If you prefer, you can exit without saving the changes by clicking the “Cancel” button.
Previous
AI Overview
Next
Next
Qpien plans explained
Try Qpien free for 14 days! 🎉
Ready to take control of all your support channels?
Empower your customer interactions with Qpien! Boost sales and elevate satisfaction with every conversation.
Try Qpien free for 14 days! 🎉
Ready to take control of all your support channels?
Empower your customer interactions with Qpien! Boost sales and elevate satisfaction with every conversation.
Try Qpien free for 14 days! 🎉
Ready to take control of all your support channels?
Empower your customer interactions with Qpien! Boost sales and elevate satisfaction with every conversation.