
Campaigns & Broadcasting
Campaigns & Broadcasting
You can send campaigns that you have created or can create on the Campaigns page in bulk via the WhatsApp channel, define recipient segments, and personalise the message content.
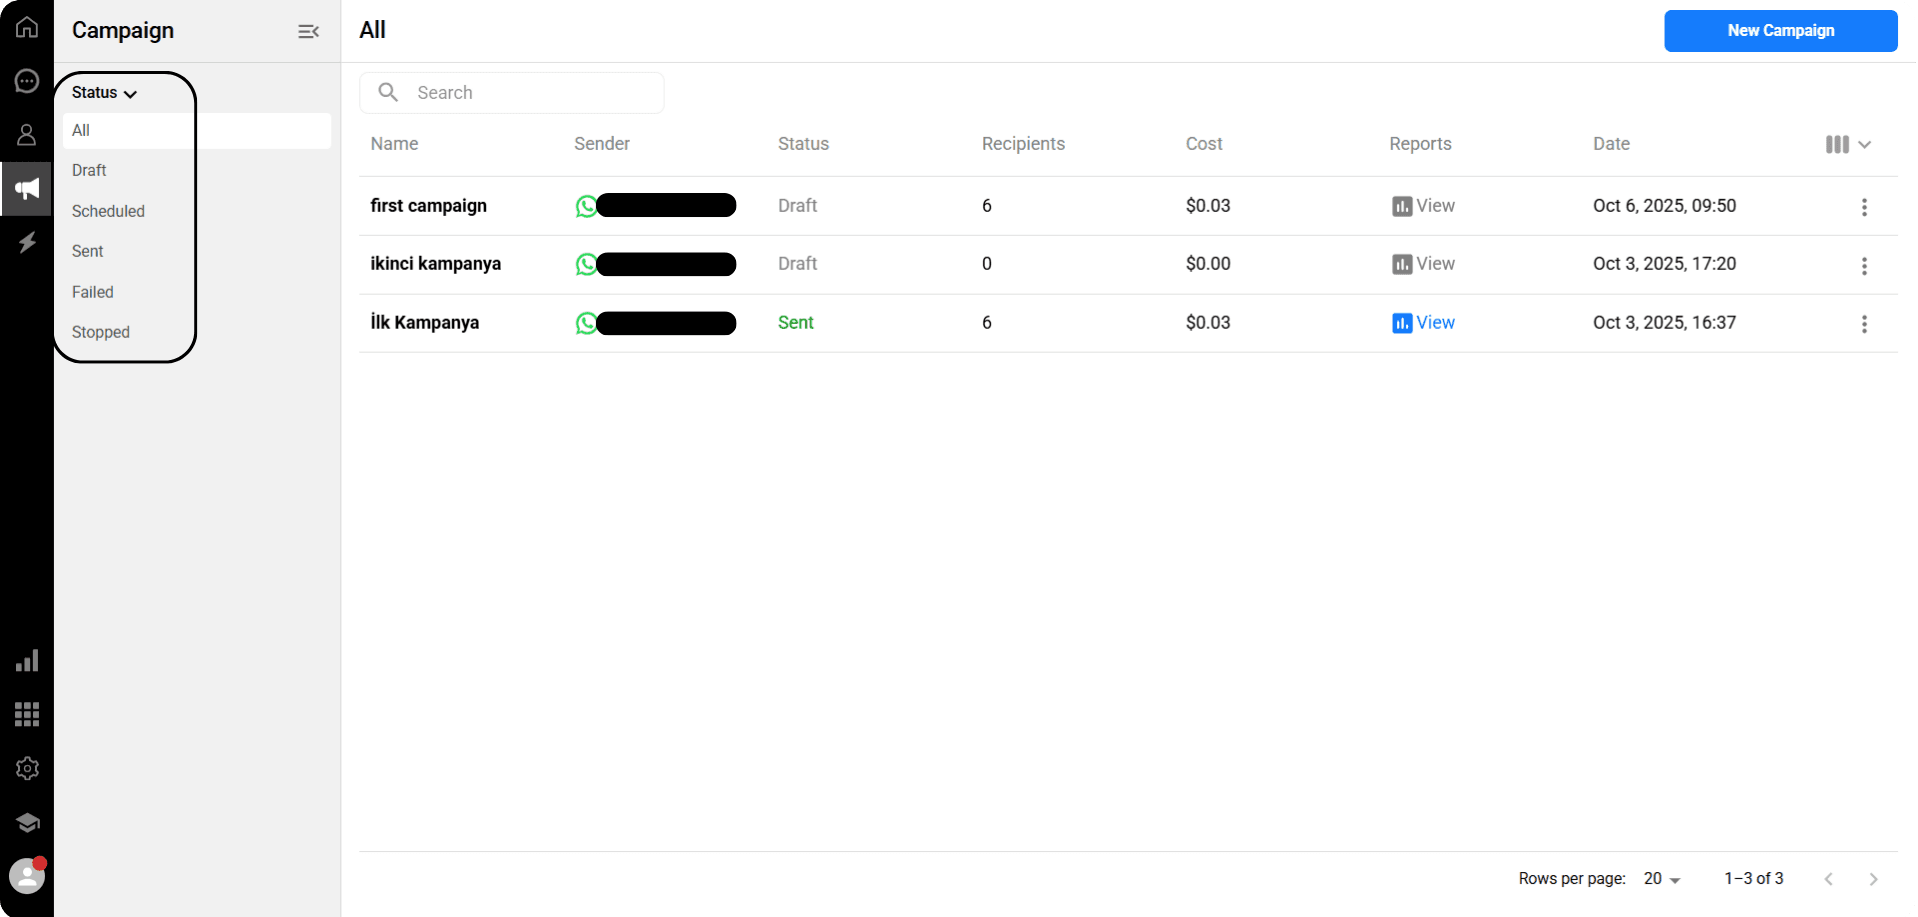
All your created campaigns are listed on this page and can be filtered based on their status:
All: Displays all campaigns on the page.
Draft: Contains campaigns that have been created but not yet sent.
Scheduled: Lists campaigns waiting to be sent at the scheduled time.
Sent: Shows campaigns that have been successfully sent.
Failed: Contains campaigns whose sending failed.
Stopped: Lists campaigns that were started but stopped before completion.
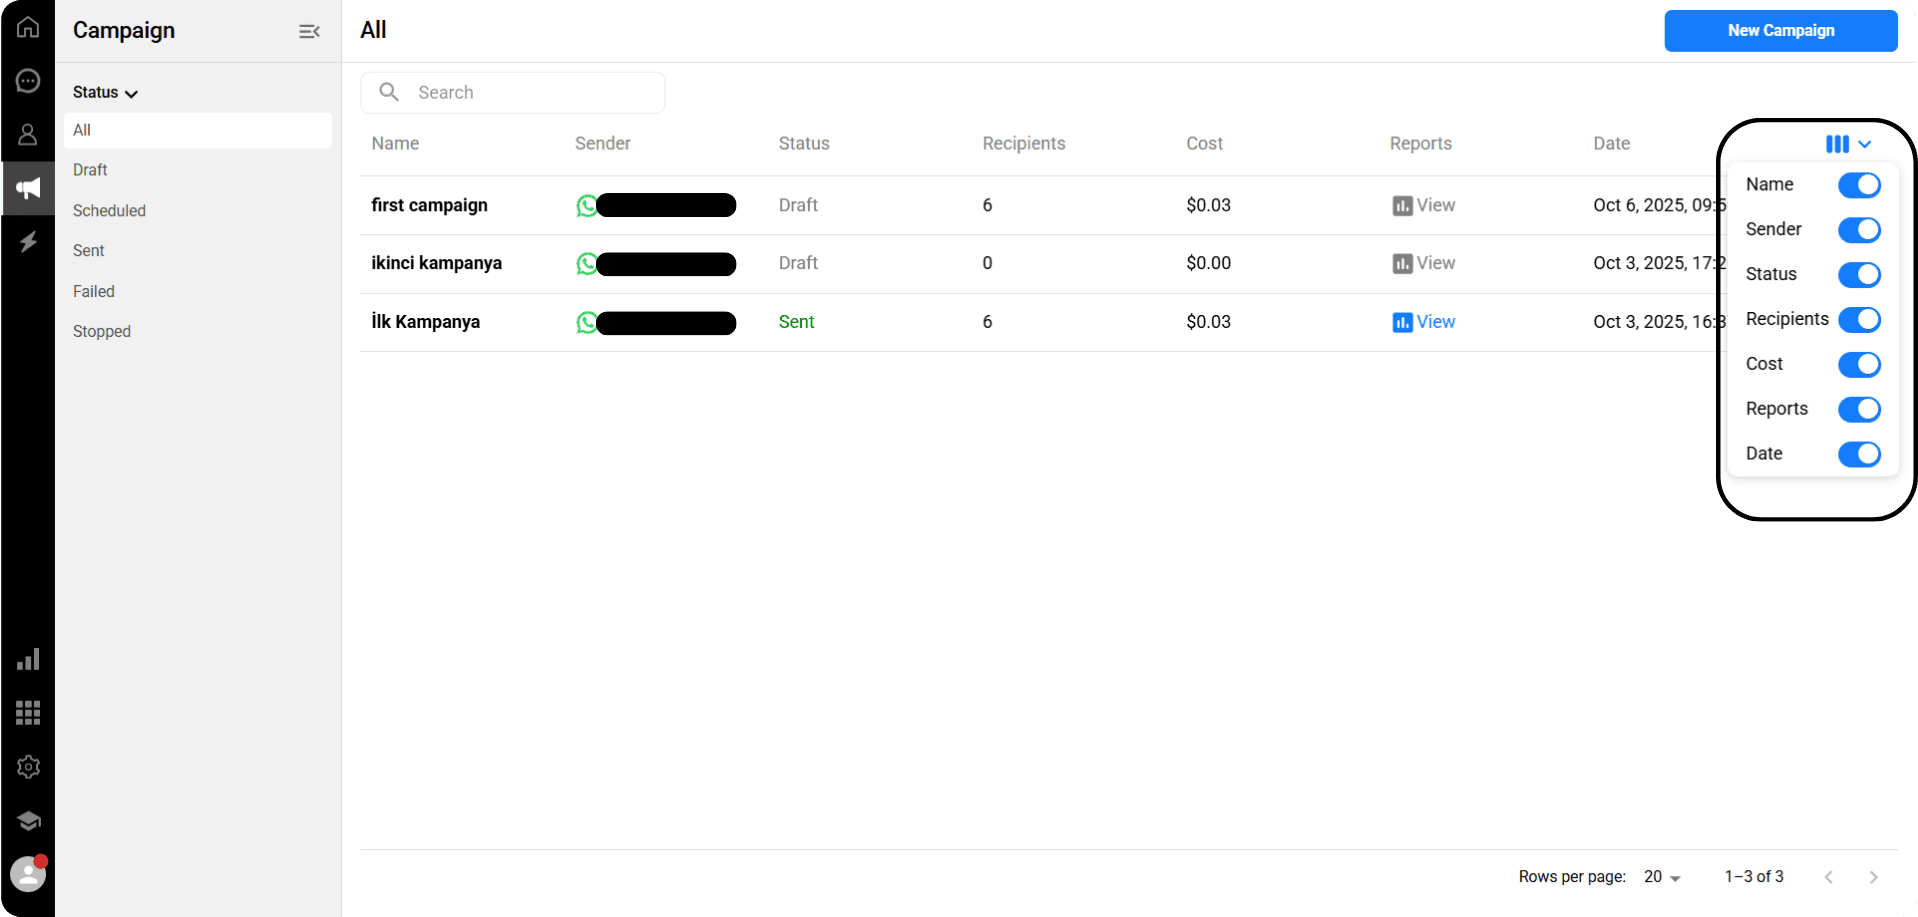
On the page where campaigns are listed, you can see the following information for each campaign in columns:
Name, Sender, Status, Number of Recipients, Cost, Reports, Date
By clicking the icon at the top right, you can choose from the list which columns are active or inactive, allowing you to control which information is displayed in the list.

On the Campaigns page, you can send out previously created or newly created campaigns in bulk.
Currently, this feature is supported only through the WhatsApp channel.
To start a new campaign, click the “New Campaign” button located at the top right of the page.
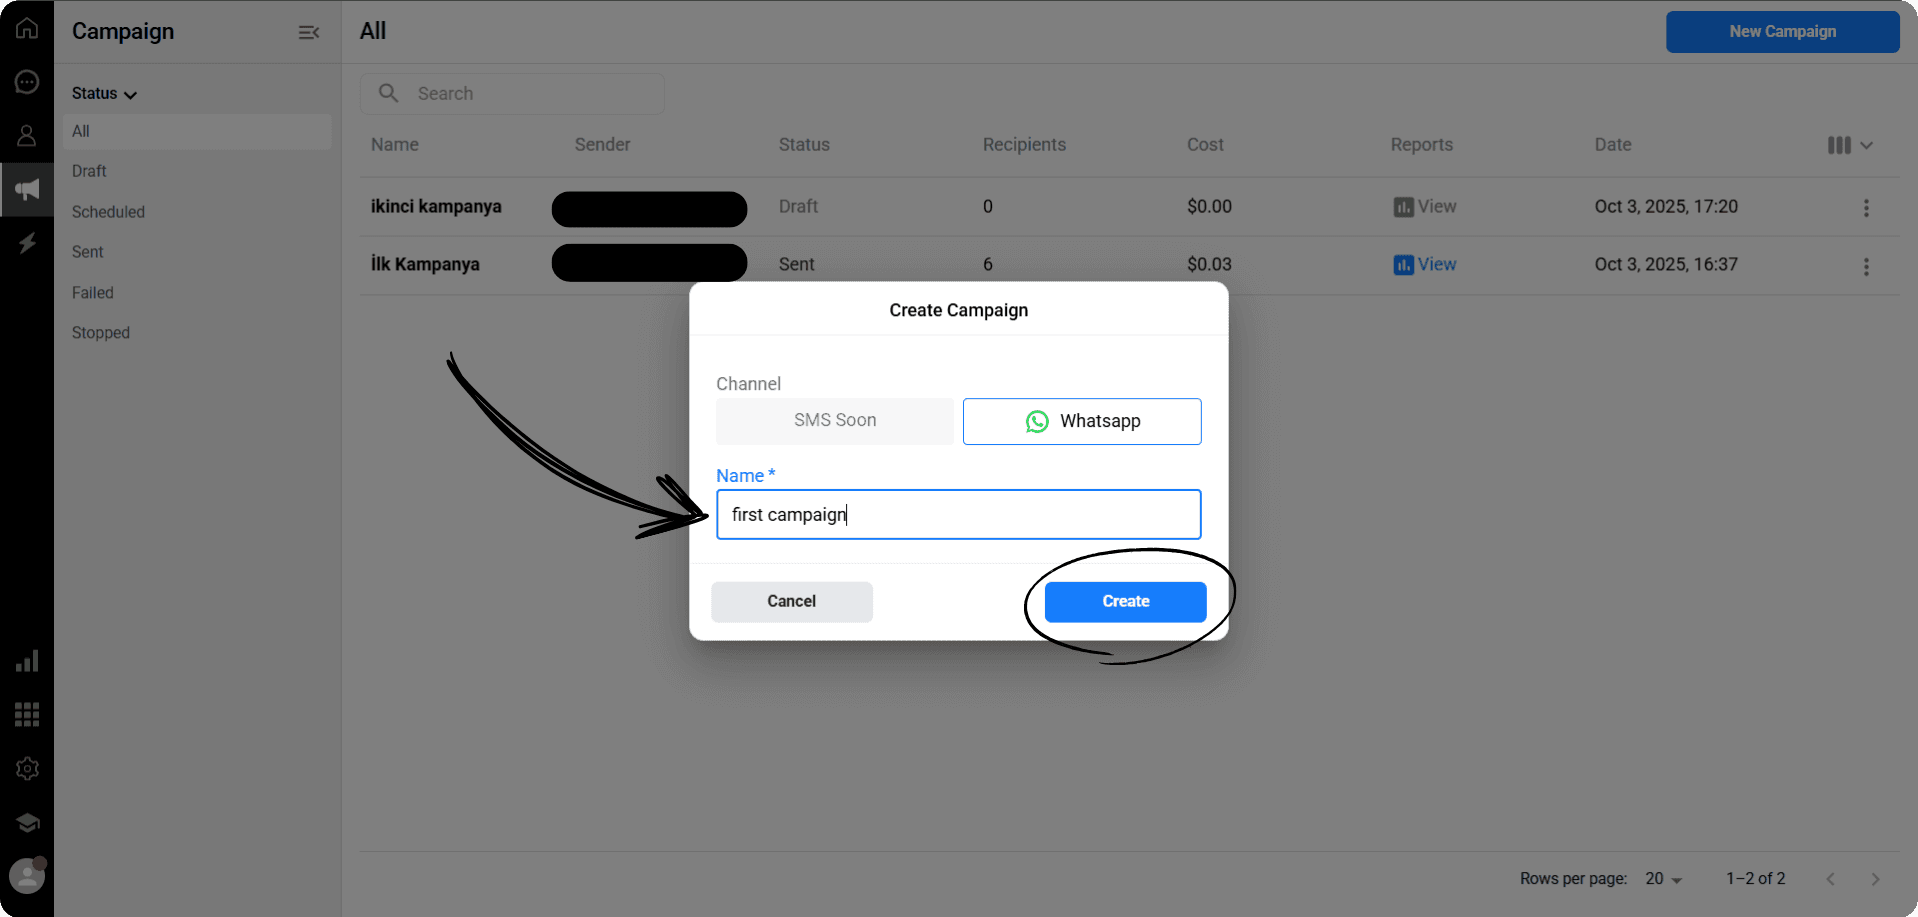
When you click the ‘New Campaign’ button, the campaign creation panel will open.
In this panel, give your campaign a name and then click the ‘Create’ button to save your campaign.
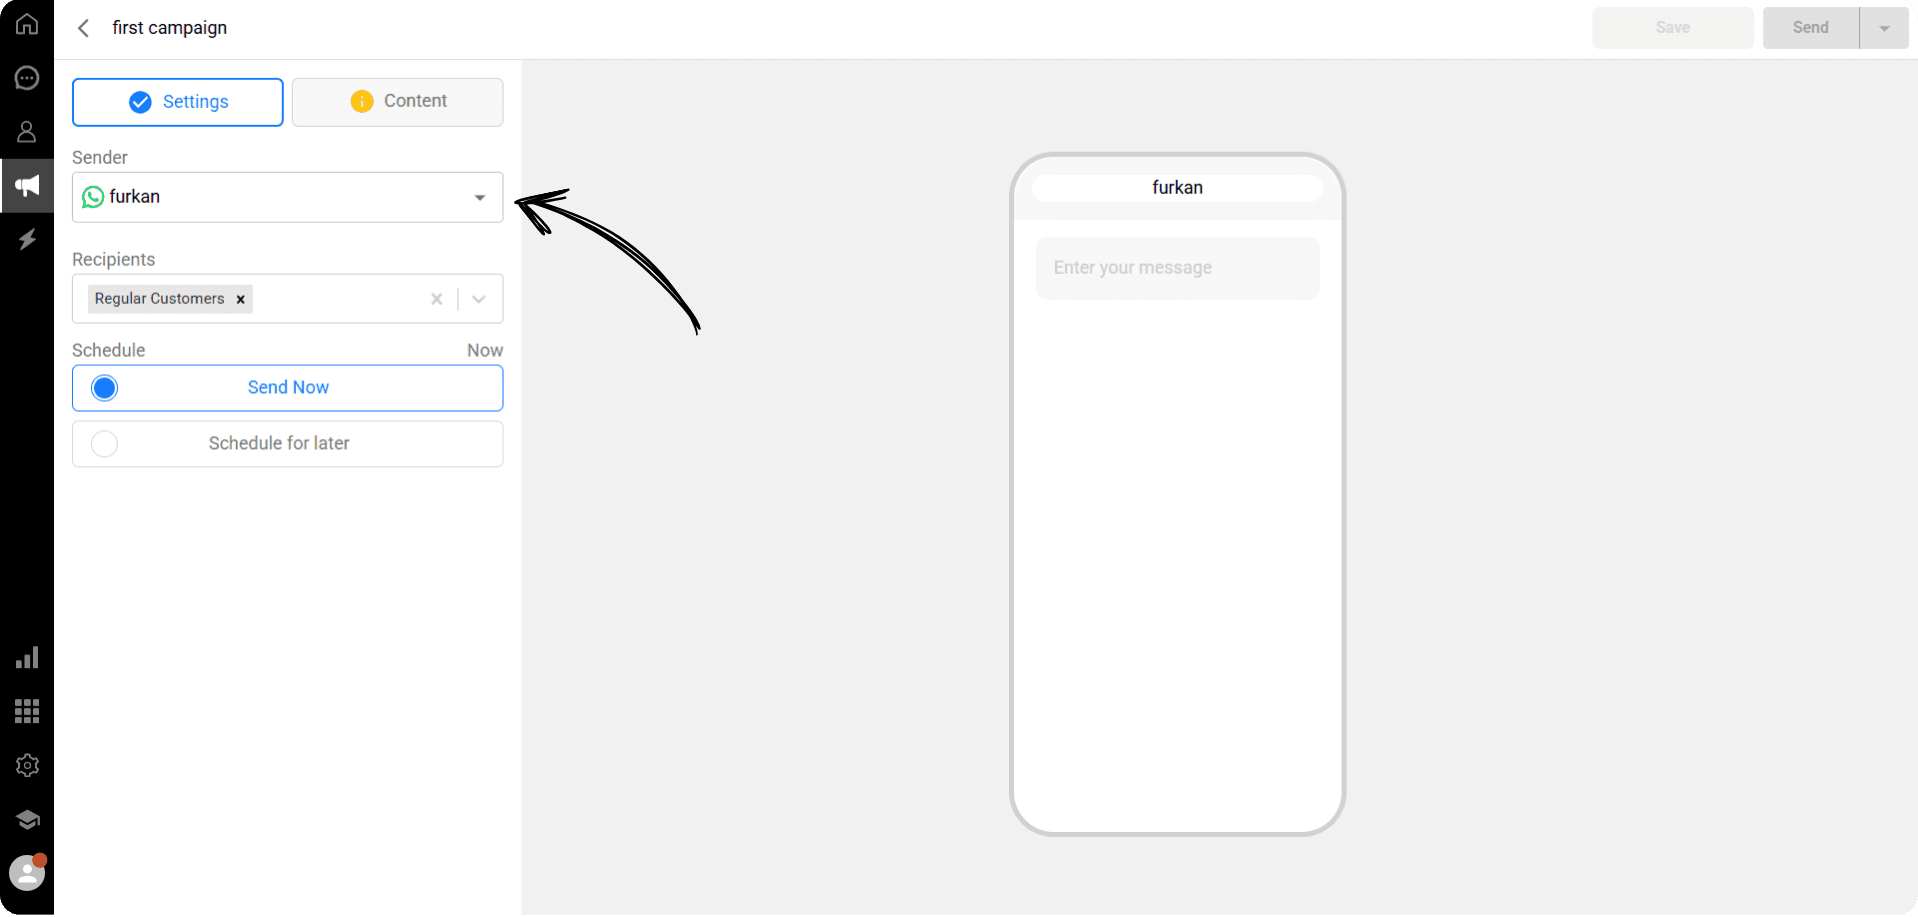
On the campaign creation screen, select the WhatsApp channel you want to use as the Sender.
💡When WhatsApp Web is selected, you can freely write and send any message you wish.
When WhatsApp Business is selected, you can only send messages using pre-approved template messages.
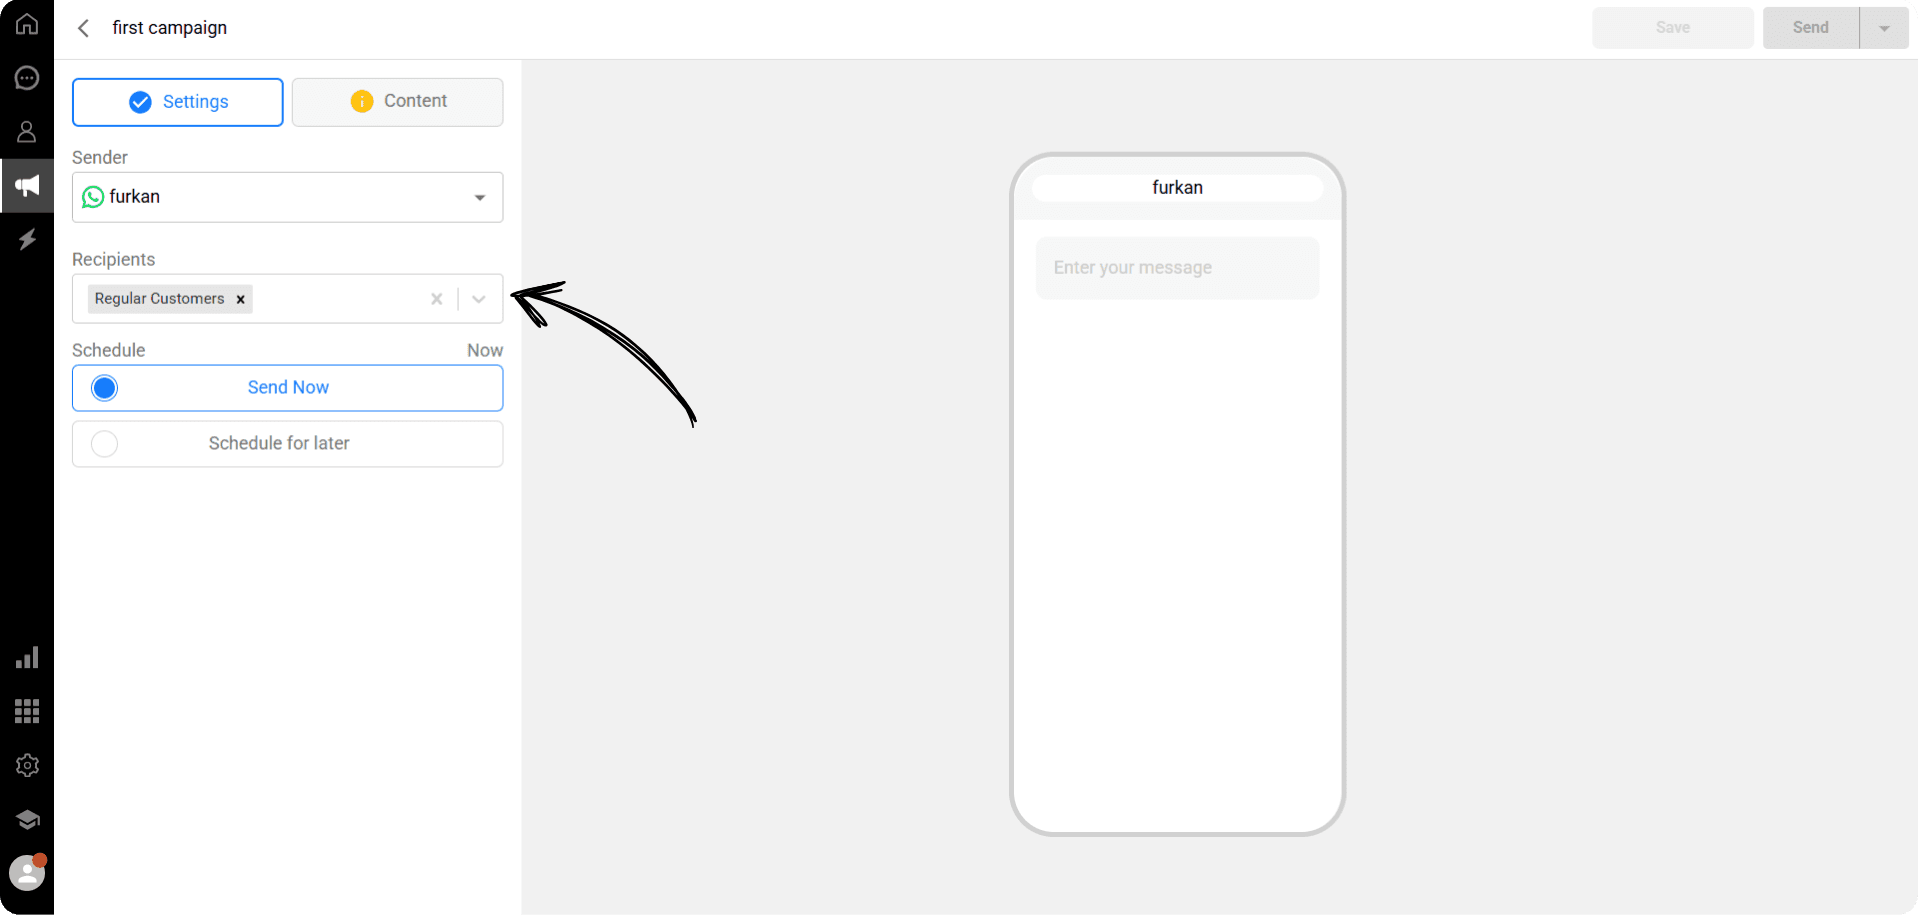
You need to specify the recipients of your campaign message in the Recipients section.
First, create a segment on the Contacts page and add the people you want to send your campaign to into this segment.
Then, on the campaign creation screen, select the segment you created as the Recipient.
Your campaign message will be sent only to the contacts included in the selected segment.
💡First, create a tag named “Regular Customers” and assign this tag to your regular customers.
Then, create a segment named “Regular Customers” and select this tag as the filter. This way, all contacts with the “Regular Customers” tag will be listed in the segment.
When you select this segment in the Recipients section of the campaign creation screen, your campaign message will be sent only to these customers.
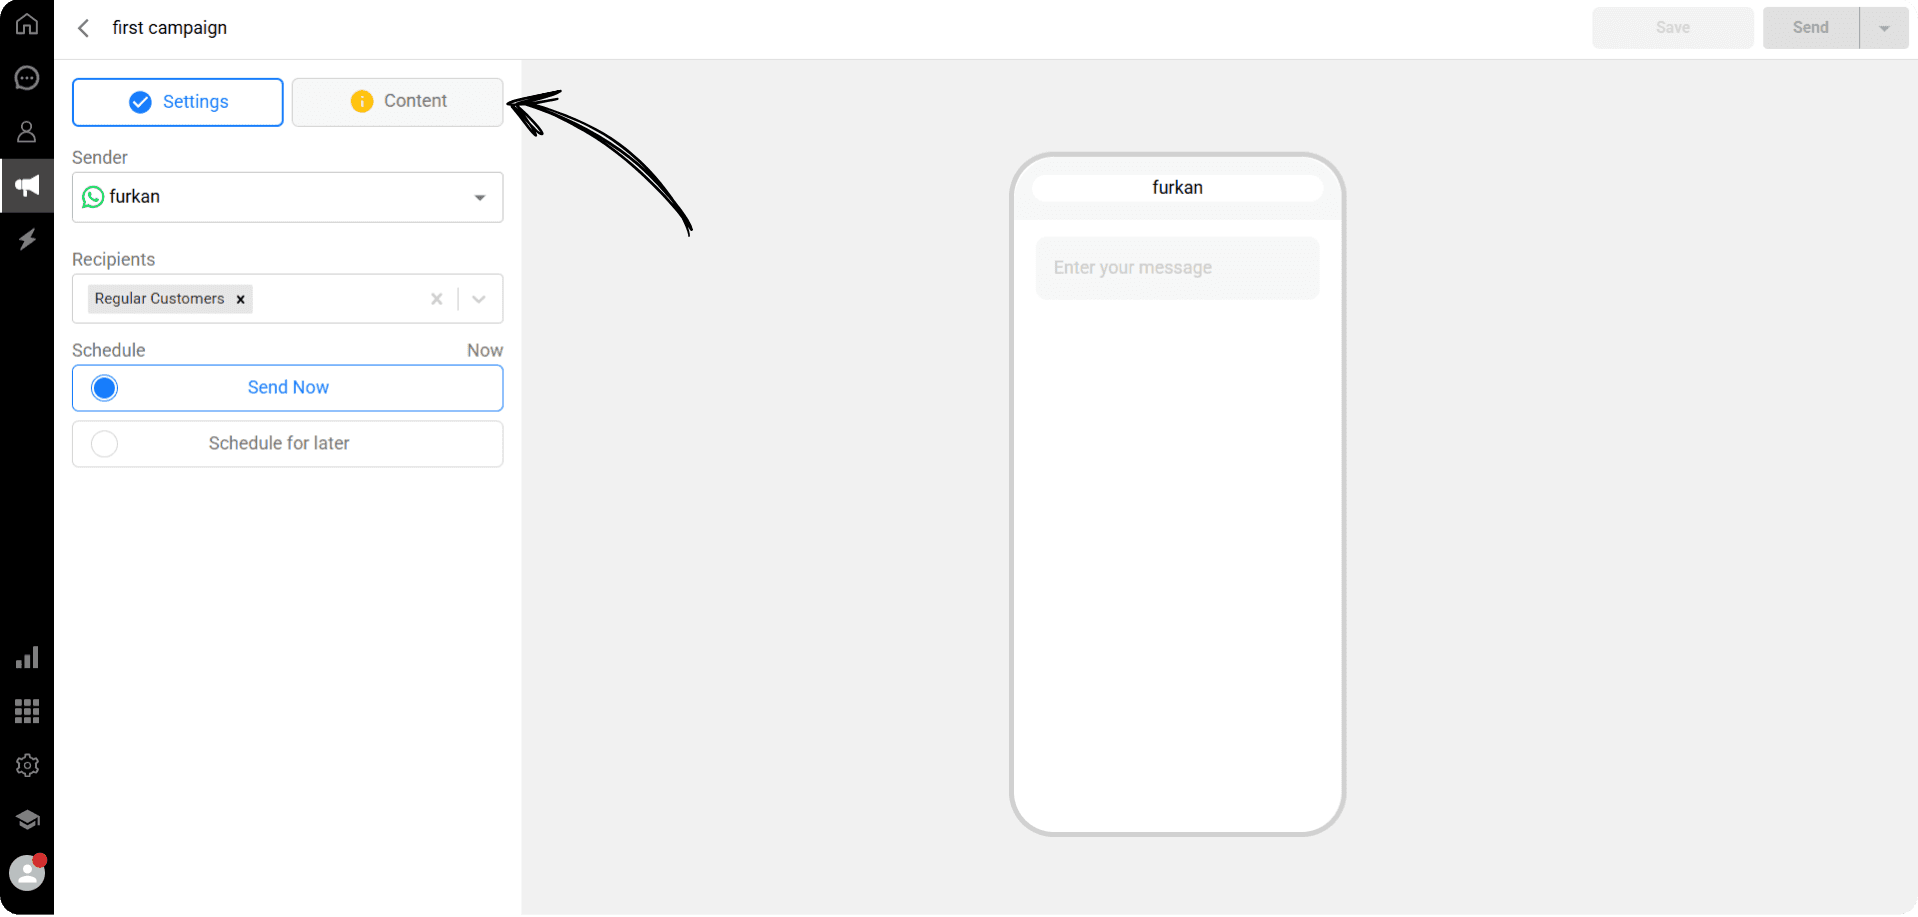
After selecting the recipients, click the “Content” button on the campaign creation screen.
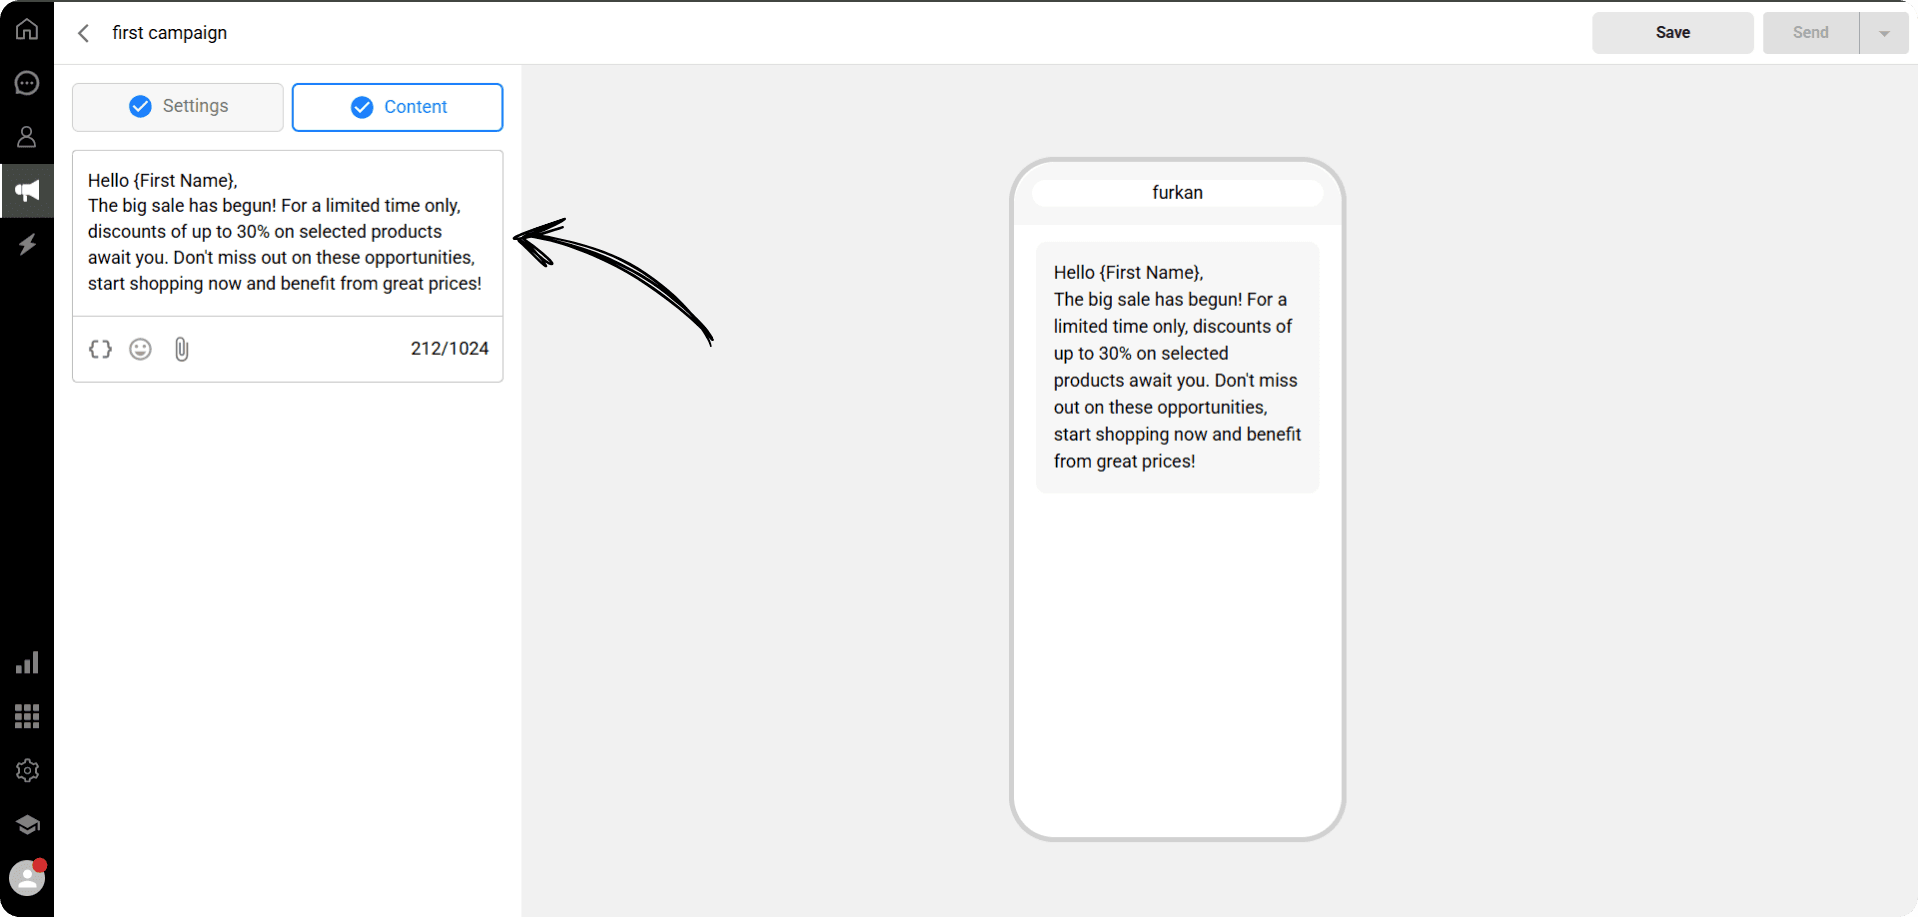
On the Content page, write your campaign message.
You can preview how your message will appear to recipients on the sample phone screen on the right side.
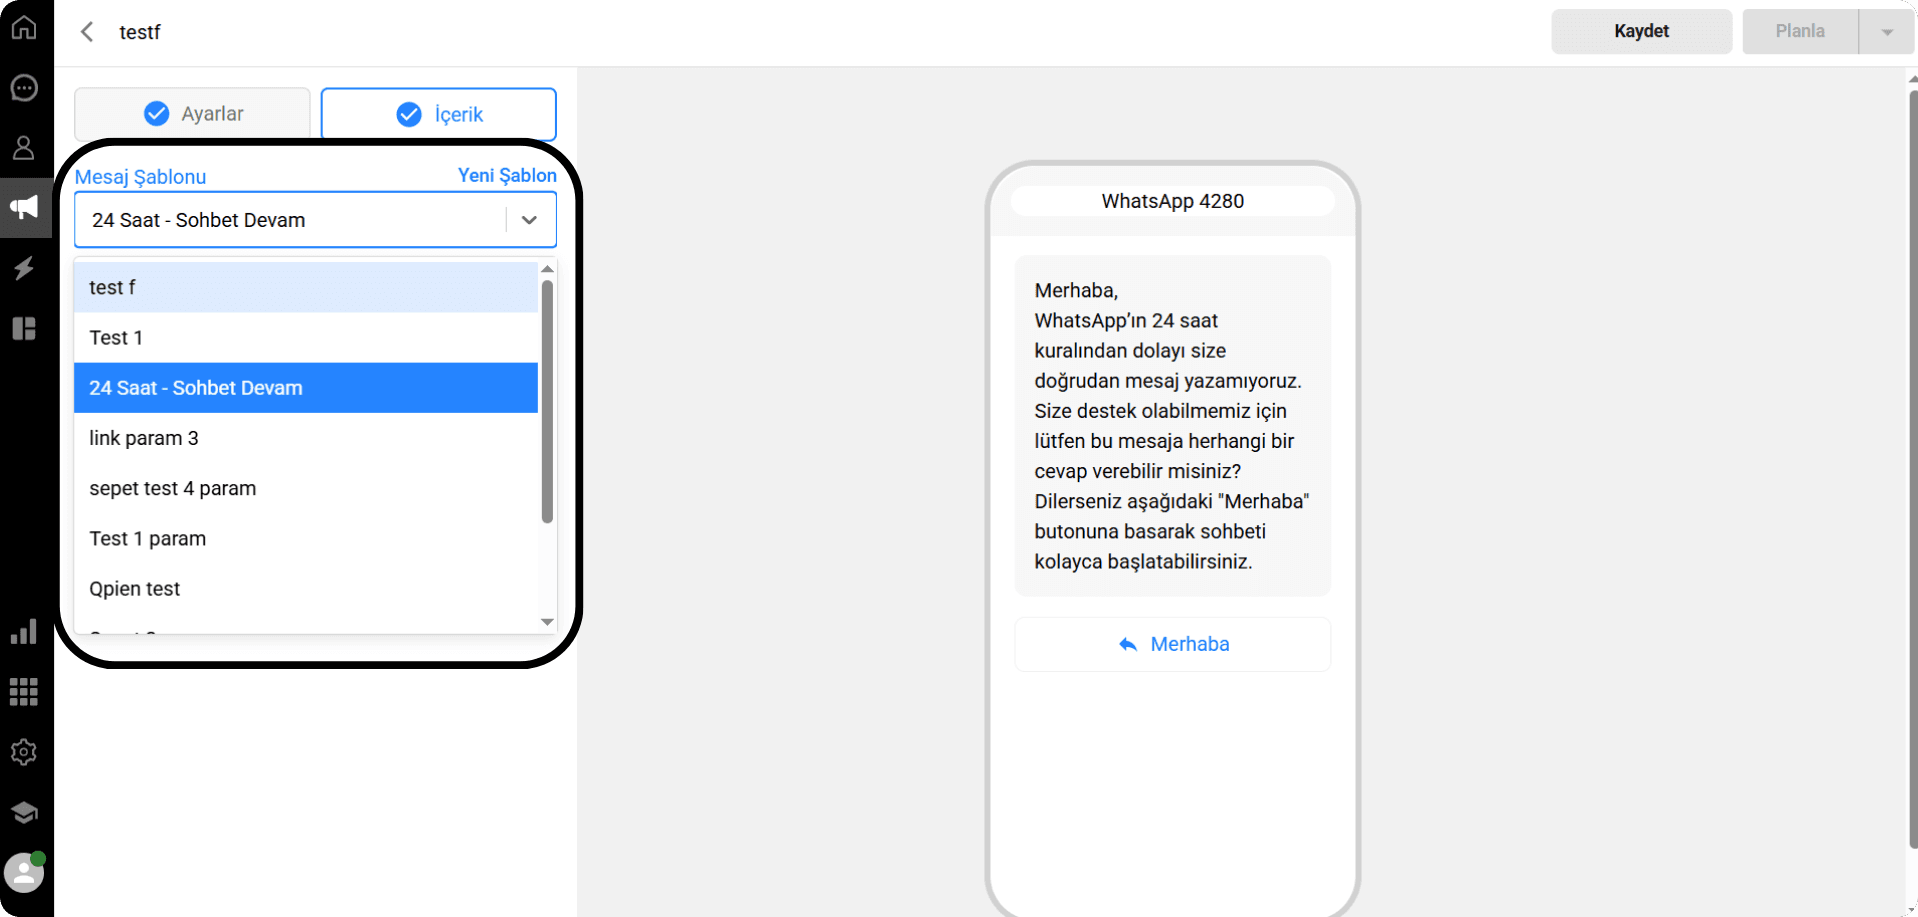
Direct messaging is not allowed through WhatsApp Business API. To contact a customer, you must use pre-approved message templates. You can select the appropriate template from the list, and the full content of the selected message will be displayed in the phone preview on the right.

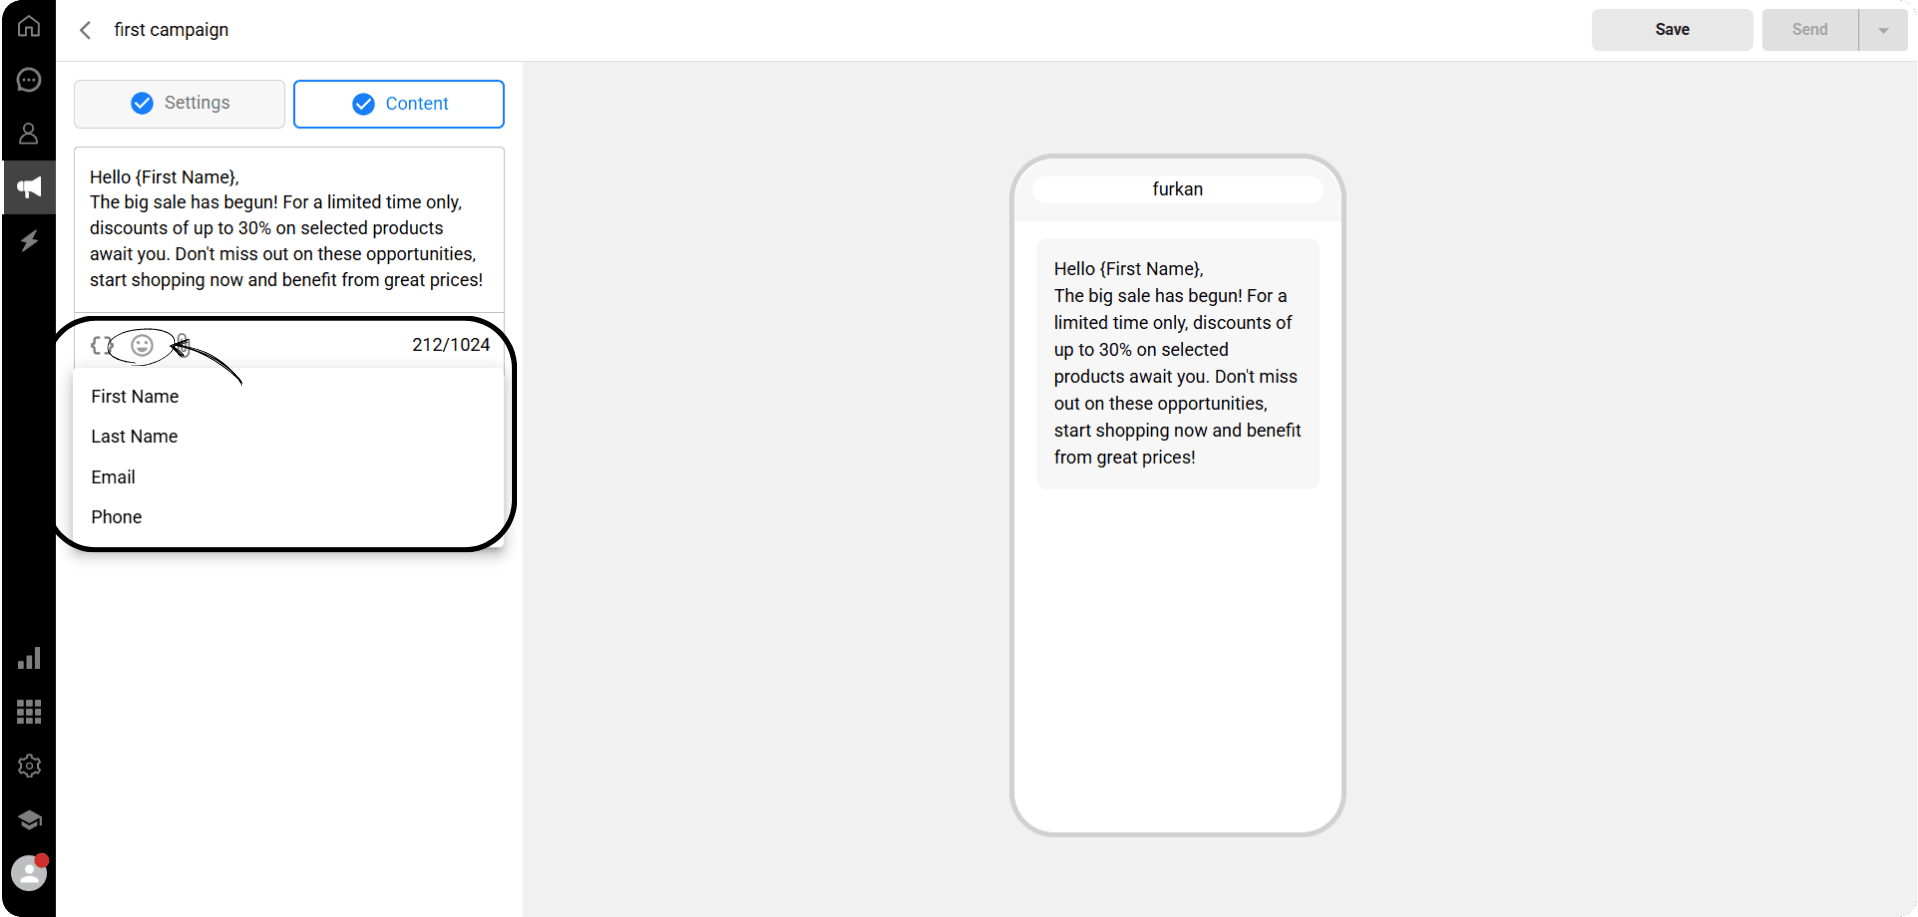
You can add any of the data fields from the marked area to your campaign message. When the message is sent, the selected data field will be automatically filled with the corresponding information for each recipient. For example, if you use {Name}, it will be replaced with the name under which the recipient is saved on the Qpien Contacts page.
💡For example, if you use {Name} in your message, it will be replaced with the name under which the recipient is saved on the Qpien Contacts page when the campaign is sent.
On the Content screen, click the emoji icon in the marked area, then select your desired emoji from the list and add it to your campaign message.
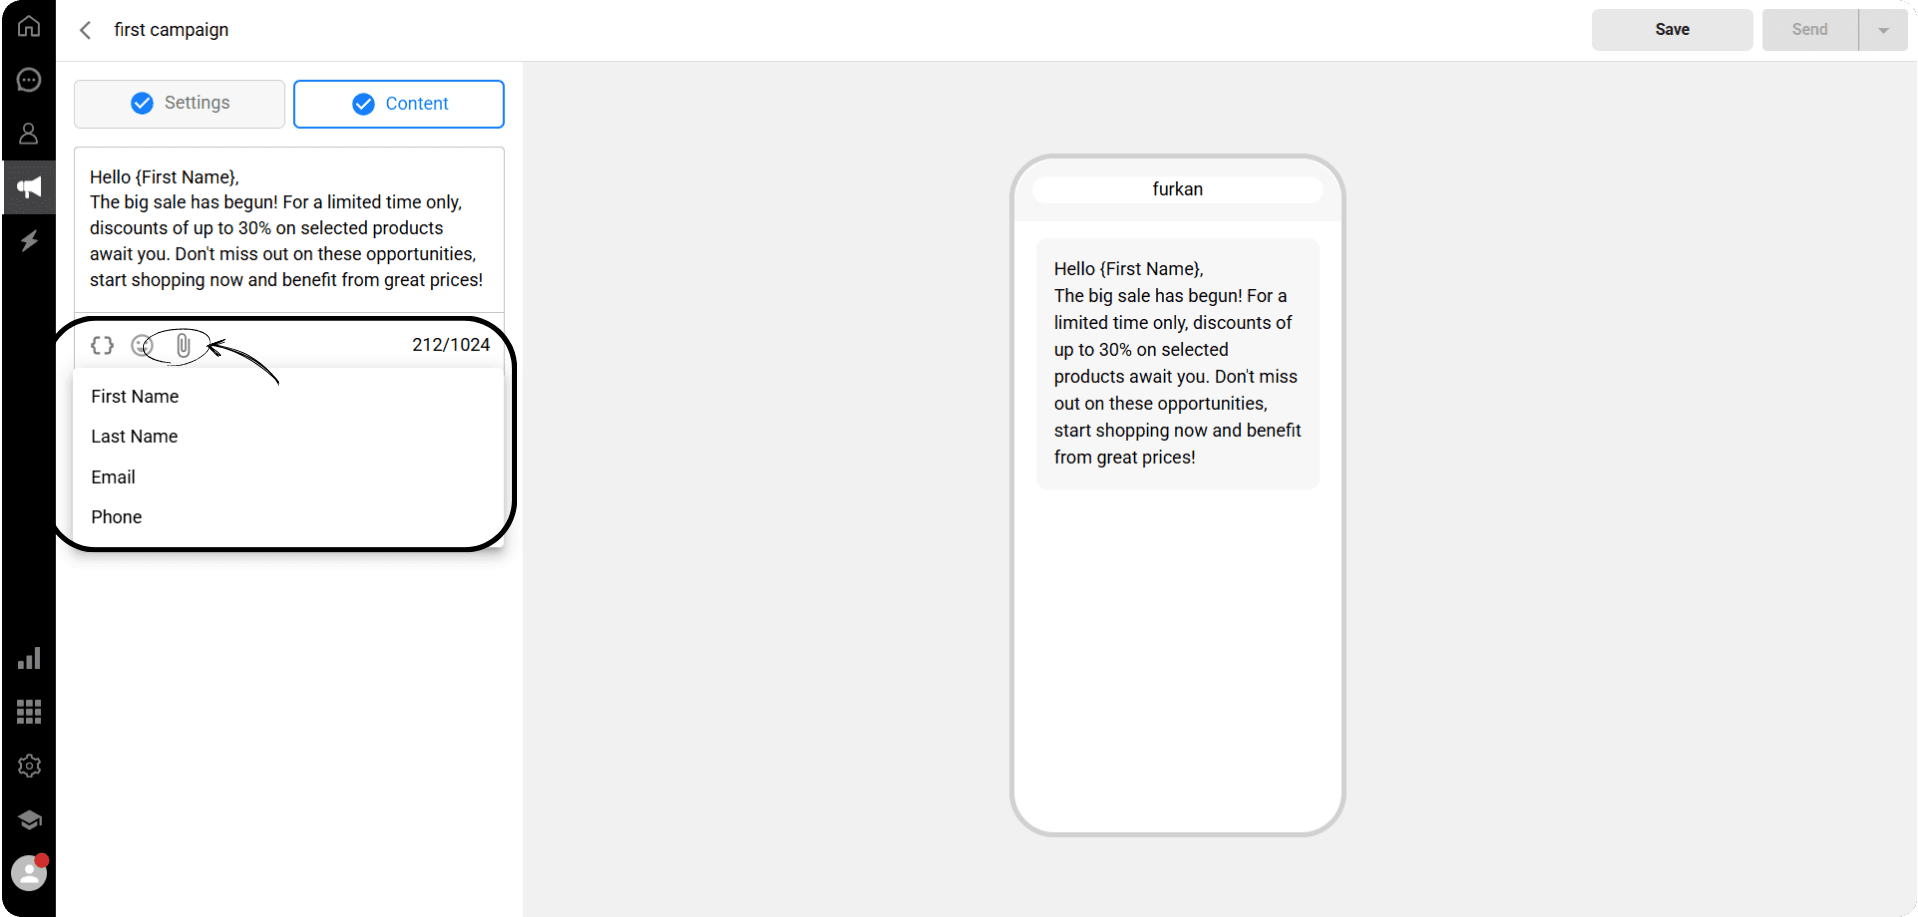
On the Content screen, you can add attachments such as images or files to your campaign message from the designated section.
After completing your edits, click the “Settings” button to return to the settings section.
In the panel that opens, enter the phone number to which you want the test message to be sent.
Then, click the Send button.
You can review the sent test message on the phone number you specified.
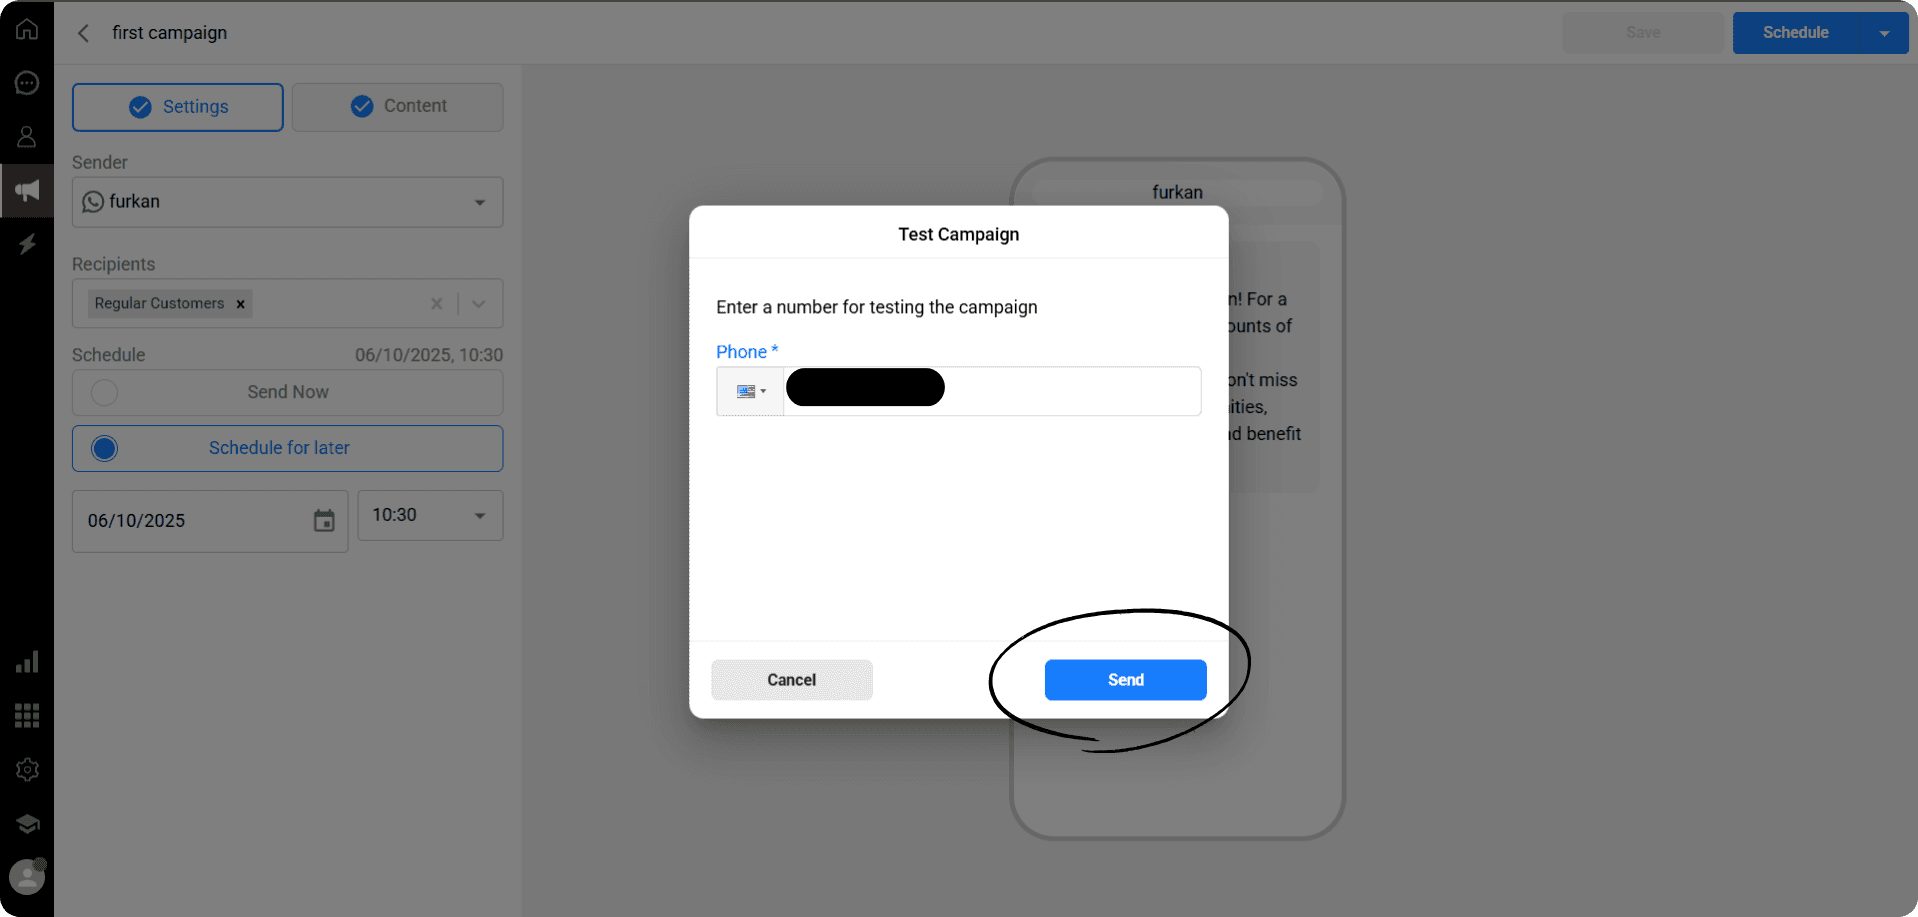
In the panel that opens, enter the phone number to which you wish to send the test message.
Then click the Send button.
You can review the sent test message from the phone number you specified.
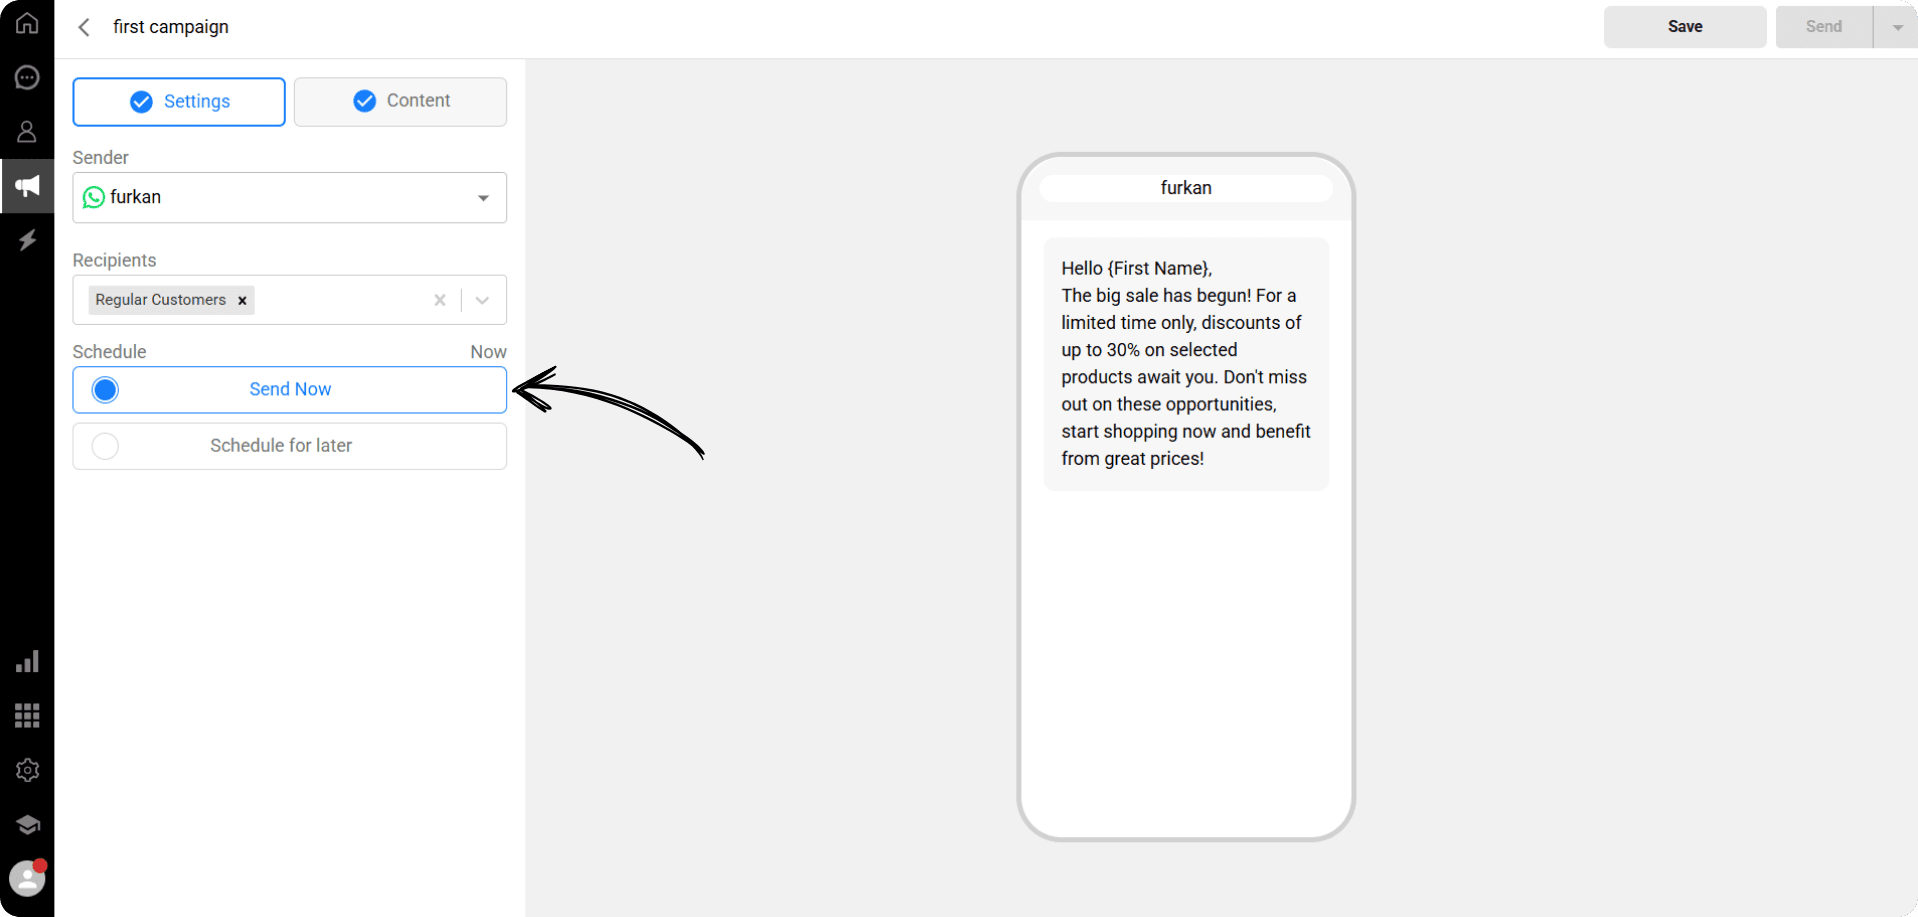
After completing all settings and content, click the Send button to start sending your campaign message.
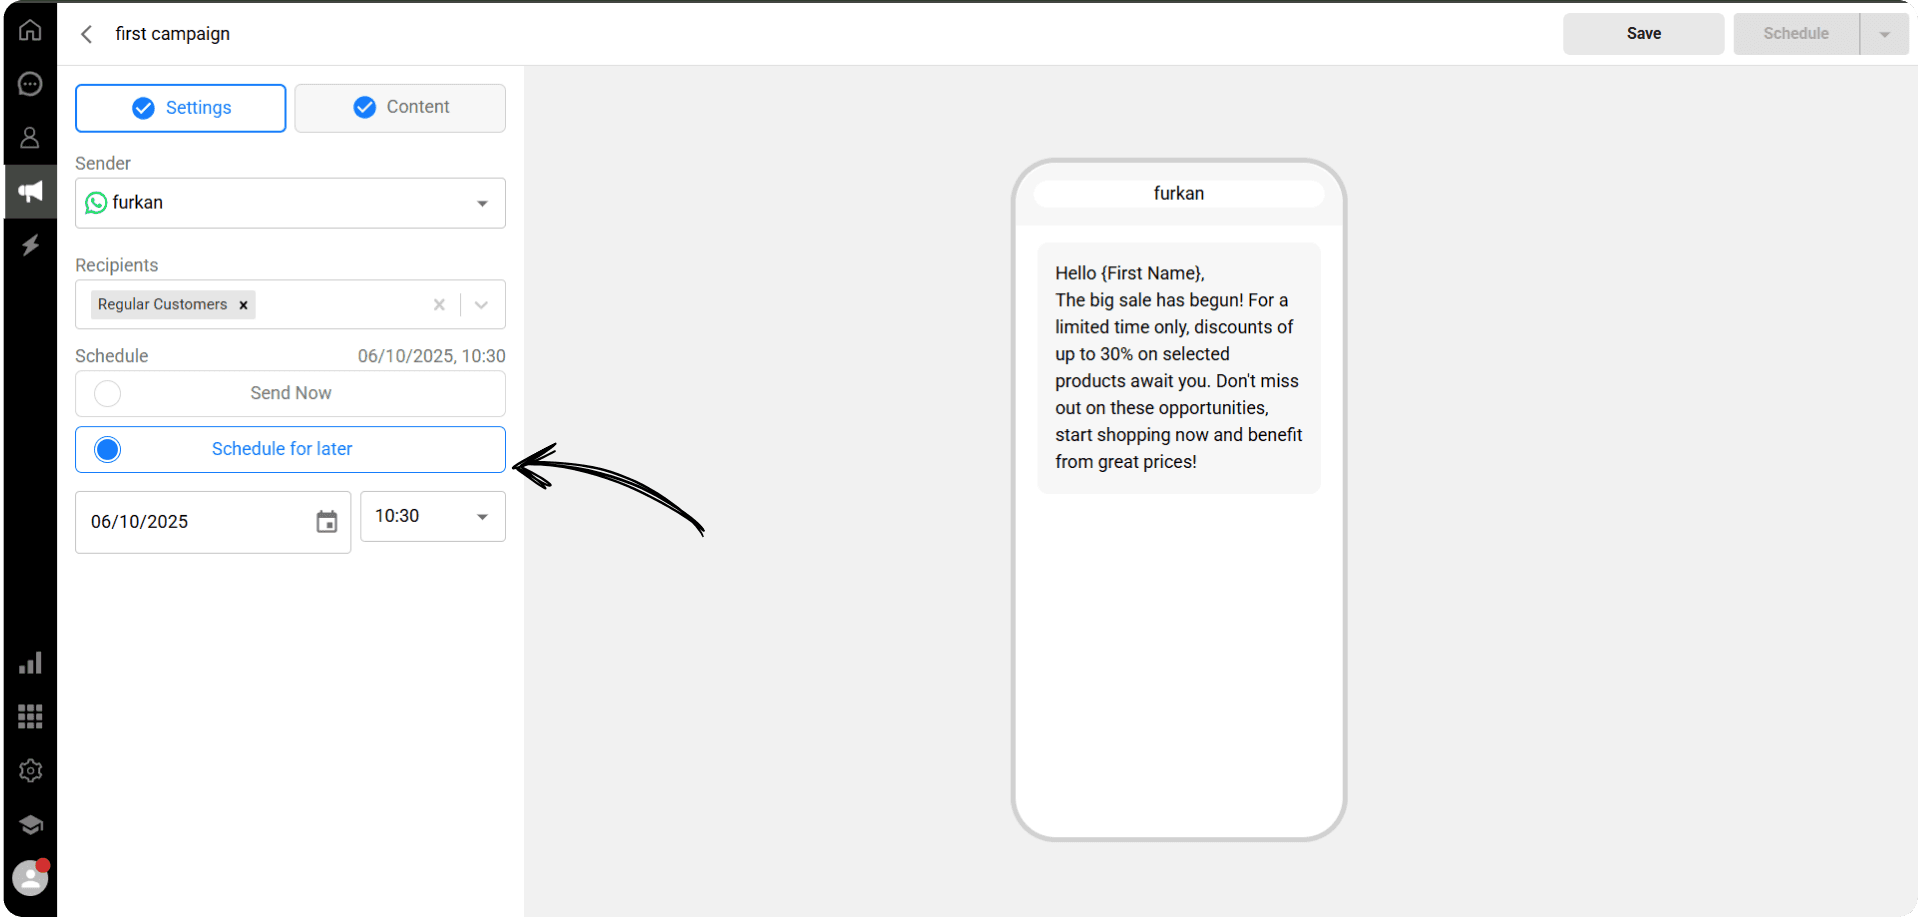
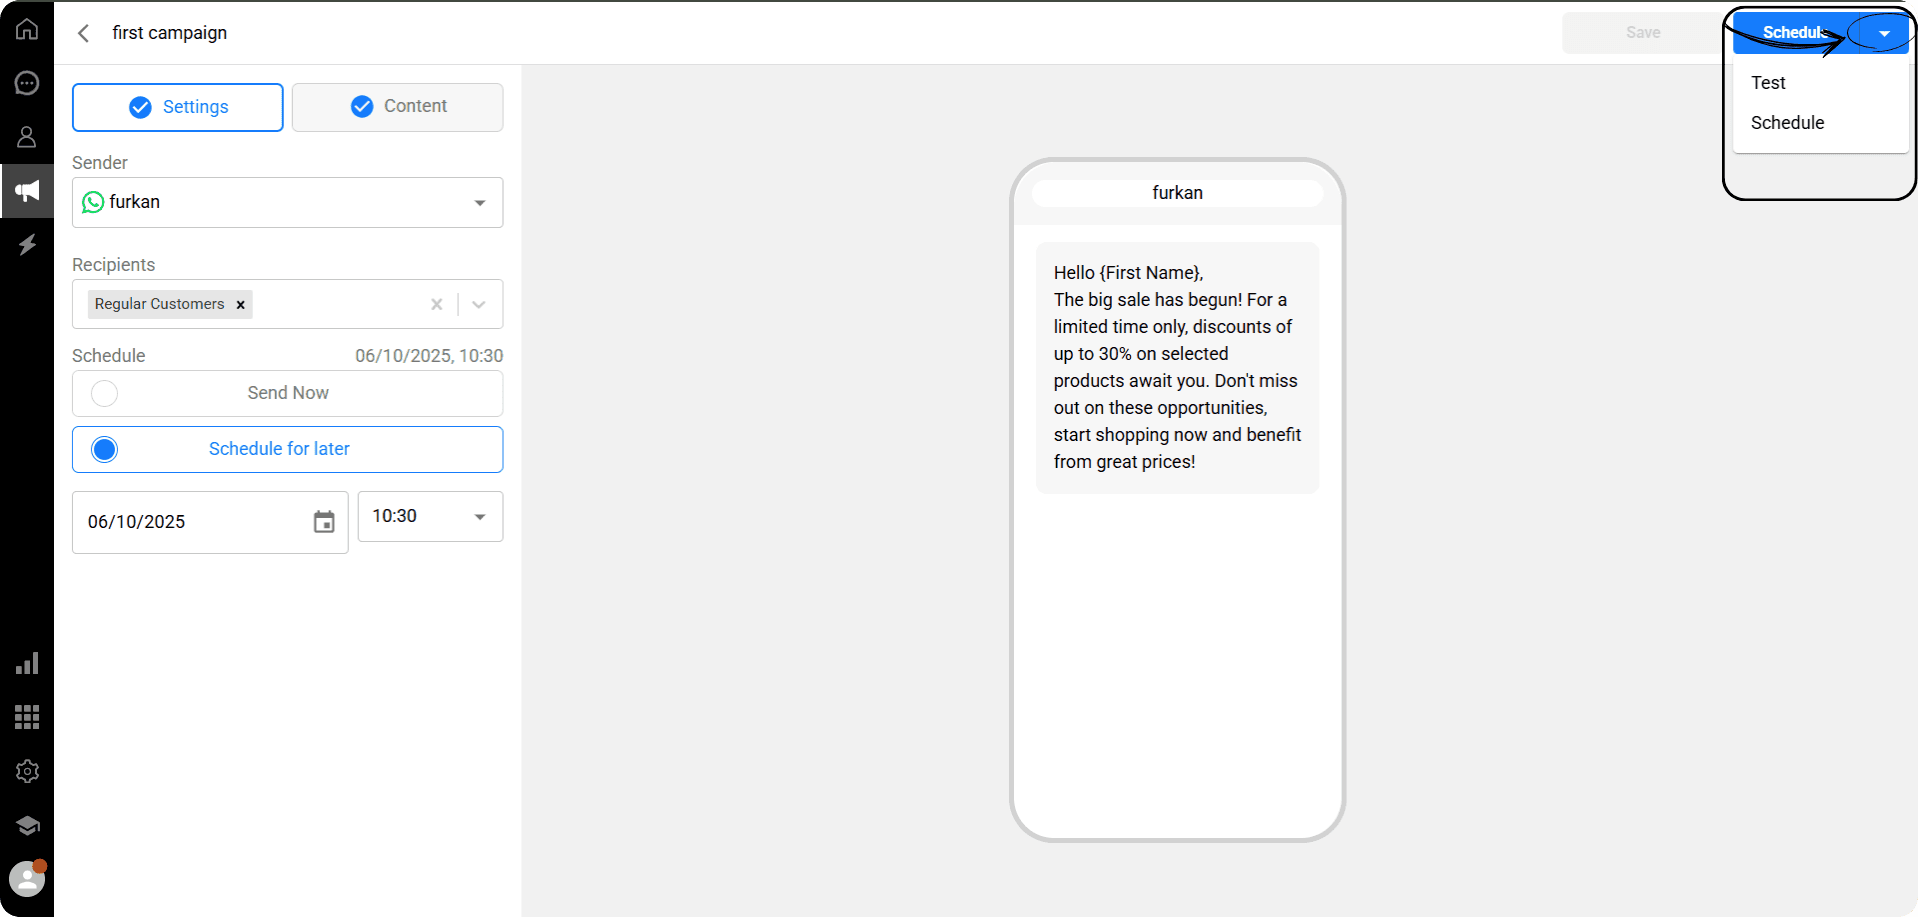
Click the “Schedule for Later” button.
In the section that opens, select the date and time you want to send the campaign.
Then, click the Save button to save your settings.
After saving, activate the sending schedule by clicking the Schedule button at the top right corner.
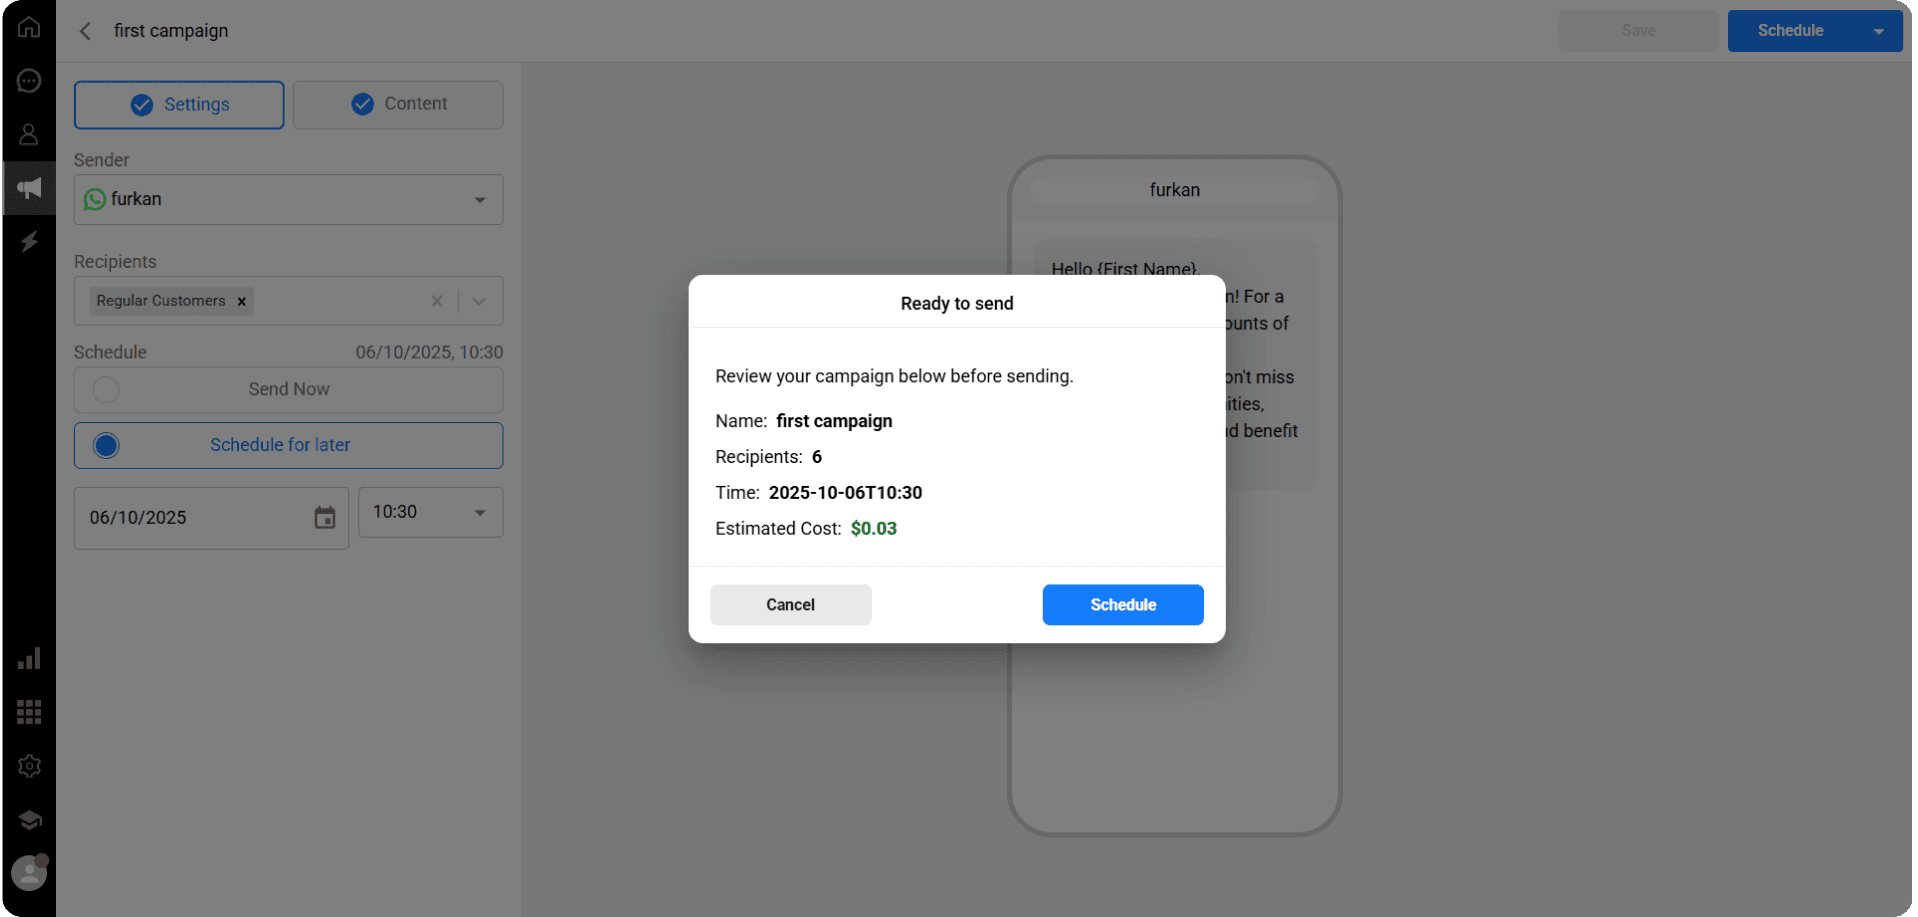
In the Ready to Send panel that opens, you can review your campaign details:
Campaign Name
Number of Recipients
Scheduled Time
Total Cost
After checking all the information, click the Schedule button to plan your campaign to be sent on the selected date and time.
All your created campaigns are listed on this page and can be filtered based on their status:
All: Displays all campaigns on the page.
Draft: Contains campaigns that have been created but not yet sent.
Scheduled: Lists campaigns waiting to be sent at the scheduled time.
Sent: Shows campaigns that have been successfully sent.
Failed: Contains campaigns whose sending failed.
Stopped: Lists campaigns that were started but stopped before completion.
On the page where campaigns are listed, you can see the following information for each campaign in columns:
Name, Sender, Status, Number of Recipients, Cost, Reports, Date
By clicking the icon at the top right, you can choose from the list which columns are active or inactive, allowing you to control which information is displayed in the list.
On the Campaigns page, you can send out previously created or newly created campaigns in bulk.
Currently, this feature is supported only through the WhatsApp channel.
To start a new campaign, click the “New Campaign” button located at the top right of the page.
When you click the ‘New Campaign’ button, the campaign creation panel will open.
In this panel, give your campaign a name and then click the ‘Create’ button to save your campaign.
On the campaign creation screen, select the WhatsApp channel you want to use as the Sender.
💡When WhatsApp Web is selected, you can freely write and send any message you wish.
When WhatsApp Business is selected, you can only send messages using pre-approved template messages.
You need to specify the recipients of your campaign message in the Recipients section.
First, create a segment on the Contacts page and add the people you want to send your campaign to into this segment.
Then, on the campaign creation screen, select the segment you created as the Recipient.
Your campaign message will be sent only to the contacts included in the selected segment.
💡First, create a tag named “Regular Customers” and assign this tag to your regular customers.
Then, create a segment named “Regular Customers” and select this tag as the filter. This way, all contacts with the “Regular Customers” tag will be listed in the segment.
When you select this segment in the Recipients section of the campaign creation screen, your campaign message will be sent only to these customers.
After selecting the recipients, click the “Content” button on the campaign creation screen.
On the Content page, write your campaign message.
You can preview how your message will appear to recipients on the sample phone screen on the right side.
Direct messaging is not allowed through WhatsApp Business API. To contact a customer, you must use pre-approved message templates. You can select the appropriate template from the list, and the full content of the selected message will be displayed in the phone preview on the right.
You can add any of the data fields from the marked area to your campaign message. When the message is sent, the selected data field will be automatically filled with the corresponding information for each recipient. For example, if you use {Name}, it will be replaced with the name under which the recipient is saved on the Qpien Contacts page.
💡For example, if you use {Name} in your message, it will be replaced with the name under which the recipient is saved on the Qpien Contacts page when the campaign is sent.
On the Content screen, click the emoji icon in the marked area, then select your desired emoji from the list and add it to your campaign message.
On the Content screen, you can add attachments such as images or files to your campaign message from the designated section.
After completing your edits, click the “Settings” button to return to the settings section.
In the panel that opens, enter the phone number to which you want the test message to be sent.
Then, click the Send button.
You can review the sent test message on the phone number you specified.
In the panel that opens, enter the phone number to which you wish to send the test message.
Then click the Send button.
You can review the sent test message from the phone number you specified.
After completing all settings and content, click the Send button to start sending your campaign message.
Click the “Schedule for Later” button.
In the section that opens, select the date and time you want to send the campaign.
Then, click the Save button to save your settings.
After saving, activate the sending schedule by clicking the Schedule button at the top right corner.
In the Ready to Send panel that opens, you can review your campaign details:
Campaign Name
Number of Recipients
Scheduled Time
Total Cost
After checking all the information, click the Schedule button to plan your campaign to be sent on the selected date and time.
Previous
Next
Next
Flow Bots
Try Qpien free for 14 days! 🎉
Ready to take control of all your support channels?
Empower your customer interactions with Qpien! Boost sales and elevate satisfaction with every conversation.
Try Qpien free for 14 days! 🎉
Ready to take control of all your support channels?
Empower your customer interactions with Qpien! Boost sales and elevate satisfaction with every conversation.
Try Qpien free for 14 days! 🎉
Ready to take control of all your support channels?
Empower your customer interactions with Qpien! Boost sales and elevate satisfaction with every conversation.